Coconut Vanilla Protein Balls: Delicious No-Bake Recipe
There’s something so satisfying about whipping up a batch of coconut vanilla protein balls that fills your kitchen with a sweet, tropical aroma. I remember the first time I made these – it was a hot summer day in Portland, and my kids, Emma and Lucas, were begging for a snack that wasn’t “boring.” I rummaged through my pantry, inspired by Nonna Rosa’s knack for turning simple ingredients into magic, and came up with this recipe. After years of tweaking, I’ve landed on a version that’s creamy, sweet, and packed with flavor. Trust me on this one – these no-bake treats are a game-changer for quick, healthy snacking!
As a professional baker with over 20 years of experience, I love recipes that are approachable yet feel indulgent. These protein balls are perfect for busy days, post-workout snacks, or even a guilt-free dessert. Let’s dive into this easy, no-bake recipe that’s ready in just 15 minutes!
Jump to
Recipe Information Table
| Details | Information |
|---|---|
| Prep Time | 15 minutes |
| Cook Time | 0 minutes (No-bake!) |
| Total Time | 15 minutes |
| Servings | 12 balls |
| Estimated Calories | 120 kcal per ball |
Nutrition Information
| Nutrient | Amount per Serving (1 Ball) |
|---|---|
| Calories | 120 kcal |
| Protein | 5g |
| Carbohydrates | 8g |
| Total Sugars | 5g |
| Total Fat | 8g |
| Saturated Fat | 2g |
| Fiber | 2g |
| Sodium | 30mg |
Values are estimates and may vary by brand or substitutions. Use a nutrition calculator for precision.
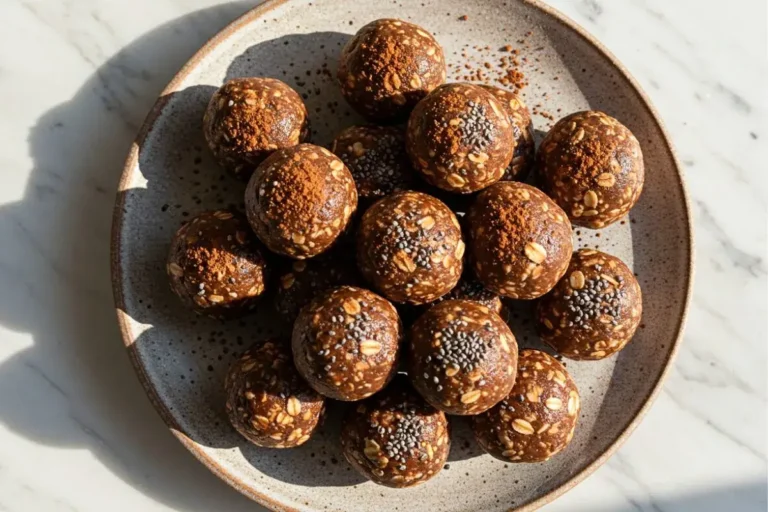
Essential Ingredients for Perfect Coconut Vanilla Protein Balls
Let’s talk ingredients – the heart of any great recipe. For these coconut vanilla protein balls, quality matters, but you don’t need to break the bank. I’ve tested countless combinations in my bakery, Sophie’s Sweet Haven, and here’s what I’ve found works best.
- 1 cup almond butter: This provides your protein balls with a creamy, nutty base. I prefer smooth almond butter for a silky texture, but crunchy works if you want a little extra bite. You can swap for peanut butter, but almond keeps it lighter.
- 1/2 cup vanilla protein powder: Choose a high-quality protein powder – it’s the backbone of the flavor. I use a plant-based vanilla protein for a clean taste, but whey works too. Avoid overly sweet brands; the natural sweetness is perfect here.
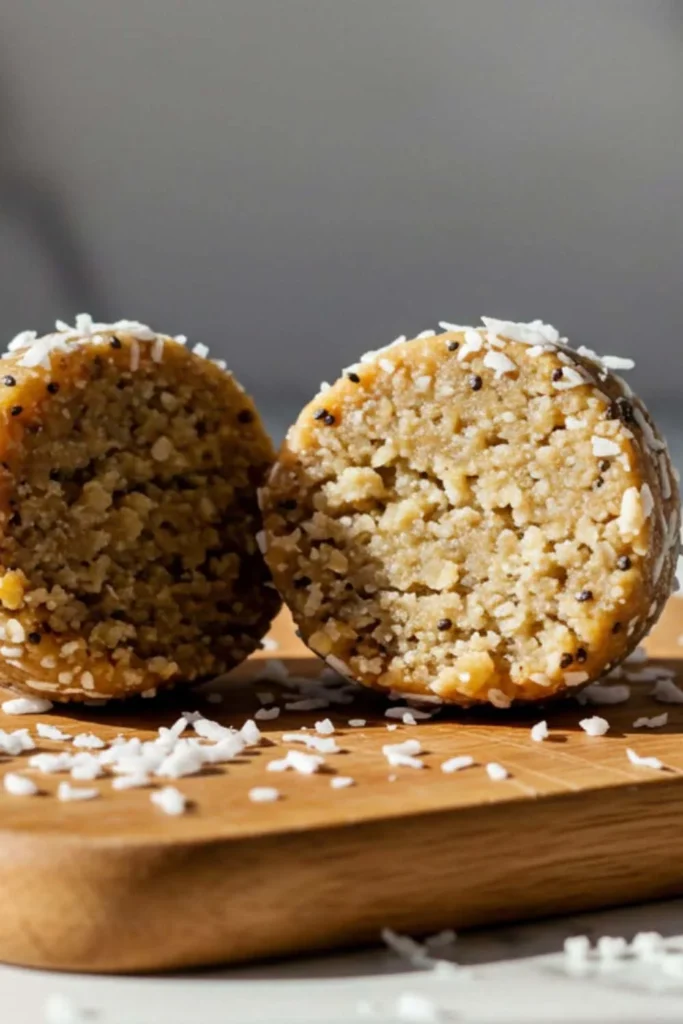
- 1/3 cup shredded unsweetened coconut: This is where the tropical magic happens. Make sure it’s unsweetened to control the sweetness. I toast mine lightly for extra flavor (optional but worth it!).
- 1/4 cup honey or maple syrup: Honey adds a floral note, while maple syrup gives a deeper, caramel-like sweetness. I lean toward maple syrup in fall recipes – it’s a nod to my seasonal obsession!
- 1 tsp vanilla extract: Pure vanilla extract elevates the flavor. I learned the hard way that imitation vanilla just doesn’t cut it here.
- 1/4 cup rolled oats: These add structure and a bit of chew. Use gluten-free oats for a gluten-free snack – perfect for my customers with dietary needs.
- 2 tbsp chia seeds: These tiny powerhouses add crunch and nutrition. They’re optional but make these balls feel like true energy snacks.
- Pinch of salt: Don’t skip this! I once forgot salt in a batch (yep, even pros mess up), and they tasted flat. A pinch enhances every flavor.
Why these ingredients? They strike a balance between creamy, sweet, and satisfying while keeping the recipe simple. If you’re out of chia seeds or want to swap honey for agave, go for it – just keep the ratios similar. Nonna Rosa always said, “Good ingredients make good memories,” and I’ve found that to be true every time.
Step-by-Step Coconut Vanilla Protein Balls Recipe
Now, let’s get to the fun part – making these coconut vanilla protein balls! I’m standing right here with you in the kitchen, and I promise this is so easy you’ll be done before your coffee’s ready. Here’s how I do it, based on years of perfecting this recipe.
- Prep your workspace: Grab a large mixing bowl and a baking sheet lined with parchment paper. I like to wear my grandmother’s flour-dusted apron for luck, even for no-bake recipes! Having everything ready (mise en place, as the pros say) keeps things stress-free.
- Mix the wet ingredients: In your bowl, combine 1 cup almond butter, 1/4 cup honey (or maple syrup), and 1 tsp vanilla extract. Stir until smooth. I use a sturdy wooden spoon – it’s what I’ve used since I was eight, helping Nonna Rosa. This usually takes me about 1-2 minutes. If your almond butter is thick, microwave it for 10 seconds to loosen it up.
- Add the dry ingredients: Add 1/2 cup vanilla protein powder, 1/4 cup rolled oats, 2 tbsp chia seeds, and a pinch of salt to the bowl. Mix until everything comes together into a thick, sticky dough. Don’t worry if it looks a bit crumbly at first – mine always does! Keep stirring for about 2 minutes until it holds together.
- Incorporate the coconut: Fold in 1/3 cup shredded coconut. I like to save a tablespoon to roll the balls in later for that extra tropical vibe. The mixture should feel like cookie dough – pliable but not too sticky. If it’s too dry, add a teaspoon of honey; if too wet, add a bit more protein powder.
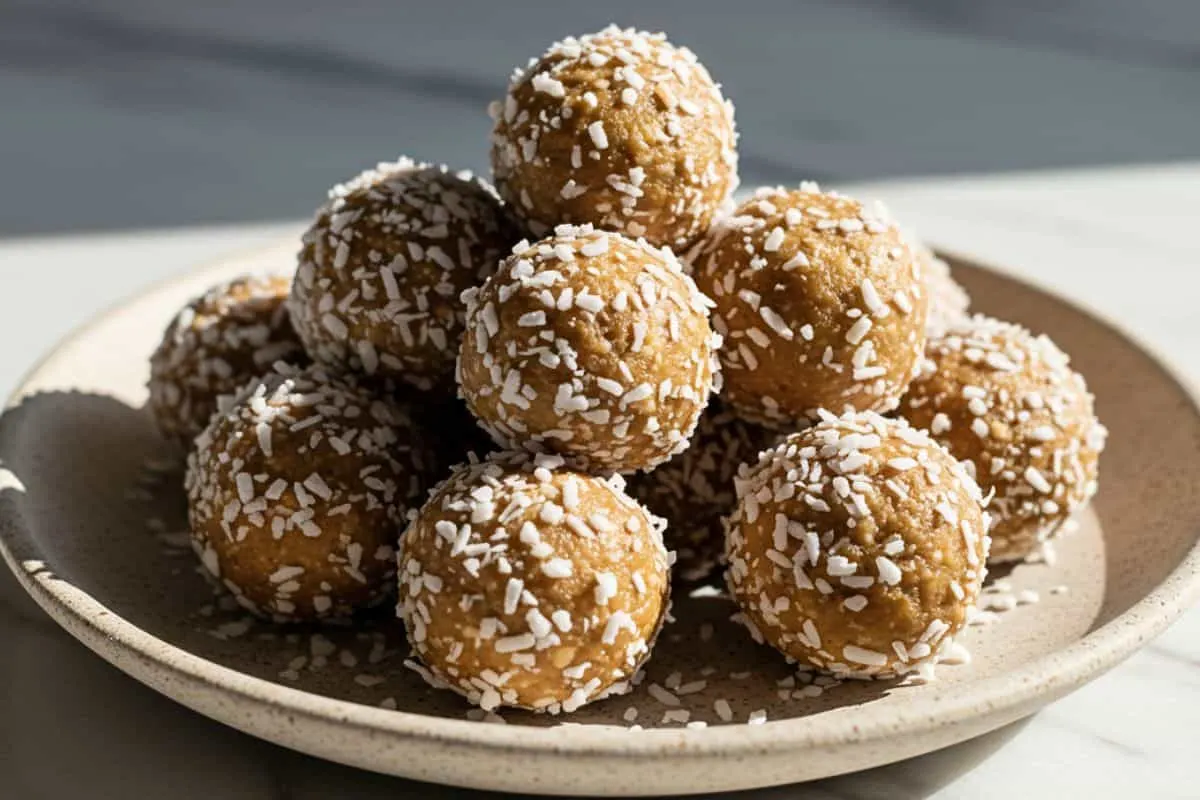
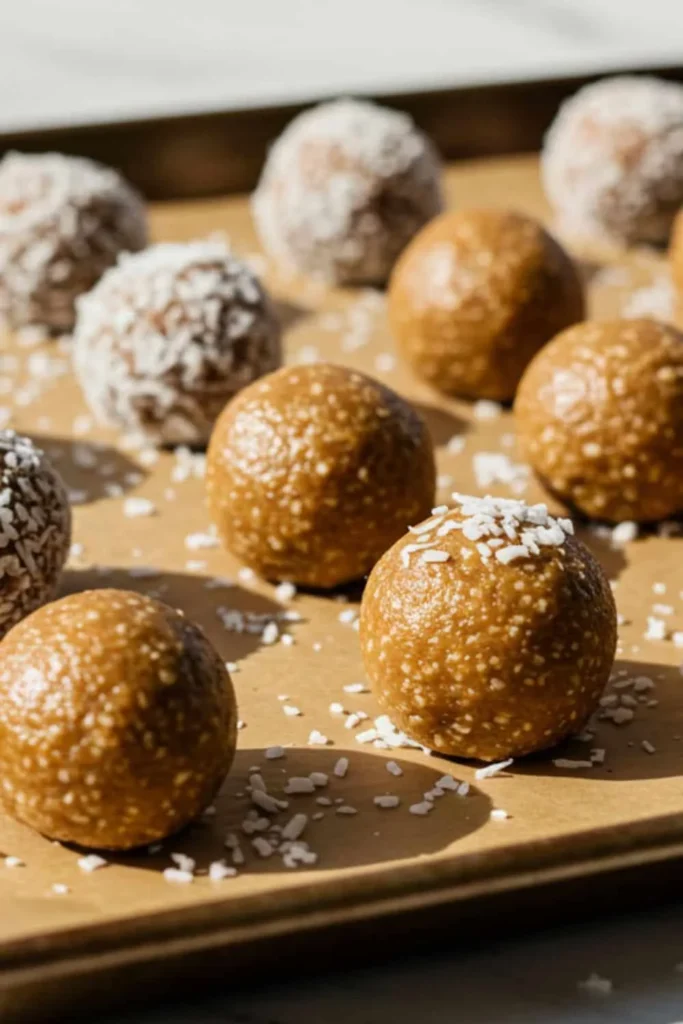
- Shape the balls: Scoop out tablespoon-sized portions and roll them into balls between your palms. I get about 12 balls per batch. This is where my kids love to “help” – though half the dough ends up in their mouths! Place each ball on the parchment-lined sheet.
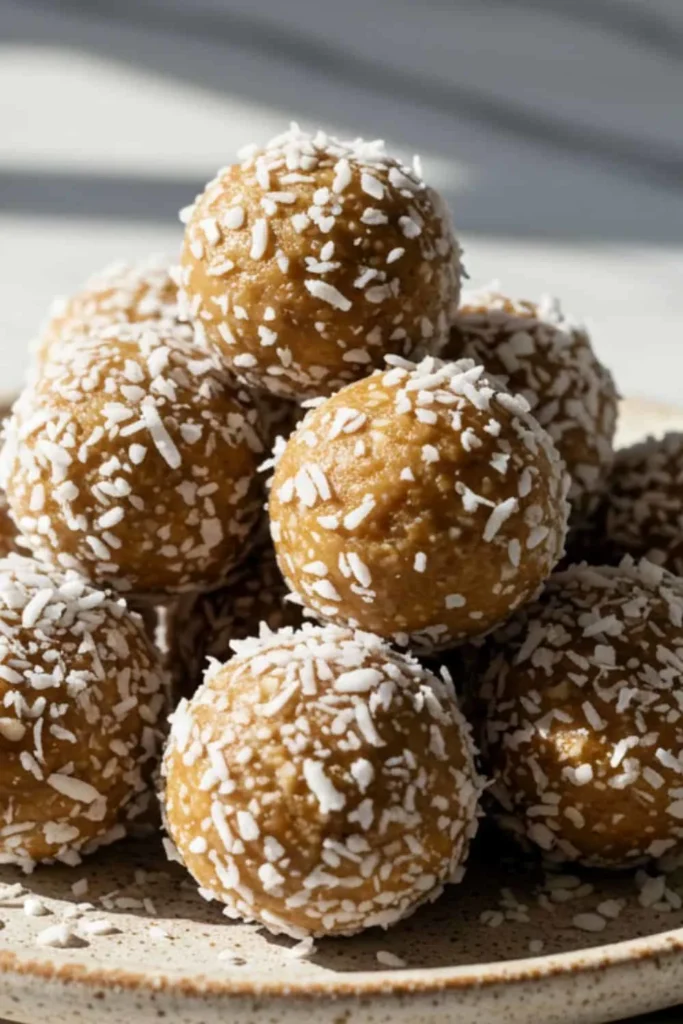
- Optional coconut coating: If you saved some coconut, roll each ball in it for a pretty, snowy look. It also adds a delightful crunch. Press gently so it sticks.
- Chill and set: Pop the tray in the fridge for 10 minutes to firm up the balls. I know it’s tempting to skip this step – I’ve been there! – but chilling helps them hold their shape and enhances the texture.
- Enjoy!: Your coconut vanilla protein balls are ready. The smell alone will have your family (or your golden retriever, Butter, in my case) hovering nearby. Serve them straight from the fridge or let them soften slightly at room temperature.
Here’s the thing: don’t stress if your balls aren’t perfectly round. Mine never are, and they still taste amazing. This no-bake snack is all about ease and flavor, not perfection.
Pro Tips for Coconut Vanilla Protein Balls Success
After years of testing protein balls in my bakery, I’ve picked up a few tricks that make a big difference. Here’s what I tell my customers:
- Use fresh almond butter: Old, separated almond butter can make the mixture too oily or dry. Stir it well before measuring.
- Taste as you go: Before rolling, taste the mixture. If it needs more sweetness, add a drizzle of honey. If it’s too sweet, a pinch of salt balances it out.
- Don’t overmix: Stir just until combined to avoid a tough texture. I learned this the hard way after overworking a batch that turned out like rubber!
- Chill for easier rolling: If the dough feels sticky, refrigerate it for 5 minutes before shaping. It’s a lifesaver on warm days.
- Experiment with add-ins: Try mini chocolate chips or chopped nuts for extra flair. Just keep add-ins to 1/4 cup max to maintain the texture.
These tips come from countless batches and a few flops – like the time I tried to “improve” the recipe with too much coconut and ended up with crumbly messes. Trust me, stick to these, and you’ll nail it.
Variations and Customizations for Coconut Vanilla Protein Balls
One of the joys of this coconut vanilla protein balls recipe is how versatile it is. Here are a few twists I’ve tried in my kitchen:
- Chocolate-Dipped: Melt dark chocolate and dip half of each ball for a decadent treat. Perfect for winter when I’m craving rich chocolate desserts.
- Lemon Zest: Add 1 tsp lemon zest for a bright, summery vibe. It pairs beautifully with the coconut.
- Gluten-Free Swap: Use certified gluten-free oats for a gluten-free snack. I do this for my celiac customers, and they love it.
- Nut-Free Option: Swap almond butter for sunflower seed butter. It’s a great alternative for school-safe snacks.
Feel free to make it your own – baking is about creating memories, not just following rules!
Storing and Serving Your Coconut Vanilla Protein Balls
These energy snacks are perfect for meal prep. Store them in an airtight container in the fridge for up to 2 weeks – though they never last that long at my house! You can also freeze them for up to 3 months; just thaw in the fridge overnight before eating.
Serve them chilled for a firm texture or at room temperature for a softer, creamier bite. I love pairing them with a cup of David’s freshly roasted coffee – the vanilla notes complement it perfectly. They’re great for lunchboxes, post-workout snacks, or even a quick breakfast on busy mornings.
Coconut Vanilla Protein Balls
Ingredients
- 1 cup almond butter
- 1/2 cup vanilla protein powder
- 1/3 cup shredded unsweetened coconut
- 1/4 cup honey or maple syrup
- 1 tsp vanilla extract
- 1/4 cup rolled oats gluten-free if needed
- 2 tbsp chia seeds
- Pinch of salt
Instructions
- Mix almond butter, honey, and vanilla extract in a bowl.
- Add protein powder, oats, chia seeds, and salt; stir until combined.
- Fold in shredded coconut.
- Scoop and roll into 12 balls.
- Optionally roll in extra coconut.
- Chill for 10 minutes to set.
Equipment
- Large mixing bowl
- Wooden spoon
- Measuring cups and spoons
- Baking sheet
- Parchment paper
FAQ
Can I make these coconut vanilla protein balls nut-free? Absolutely! Swap almond butter for sunflower seed butter or tahini. I’ve made nut-free batches for Emma’s preschool, and they’re just as delicious.
How do I keep my protein balls from falling apart? If they’re crumbly, add a teaspoon of honey or almond butter. Chilling the mixture before rolling also helps. I learned this after a batch fell apart on me mid-roll!
Can I use a different sweetener? Yes, agave or date syrup works well. Just keep the amount the same to maintain the texture. Maple syrup is my go-to for a cozy fall twist.
Are these protein balls gluten-free? They are if you use gluten-free oats! Always check your protein powder’s label, as some brands sneak in gluten-containing additives.
How long do these take to prep? About 15 minutes, start to finish. I’ve timed it while juggling kids and a curious dog, so trust me, it’s quick!
Conclusion
These coconut vanilla protein balls are the kind of recipe that makes you feel like a baking pro without breaking a sweat. Whether you’re whipping them up for a quick snack, a post-workout boost, or a healthy dessert, they’re sure to become a staple in your kitchen. I love how they bring back memories of experimenting in Nonna Rosa’s kitchen – and I hope they create new memories for you. So grab your ingredients, channel your inner baker, and enjoy the buttery, tropical goodness. Don’t forget to share them with someone special – the smell alone will have everyone asking for seconds!