15 Beginner Valentine’s Day Desserts That’ll Make Hearts Flutter
Valentine’s Day always gets me excited in the kitchen! There’s something about creating sweet treats for the people you love that makes this holiday so special. After years of making Valentine’s Day desserts for my family, customers, and blog readers, I’ve learned that the best recipes are the ones that look impressive but don’t stress you out. Whether you’re baking for your partner, kids, or a Galentine’s celebration, these easy Valentine’s Day desserts are perfect for beginners. Trust me—I’ve made every mistake in the book, and these recipes are truly foolproof!
1. 3-Ingredient Sweetheart Swirl Bark
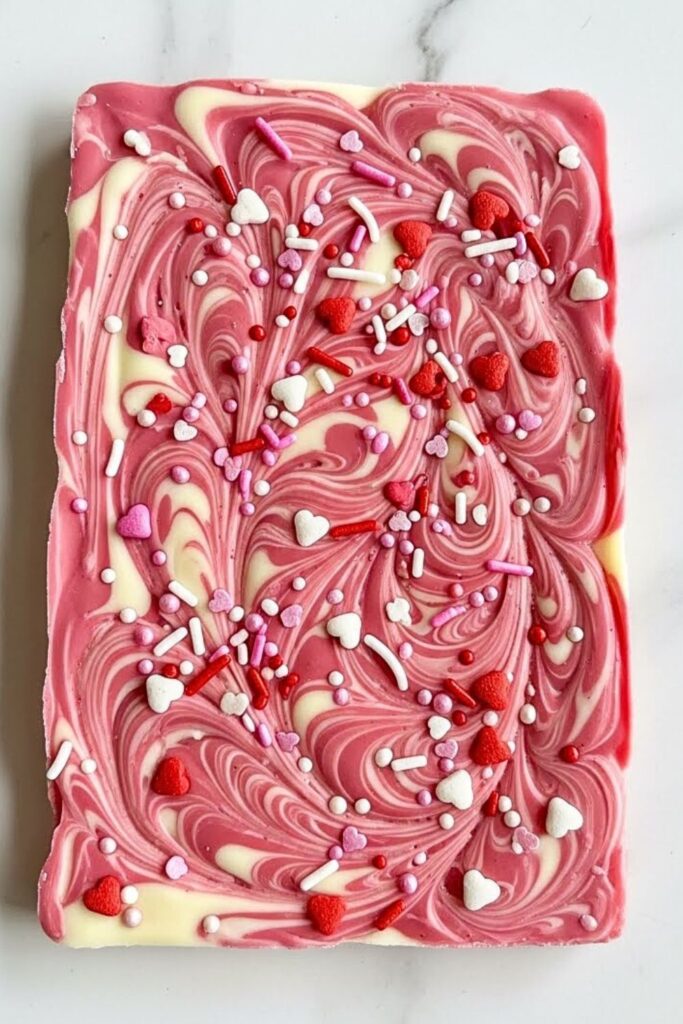
This gorgeous bark looks like you spent hours on it, but it comes together in about 15 minutes! The pink and white chocolate swirls create a beautiful marbled effect that’s perfect for Valentine’s Day.
| Prep Time | 10 minutes |
| Chill Time | 30 minutes |
| Servings | 16 pieces |
| Difficulty | Easy |
| Calories | ~120 per piece |
Essential Equipment:
- Baking sheet – For spreading the chocolate evenly.
- Parchment paper – Prevents sticking and makes cleanup a breeze.
- Microwave-safe bowls – For melting chocolate safely.
Ingredients:
- 12 oz white chocolate chips
- 12 oz pink candy melts (or white chocolate with pink food coloring)
- Valentine sprinkles (optional)
Instructions:
- Line your baking sheet with parchment paper and set it aside.
- Melt the white chocolate in 30-second intervals, stirring between each, until smooth. This usually takes me about 90 seconds total—don’t rush it!
- Repeat with the pink candy melts in a separate bowl.
- Pour the white chocolate onto your prepared baking sheet and spread it into a rectangle about ¼-inch thick.
- Drizzle the pink chocolate over the white in lines, then use a toothpick or knife to swirl them together. Here’s where most people go wrong—don’t over-swirl! Just a few gentle figure-8 motions create the prettiest effect.
- Sprinkle with Valentine decorations if you’re using them, then refrigerate for 30 minutes until firm.
- Break into irregular pieces and store in an airtight container for up to 2 weeks.
2. Cheesecake-Stuffed Strawberries
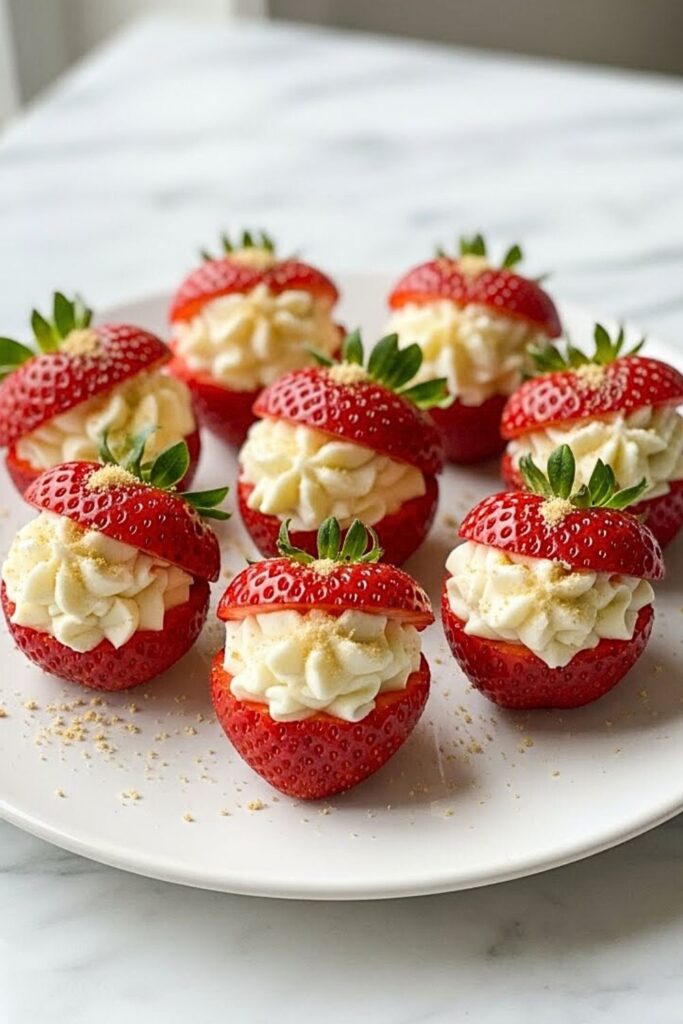
These elegant bites are always the first to disappear at my Valentine’s gatherings! They’re like individual no-bake cheesecakes in strawberry form.
| Prep Time | 20 minutes |
| Chill Time | 30 minutes |
| Servings | 24 strawberries |
| Difficulty | Easy |
| Calories | ~45 per strawberry |
Essential Equipment:
- Piping bag with star tip – Makes filling the strawberries so much easier.
- Small paring knife – For hollowing out the strawberries neatly.
Ingredients:
- 24 large fresh strawberries
- 8 oz cream cheese, softened
- ¼ cup powdered sugar
- 1 teaspoon vanilla extract
- Graham cracker crumbs (for topping)
Instructions:
- Wash and dry your strawberries completely—any moisture will make the filling runny, and I learned that the hard way!
- Cut off the tops and use a small knife or melon baller to hollow out the centers, creating little cups. Don’t go all the way to the bottom.
- Beat cream cheese, powdered sugar, and vanilla until smooth and fluffy, about 2 minutes. You’ll know it’s ready when there are no lumps left.
- Transfer the mixture to your piping bag fitted with a star tip.
- Pipe the cheesecake filling into each strawberry, swirling at the top for a pretty presentation.
- Sprinkle with graham cracker crumbs and refrigerate for at least 30 minutes before serving.
3. Classic Chocolate Lava Cakes
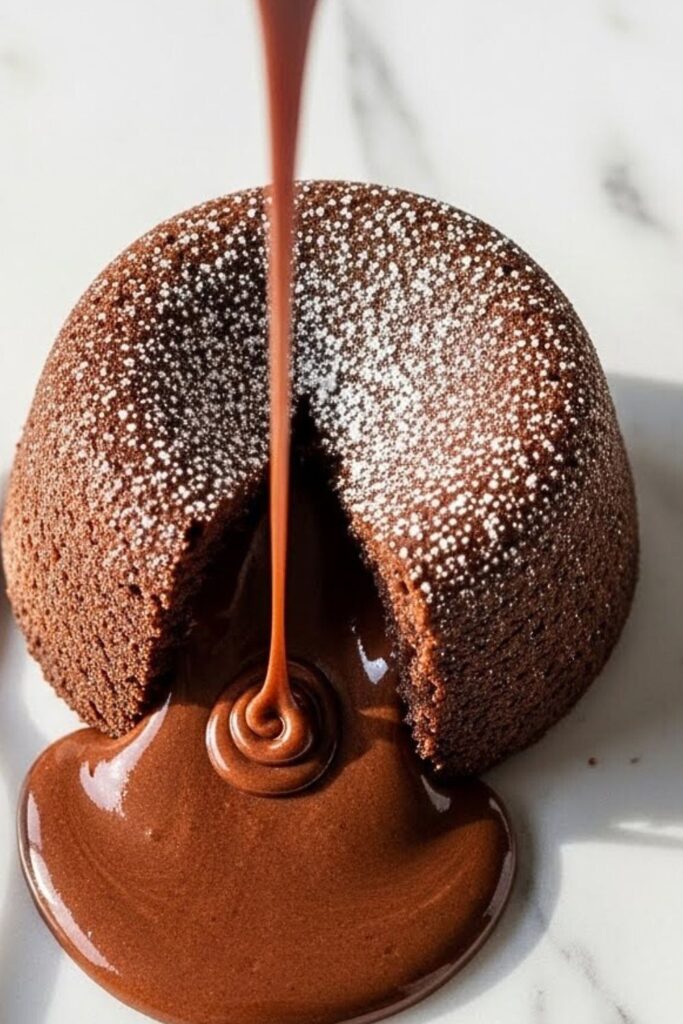
These individual Valentine’s dessert ideas never fail to impress! The gooey chocolate center is pure magic, and they’re surprisingly simple to make.
| Prep Time | 15 minutes |
| Bake Time | 12 minutes |
| Servings | 4 cakes |
| Difficulty | Medium |
| Calories | ~380 per cake |
Essential Equipment:
- 4-ounce ramekins – Essential for the perfect individual portion.
- Double boiler or microwave-safe bowl – For melting chocolate smoothly.
Ingredients:
- 4 oz dark chocolate, chopped
- ½ cup unsalted butter
- 2 large eggs
- 2 egg yolks
- ¼ cup granulated sugar
- 2 tablespoons all-purpose flour
- Butter and cocoa powder for ramekins
Instructions:
- Preheat your oven to 425°F. Generously butter four ramekins and dust with cocoa powder—this step is crucial for easy removal!
- Melt the chocolate and butter together, stirring until smooth. Let it cool slightly while you work on the eggs.
- In another bowl, whisk eggs, egg yolks, and sugar for about 2 minutes until thick and pale. After years of testing, I’ve found that this step creates the best texture.
- Fold the chocolate mixture into the eggs gently, then fold in the flour just until combined. Don’t overmix here!
- Divide the batter among your prepared ramekins, filling them about ¾ full.
- Bake for exactly 12 minutes. The edges should be set, but the centers will still jiggle slightly—that’s what we want!
- Let them cool for 1 minute, then carefully invert onto plates. The molten center will flow out beautifully!
4. Red Velvet Rice Krispie Treats
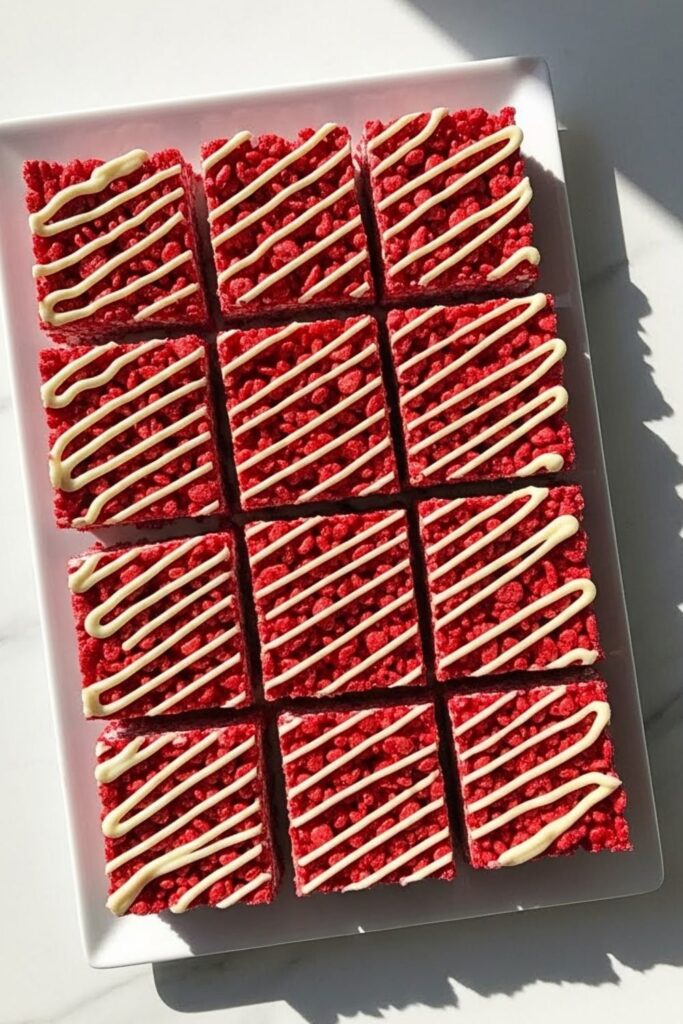
I created these for Emma’s Valentine’s Day class party last year, and they were a massive hit! They’re a fun twist on classic Rice Krispies treats with that gorgeous red velvet color.
| Prep Time | 10 minutes |
| Cook Time | 5 minutes |
| Servings | 16 squares |
| Difficulty | Easy |
| Calories | ~140 per square |
Essential Equipment:
- 9×13-inch pan – For pressing the treats evenly.
- Large pot – For melting the marshmallow mixture.
Ingredients:
- 6 cups Rice Krispies cereal
- 4 cups mini marshmallows
- 3 tablespoons butter
- 1 tablespoon red velvet cake mix (dry)
- Red gel food coloring
- White chocolate chips for drizzling (optional)
Instructions:
- Butter your 9×13-inch pan and set it aside.
- In a large pot over low heat, melt butter and marshmallows, stirring constantly. This usually takes me about 3-4 minutes.
- Once melted, remove from heat and stir in the cake mix and a few drops of red food coloring until you get that beautiful red velvet shade.
- Add the Rice Krispies and fold quickly until everything is coated. Work fast here—the mixture sets up quickly!
- Press into your prepared pan using buttered hands or wax paper. Don’t press too hard, or they’ll be dense instead of crispy.
- If you want to get fancy, melt some white chocolate and drizzle it over the top in a zigzag pattern.
- Let them cool completely before cutting into squares.
5. Easy Oreo Truffles Dipped in White Chocolate
These are my go-to when I need easy desserts that look professional! Only three ingredients, and they taste as if they came from a fancy chocolate shop.
| Prep Time | 20 minutes |
| Chill Time | 1 hour |
| Servings | 24 truffles |
| Difficulty | Easy |
| Calories | ~110 per truffle |
Essential Equipment:
- Food processor – Makes crushing the Oreos so much faster.
- Cookie scoop – For perfectly uniform truffles.
Ingredients:
- 36 Oreo cookies
- 8 oz cream cheese, softened
- 16 oz white chocolate melting wafers
- Valentine sprinkles or pink drizzle
Instructions:
- Crush the Oreos in your food processor until they’re fine crumbs—trust me on this one, it’s so much easier than doing it by hand!
- Mix the cookie crumbs with softened cream cheese until well combined. The mixture should hold together when squeezed.
- Roll into 1-inch balls using a cookie scoop for consistency, then place them on a parchment-lined baking sheet.
- Freeze for 30 minutes—this makes dipping so much cleaner.
- Melt white chocolate according to package directions, stirring until smooth.
- Dip each truffle using a fork, letting excess chocolate drip off. Place back on the parchment paper.
- Immediately add sprinkles or a pink chocolate drizzle before the coating sets.
- Refrigerate until firm, about 30 minutes, then store in an airtight container for up to a week.
6. Heart-Shaped Cherry Hand Pies
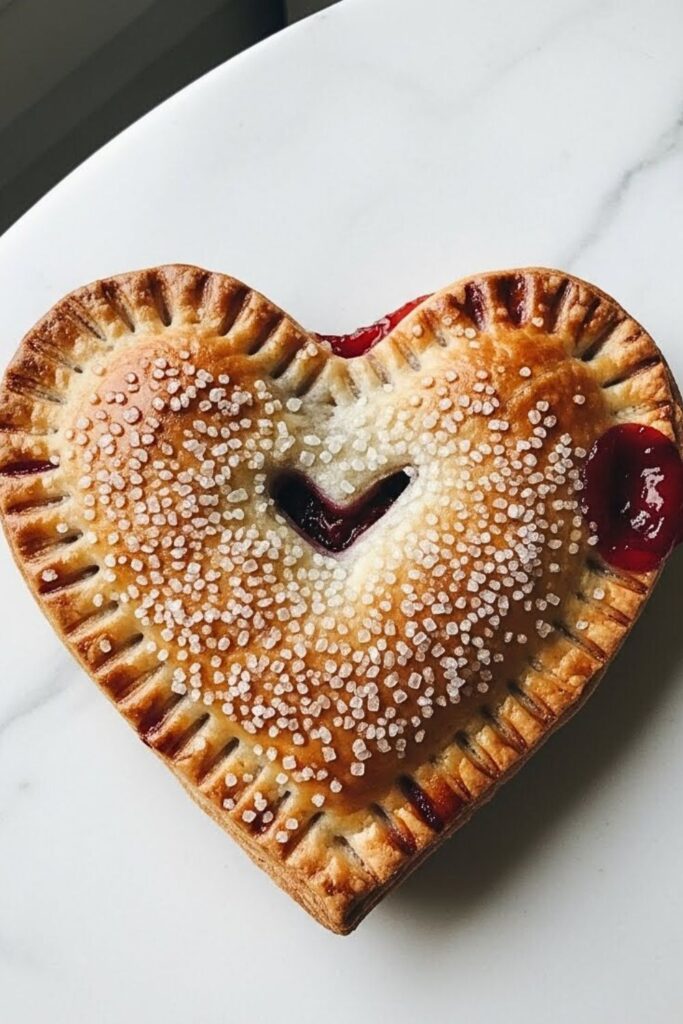
These adorable hand pies use store-bought pie crust, so they’re perfect for beginners! The cherry filling is sweet and tangy—just like the ones I used to make with Nonna Rosa.
| Prep Time | 15 minutes |
| Bake Time | 20 minutes |
| Servings | 8 hand pies |
| Difficulty | Easy |
| Calories | ~200 per pie |
Essential Equipment:
- Heart-shaped cookie cutter – Creates the perfect Valentine shape.
- Baking sheet – For even baking.
Ingredients:
- 2 store-bought pie crusts
- 1 can cherry pie filling
- 1 egg (for egg wash)
- Coarse sugar for sprinkling
Instructions:
- Preheat oven to 375°F and line a baking sheet with parchment paper.
- Roll out your pie crusts and use a heart-shaped cookie cutter to cut out 16 hearts. You’ll need two hearts per pie.
- Place 8 hearts on your prepared baking sheet. Add about a tablespoon of cherry filling to the center of each, leaving a ½-inch border.
- Top with the remaining hearts and press the edges with a fork to seal. Here’s where most people go wrong—make sure those edges are really sealed or the filling will leak out!
- Cut small slits in the top of each pie to let steam escape.
- Brush with beaten egg and sprinkle with coarse sugar for that bakery-style finish.
- Bake for 18-20 minutes until golden brown. The smell alone will have your neighbors knocking!
7. Strawberry Pudding Parfaits with Chocolate Curls
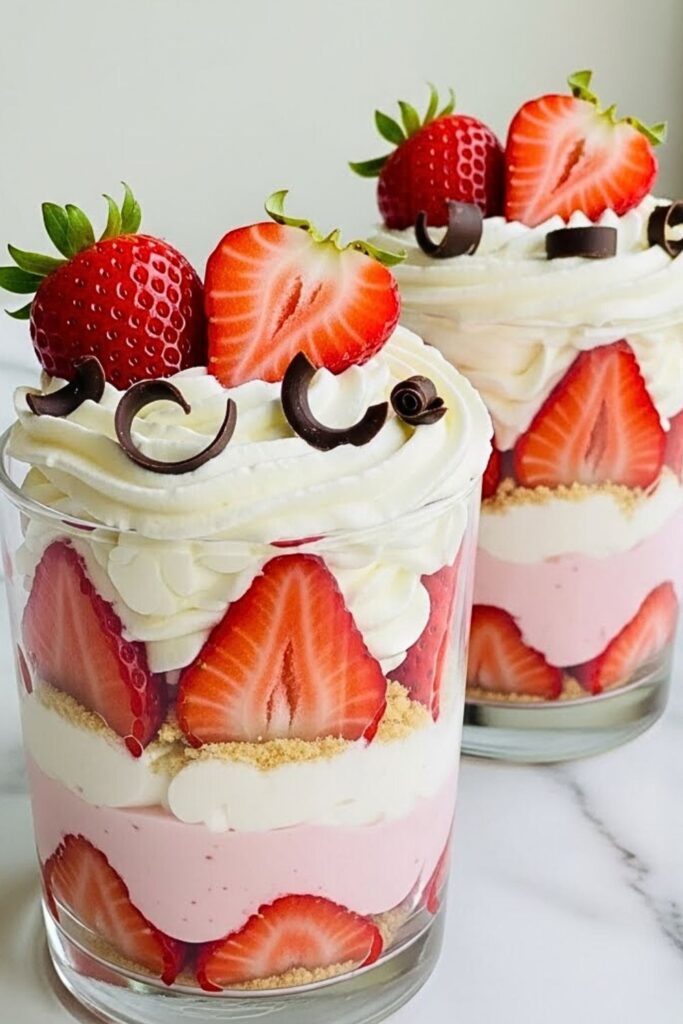
These pretty parfaits come together in minutes and look so elegant! I make these when I want something special without turning on the oven.
| Prep Time | 15 minutes |
| Chill Time | 30 minutes |
| Servings | 6 parfaits |
| Difficulty | Easy |
| Calories | ~250 per parfait |
Essential Equipment:
- Clear parfait glasses – Shows off those beautiful layers.
- Vegetable peeler – For making chocolate curls.
Ingredients:
- 2 boxes instant strawberry pudding mix
- 4 cups cold milk
- 2 cups whipped cream
- 2 cups fresh strawberries, sliced
- Chocolate bar for curls
- Graham cracker crumbs
Instructions:
- Prepare pudding according to package directions and refrigerate for 5 minutes to set slightly.
- While pudding sets, make chocolate curls by running a vegetable peeler along the edge of a chocolate bar. I keep mine at room temperature for easier curling!
- In clear glasses, layer graham cracker crumbs, pudding, whipped cream, and strawberries.
- Repeat the layers until glasses are full, ending with whipped cream on top.
- Garnish with chocolate curls and a strawberry slice.
- Refrigerate for at least 30 minutes before serving to let the graham crackers soften slightly.
8. Pink Champagne Jello Jigglers
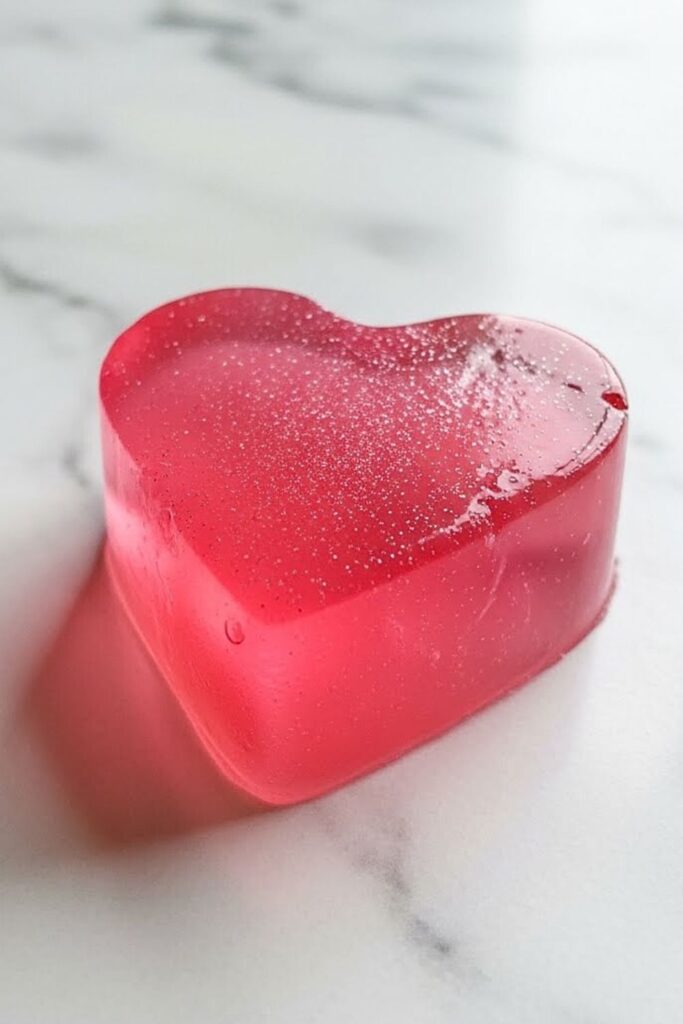
These grown-up jigglers are perfect for a Valentine’s celebration! They have a subtle champagne flavor that makes them feel special and festive.
| Prep Time | 10 minutes |
| Chill Time | 3 hours |
| Servings | 20 jigglers |
| Difficulty | Easy |
| Calories | ~35 per jiggler |
Essential Equipment:
- 9×13-inch dish – For setting the jello evenly.
- Heart-shaped mini cookie cutters – For the cutest presentation.
Ingredients:
- 3 boxes (3 oz each) strawberry Jell-O
- 2½ cups boiling water
- 1 cup pink champagne or sparkling rosé
- Edible glitter (optional)
Instructions:
- In a large bowl, dissolve jello in boiling water, stirring for 2 minutes until completely dissolved.
- Add champagne and stir gently—you’ll lose some of the bubbles, but that’s okay!
- Pour into your 9×13-inch dish and refrigerate for at least 3 hours until very firm. I usually make these the night before.
- Once set, cut into squares or use heart-shaped cookie cutters for a festive touch.
- Dust with edible glitter if you want them extra sparkly—my daughter Emma insists on this step every time!
9. Chocolate-Dipped Pretzel Rods with Heart Sprinkles

These sweet and salty treats are so simple but always impressive! They’re perfect for packaging as Valentine’s gifts too.
| Prep Time | 15 minutes |
| Set Time | 30 minutes |
| Servings | 12 pretzel rods |
| Difficulty | Easy |
| Calories | ~150 per rod |
Essential Equipment:
- Tall glass or jar – Makes dipping pretzels much easier.
- Wax paper – For letting the chocolate set properly.
Ingredients:
- 12 pretzel rods
- 12 oz chocolate melting wafers (milk or dark)
- 6 oz pink candy melts
- Valentine sprinkles
Instructions:
- Line a baking sheet with wax paper and set aside.
- Melt chocolate wafers according to package directions. Pour into a tall glass for easier dipping.
- Dip each pretzel rod about ¾ of the way into the chocolate, letting excess drip off. Trust me, the tall glass trick will change everything for you!
- Place on wax paper and immediately sprinkle with Valentine decorations before the chocolate sets.
- Melt pink candy melts and drizzle over the chocolate in a zigzag pattern using a fork or piping bag.
- Let set at room temperature for 30 minutes, or refrigerate for 15 minutes if you’re in a hurry.
10. No-Bake Raspberry Icebox Cake
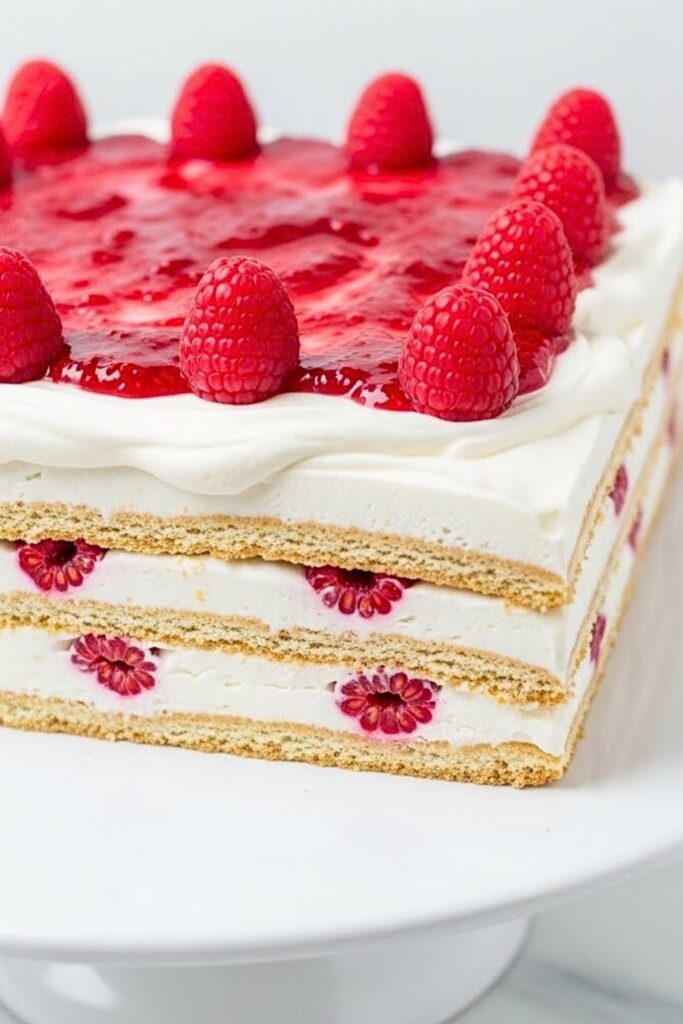
This is one of those holiday desserts that looks like it took hours but comes together in 20 minutes! The layers soften overnight into cake-like perfection.
| Prep Time | 20 minutes |
| Chill Time | 6 hours (or overnight) |
| Servings | 10 slices |
| Difficulty | Easy |
| Calories | ~320 per slice |
Essential Equipment:
- 9-inch springform pan – Makes serving so much easier.
- Hand mixer – For fluffy whipped cream.
Ingredients:
- 2 cups heavy cream
- ¼ cup powdered sugar
- 1 teaspoon vanilla extract
- 2 packages of graham crackers
- 2 cups fresh raspberries
- Raspberry jam for drizzling
Instructions:
- Beat heavy cream, powdered sugar, and vanilla until stiff peaks form—this usually takes me about 3-4 minutes.
- Spread a thin layer of whipped cream in the bottom of your springform pan.
- Layer graham crackers to cover the bottom, breaking them as needed to fit.
- Spread ⅓ of the remaining whipped cream over the crackers, then dot with raspberries.
- Repeat layers twice more, ending with whipped cream on top.
- Cover and refrigerate overnight—this is where the magic happens! The graham crackers soften into cake layers.
- Before serving, warm the raspberry jam slightly and drizzle it over the top. Garnish with fresh raspberries.
11. Red Velvet Whoopie Pies with Cream Cheese Filling
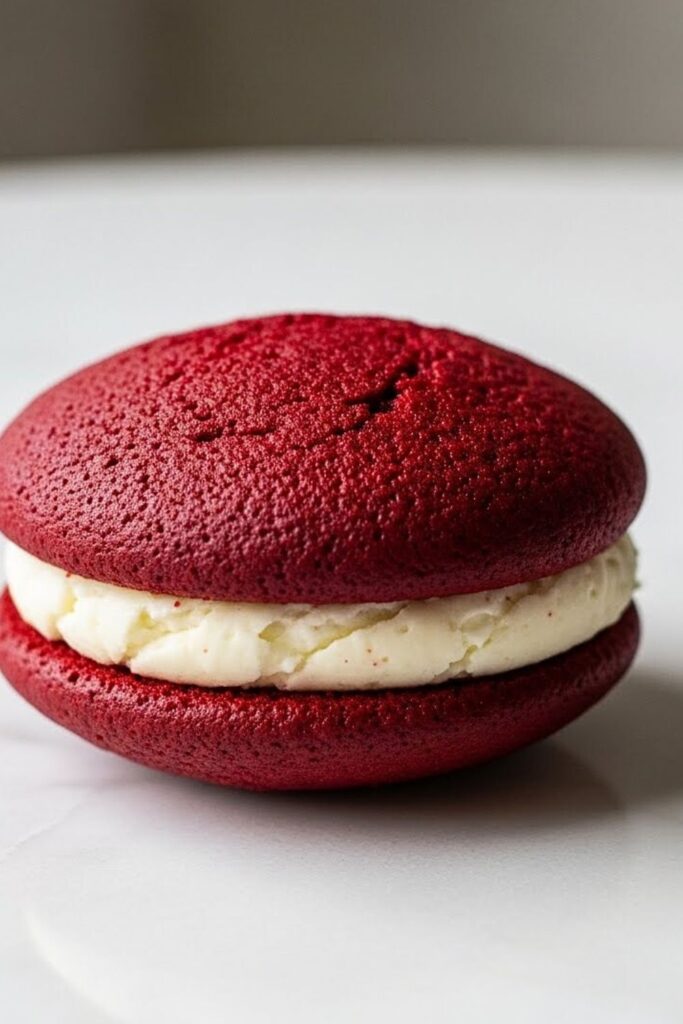
These soft, cake-like cookies with tangy cream cheese filling are always a hit! They’re like mini red velvet cakes you can hold in your hand.
| Prep Time | 20 minutes |
| Bake Time | 10 minutes |
| Servings | 12 whoopee pies |
| Difficulty | Medium |
| Calories | ~280 per pie |
Essential Equipment:
- Cookie scoop – For uniform-sized cookies.
- Piping bag – Makes filling the pies neat and easy.
Ingredients:
For the Cookies:
- 2 cups all-purpose flour
- ¼ cup cocoa powder
- 1 teaspoon baking soda
- 1 cup granulated sugar
- ½ cup butter, softened
- 1 large egg
- 1 cup buttermilk
- Red gel food coloring
For the Filling:
- 4 oz cream cheese, softened
- ¼ cup butter, softened
- 2 cups powdered sugar
- 1 teaspoon vanilla extract
Instructions:
- Preheat oven to 350°F and line baking sheets with parchment paper.
- Whisk together flour, cocoa powder, and baking soda. Set aside.
- Cream butter and sugar until fluffy, about 2 minutes. Add egg and red food coloring, beating until well combined.
- Alternate adding flour mixture and buttermilk to the butter mixture, beginning and ending with flour. After years of testing, I’ve found this method creates the softest cookies!
- Drop tablespoon-sized scoops onto prepared baking sheets, spacing them 2 inches apart.
- Bake for 10-12 minutes until the tops spring back when touched lightly.
- Cool completely on wire racks while you make the filling.
- Beat cream cheese and butter until smooth, then add powdered sugar and vanilla. Mix until light and fluffy.
- Pipe or spread filling on the flat side of half the cookies, then top with the remaining cookies to create sandwiches.
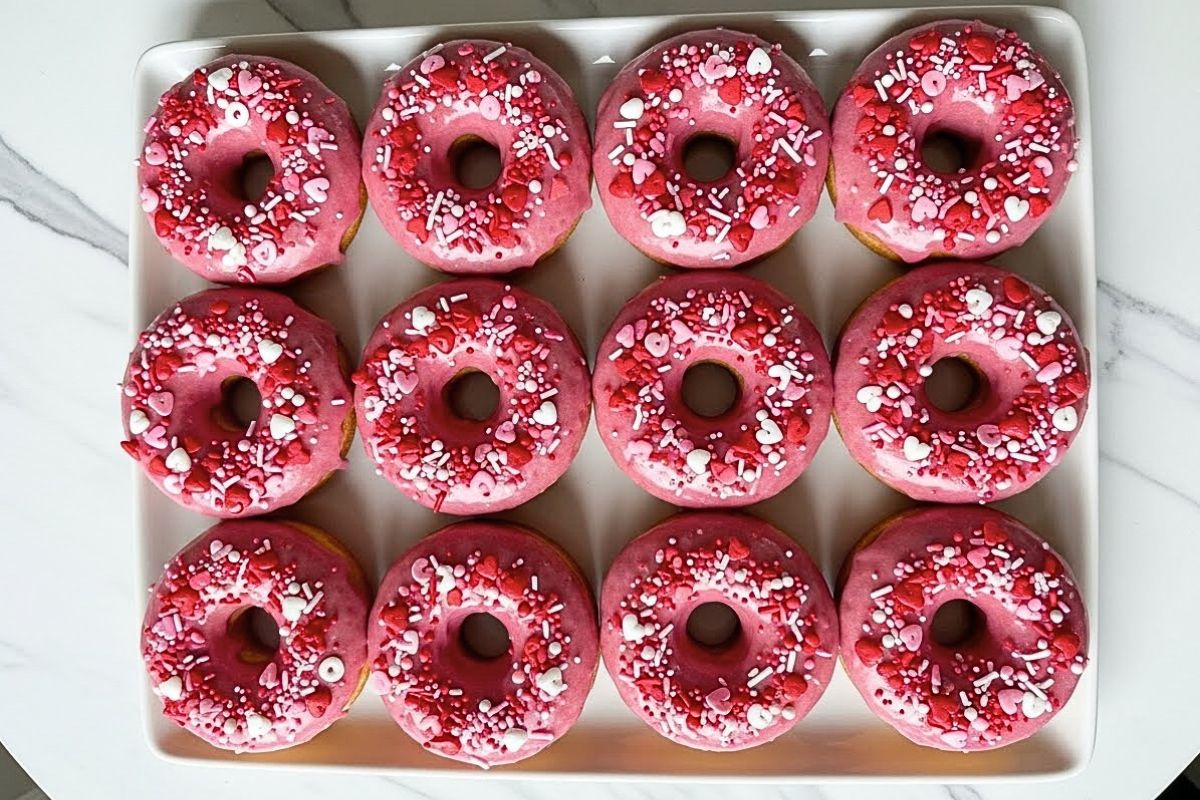
12. Strawberry Glazed Donuts (Baked, Not Fried)
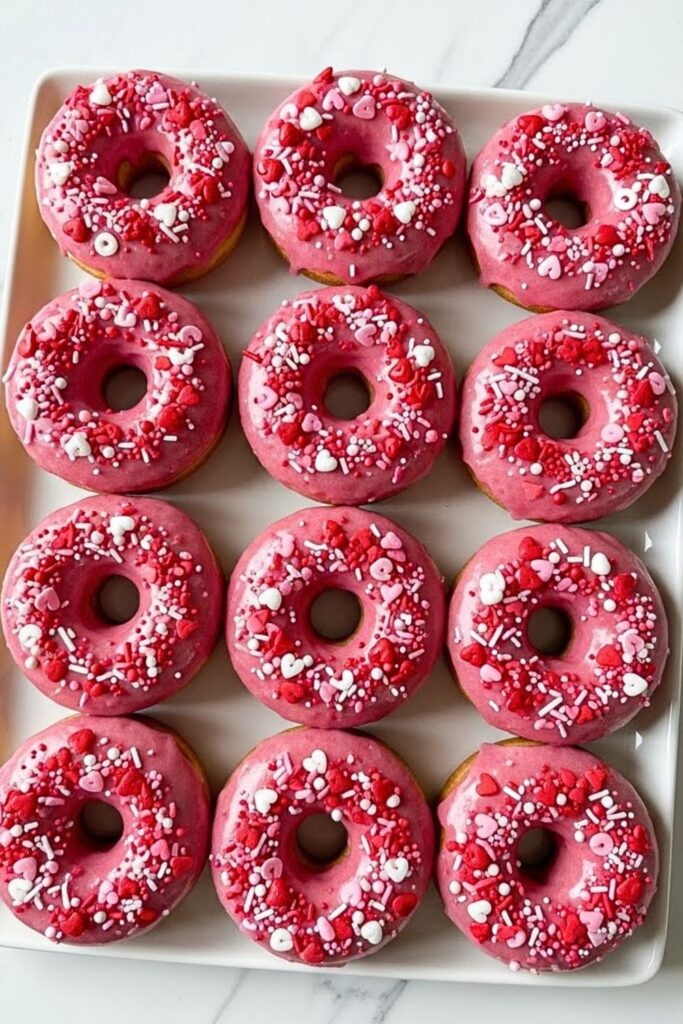
These baked donuts are so much easier than fried ones, and that strawberry glaze is absolutely irresistible! They’re perfect for a Valentine’s Day breakfast surprise.
| Prep Time | 15 minutes |
| Bake Time | 12 minutes |
| Servings | 12 donuts |
| Difficulty | Easy |
| Calories | ~210 per donut |
Essential Equipment:
- Donut pan – Essential for baked donuts.
- Wire cooling rack – For glazing donuts cleanly.
Ingredients:
For the Donuts:
- 2 cups all-purpose flour
- ¾ cup granulated sugar
- 2 teaspoons baking powder
- 1 cup milk
- 2 eggs
- 4 tablespoons butter, melted
- 1 teaspoon vanilla extract
For the Glaze:
- 2 cups powdered sugar
- 3 tablespoons strawberry puree
- 2 tablespoons milk
- Valentine sprinkles
Instructions:
- Preheat oven to 350°F and spray your donut pan generously with cooking spray—don’t skip this step!
- Mix flour, sugar, and baking powder in a large bowl.
- In another bowl, whisk together milk, eggs, melted butter, and vanilla.
- Pour wet ingredients into dry and stir just until combined. Don’t overmix here—a few lumps are fine!
- Fill donut cavities about ⅔ full. I like to use a piping bag for this, but a spoon works too.
- Bake for 10-12 minutes until the tops spring back when touched.
- Cool in the pan for 5 minutes, then turn out onto a wire rack.
- For the glaze, whisk together powdered sugar, strawberry puree, and milk until smooth. Dip the top of each cooled donut into the glaze, then add sprinkles immediately before it sets.
13. White Chocolate Raspberry Cheesecake Bars
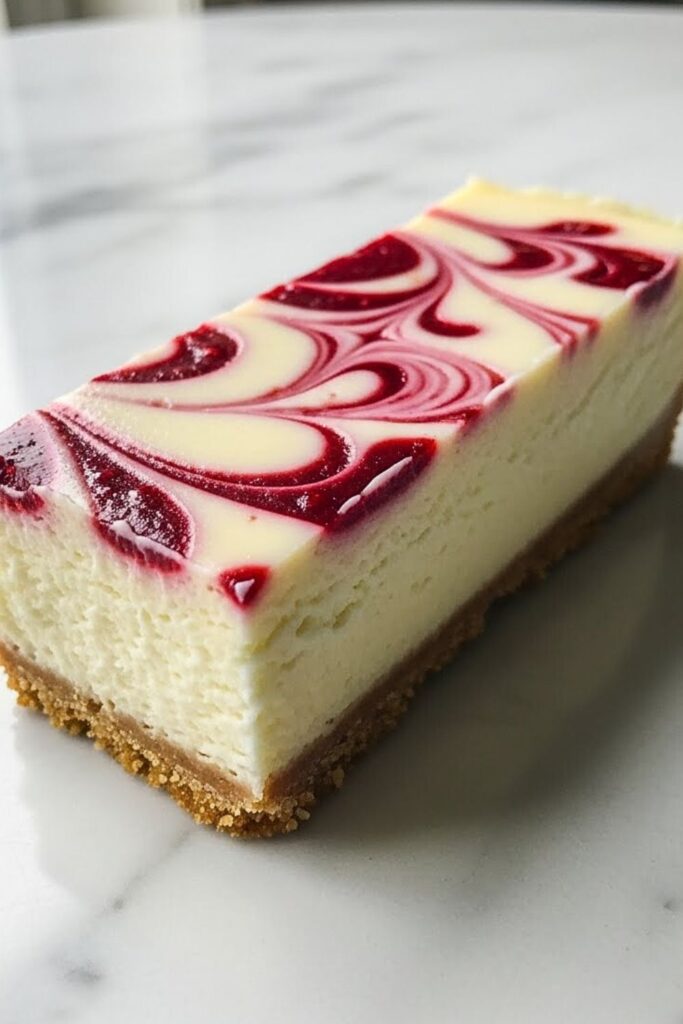
These bars have that classic cheesecake flavor with a beautiful raspberry swirl! They’re easier than making a full cheesecake and perfect for sharing.
| Prep Time | 20 minutes |
| Bake Time | 35 minutes |
| Servings | 16 bars |
| Difficulty | Medium |
| Calories | ~290 per bar |
Essential Equipment:
- 9×13-inch baking pan – For perfectly portioned bars.
- Food processor – Makes the crust come together in seconds.
Ingredients:
For the Crust:
- 2 cups graham cracker crumbs
- ⅓ cup melted butter
- 2 tablespoons sugar
For the Filling:
- 16 oz cream cheese, softened
- ½ cup sugar
- 2 eggs
- 1 teaspoon vanilla extract
- 6 oz white chocolate, melted and cooled
- ½ cup raspberry jam
Instructions:
- Preheat oven to 325°F and line a 9×13-inch pan with parchment paper, leaving overhang on the sides for easy removal.
- Mix graham cracker crumbs, melted butter, and sugar. Press firmly into the bottom of your prepared pan.
- Bake the crust for 8 minutes, then let it cool while you prepare the filling.
- Beat cream cheese and sugar until smooth and fluffy, about 2 minutes. Add eggs one at a time, mixing well after each addition.
- Stir in vanilla and cooled white chocolate until combined.
- Pour filling over the cooled crust and smooth the top.
- Warm the raspberry jam slightly so it’s pourable, then drop spoonfuls over the cheesecake filling.
- Use a knife to swirl the jam through the filling—just a few gentle swirls create the prettiest pattern. Trust me, I’ve learned not to overdo it!
- Bake for 30-35 minutes until the center is almost set but still slightly jiggly.
- Cool completely, then refrigerate for at least 4 hours before cutting into bars.
14. Chocolate-Covered Cherry Dump Cake
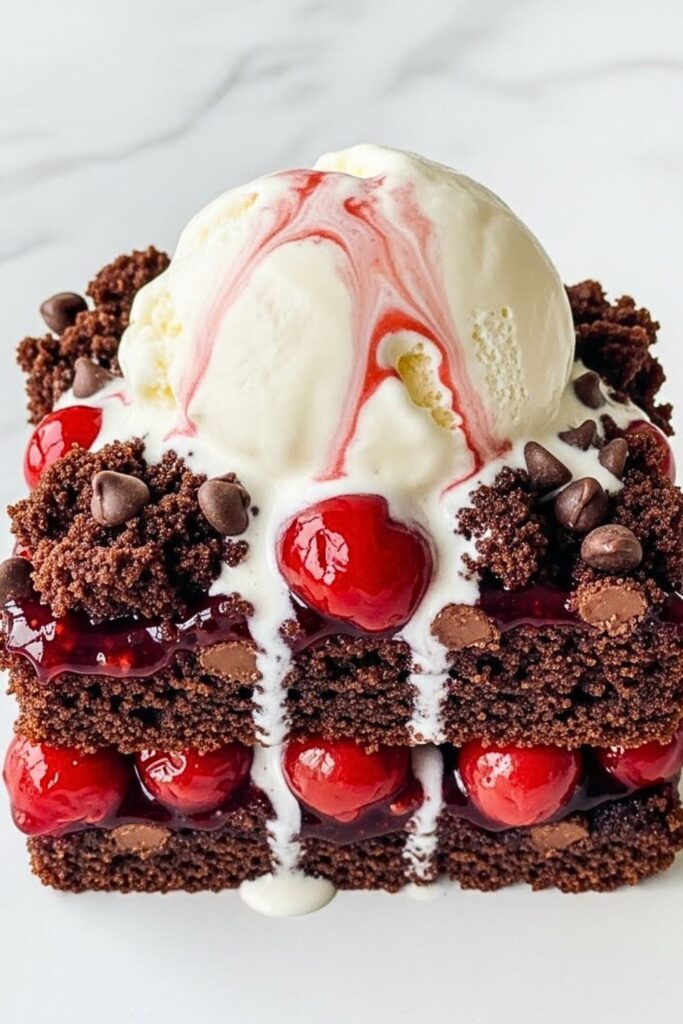
This is my go-to when I need a crowd-pleasing dessert with minimal effort! It’s called a dump cake because you literally dump everything in—no mixing required.
| Prep Time | 5 minutes |
| Bake Time | 45 minutes |
| Servings | 12 servings |
| Difficulty | Easy |
| Calories | ~340 per serving |
Essential Equipment:
- 9×13-inch baking dish – For even baking and easy serving.
Ingredients:
- 1 can (21 oz) cherry pie filling
- 1 box chocolate cake mix
- ½ cup butter, melted
- 1 cup semi-sweet chocolate chips
- Vanilla ice cream for serving
Instructions:
- Preheat oven to 350°F and spray a 9×13-inch baking dish with cooking spray.
- Spread cherry pie filling evenly in the bottom of the dish.
- Sprinkle dry cake mix over the cherries—don’t mix it in! Just let it sit on top.
- Drizzle melted butter over the cake mix, trying to cover as much as possible.
- Sprinkle chocolate chips over everything.
- Bake for 45-50 minutes until the top is golden and the edges are bubbling. Your kitchen will smell like heaven!
- Let cool for 10 minutes before serving. This is best warmed with a scoop of vanilla ice cream on top.
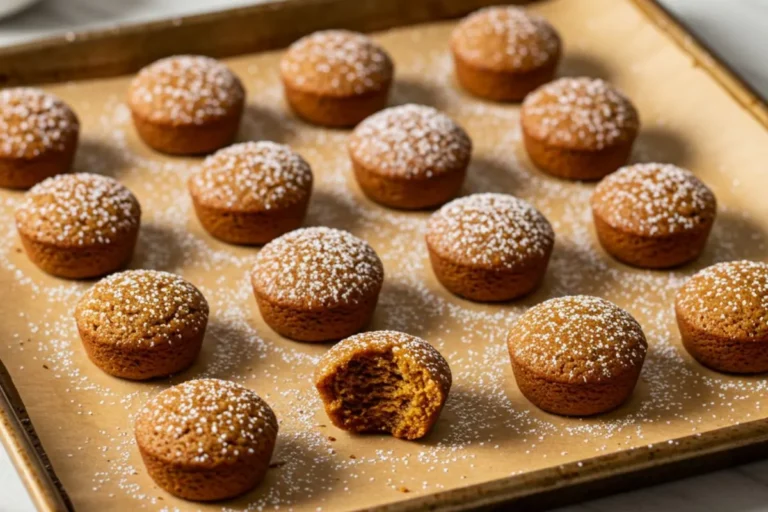
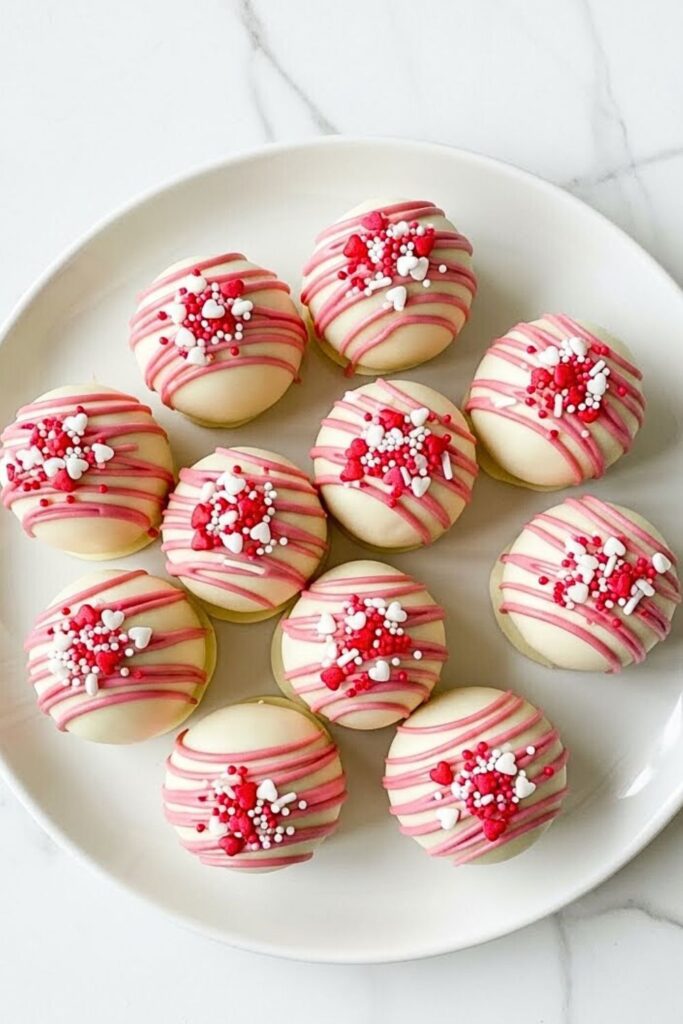
15. Conversation Heart Brownie Bites

These adorable brownie bites are decorated with conversation hearts for the cutest Valentine’s treat! They’re rich, fudgy, and perfectly bite-sized.
| Prep Time | 15 minutes |
| Bake Time | 18 minutes |
| Servings | 24 brownie bites |
| Difficulty | Easy |
| Calories | ~110 per bite |
Essential Equipment:
- Mini muffin pan – Creates perfect bite-sized portions.
- Mini paper liners – Makes removal and serving easier.
Ingredients:
- 1 box brownie mix (plus ingredients listed on box)
- ½ cup mini chocolate chips
- Pink buttercream frosting
- Conversation heart candies
Instructions:
- Preheat oven according to brownie mix directions. Line mini muffin pans with paper liners.
- Prepare brownie batter according to package directions, then fold in mini chocolate chips.
- Fill each liner about ¾ full—they won’t rise much, so you want them fairly full.
- Bake for 15-18 minutes until a toothpick inserted comes out with just a few moist crumbs. Don’t overbake these! I learned that lesson after making several dry batches.
- Cool completely in the pan, then remove to a wire rack.
- Once cool, pipe or spread a small amount of pink frosting on each brownie bite.
- Press a conversation heart candy into the frosting on each one while it’s still soft.
General Tips & Notes for Valentine’s Day Baking Success
Baking Tips:
- Make sure all your refrigerated ingredients (butter, cream cheese, eggs) are at room temperature unless the recipe says otherwise. This helps everything blend smoothly and creates better texture—I can’t tell you how many times cold cream cheese has ruined my mixing bowl!
- If you’re making treats ahead, most of these easy Valentine’s Day desserts store well for 2-3 days in airtight containers. Some, like the cheesecake bars and icebox cake, actually taste better the next day.
- Don’t be afraid to get creative with colors! While traditional Valentine’s colors are red and pink, you can use any shade that makes you happy.
- When melting chocolate, patience is key. Use 30-second intervals in the microwave and stir thoroughly between each one. Rushed chocolate tends to seize up, and that’s not fun to fix.
Troubleshooting:
- Chocolate seized or got lumpy? Try adding a teaspoon of vegetable oil and stirring vigorously. It usually comes back together!
- Desserts too sweet? Balance sweetness with a pinch of salt or serve with unsweetened whipped cream.
- Running out of time? Focus on the no-bake options like the Oreo truffles, strawberry parfaits, or chocolate bark. They’re just as impressive but much faster.
- Don’t have heart-shaped cutters? Use a knife to freehand heart shapes, or embrace simple circles and squares—they’ll taste just as amazing!
Variations:
- Many of these recipes can be made gluten-free by using gluten-free graham crackers, cookies, or cake mixes.
- For dairy-free versions, try coconut cream instead of heavy cream, and dairy-free chocolate chips work beautifully.
- If you’re not a fan of strawberries or raspberries, substitute with cherries, pomegranate, or even blackberries for a different twist.
- Add a tablespoon of liqueur to any of the chocolate-based desserts for a grown-up version—my favorite is adding raspberry liqueur to the lava cakes!
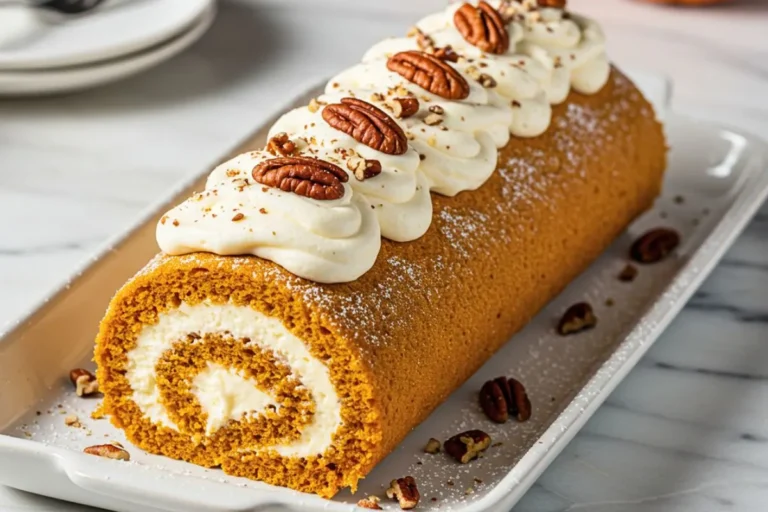
More Related Recipes
Looking for more ways to celebrate with homemade desserts? Check out these collections:
- 10 Heart-Shaped Cake Ideas
- 12 Beginner-Friendly Valentine’s Cake Ideas
- 10 Beginner-Friendly Valentine’s Cookie Recipes
Conclusion
These 15 beginner-friendly Valentine’s Day desserts prove you don’t need fancy skills to create something special for the people you love! From simple no-bake treats to impressive-looking cakes, there’s something here for every skill level and time constraint. My family goes crazy for every single one of these recipes, and I hope yours does too. Pick one or two that speak to you, gather your ingredients, and create some sweet memories this Valentine’s Day. Trust me—the smiles on your loved ones’ faces will make every minute in the kitchen worth it!