7 Valentine Cupcakes for Beginners
Valentine’s Day has always been special in my house—not just for the romance, but because it’s the one holiday where Emma and Lucas beg to help me bake. Last year, we made such a mess trying to frost heart-shaped cookies that I decided cupcakes would be our new tradition. They’re forgiving, fun to decorate, and honestly? Way easier to transport to school parties without disaster striking!
I’ve put together seven Valentine cupcakes for beginners that are genuinely simple enough for your first attempt at holiday baking. No fancy piping skills required, no complicated techniques—just straightforward recipes that taste amazing and look adorable. Whether you’re baking for a classroom party, a romantic dinner, or just because you love an excuse to make something sweet, these easy Valentine cupcakes will have everyone asking for seconds.
Each recipe includes everything you need to know, from the essential equipment to step-by-step instructions written exactly how I’d explain them if we were baking together in my kitchen. Trust me on this one—if my six-year-old can successfully make most of these with minimal supervision, you’ve absolutely got this!
Jump to
1. Love Bug Chocolate Cupcakes
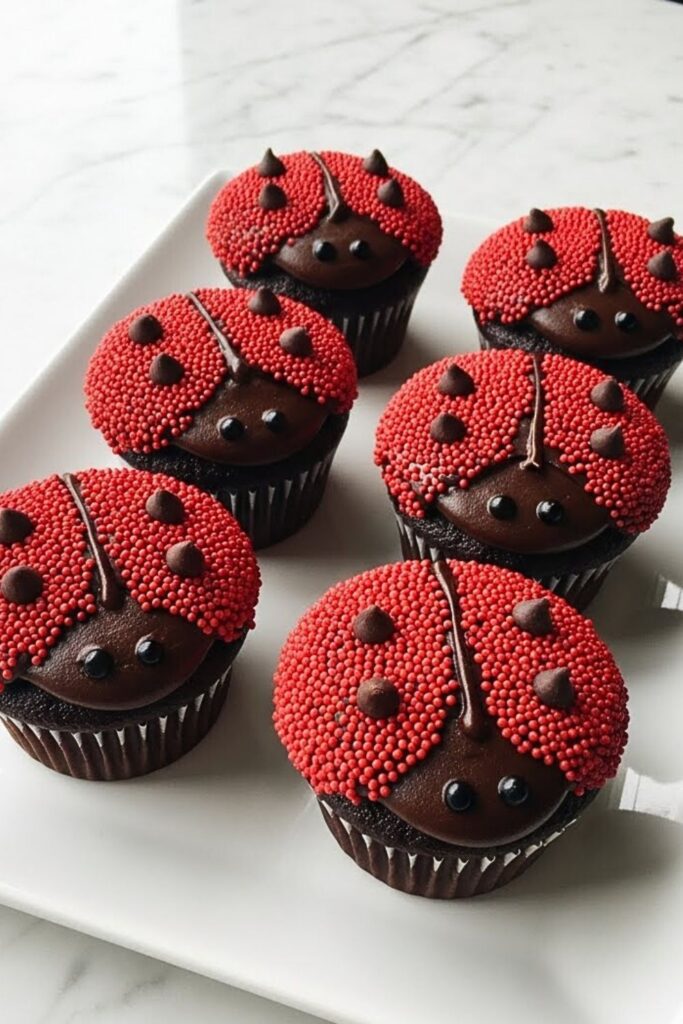
These adorable cupcakes are perfect for kids and adults alike—rich chocolate cake decorated to look like little ladybugs with red sprinkles and chocolate chip “spots.” Emma named these after watching me make the first batch, and the name stuck!
| Prep Time | 15 minutes |
| Bake Time | 18 minutes |
| Servings | 12 cupcakes |
| Difficulty | Easy |
| Calories | ~285 per cupcake |
Essential Equipment:
- Standard muffin tin – For perfectly sized cupcakes every time.
- Paper cupcake liners – Keeps cleanup simple and adds color.
- Electric hand mixer – Makes mixing batter smooth and effortless.
- Wire cooling rack – Essential for preventing soggy bottoms.
Ingredients:
For the Cupcakes:
- 1½ cups all-purpose flour
- ½ cup unsweetened cocoa powder
- 1 cup granulated sugar
- 1 teaspoon baking soda
- ½ teaspoon salt
- 1 cup warm water
- ⅓ cup vegetable oil
- 1 tablespoon white vinegar
- 1 teaspoon vanilla extract
For the Decoration:
- 1 cup chocolate buttercream frosting
- Red sprinkles or sanding sugar
- Mini chocolate chips
- Black decorating gel or mini chocolate chips for eyes
Instructions:
- Preheat your oven to 350°F and line your muffin tin with those festive liners—I always use red or pink for Valentine’s Day because presentation matters, even for beginners!
- Whisk together the flour, cocoa powder, sugar, baking soda, and salt in a large bowl. This is what I call the “no-fail” method because you’re mixing dry ingredients first, which means less chance of overmixing later.
- Add the warm water, oil, vinegar, and vanilla to your dry ingredients. Mix with your hand mixer on medium speed for about 2 minutes until the batter looks smooth and slightly glossy—you’ll notice it’s pretty thin, and that’s exactly what we want for moist cupcakes.
- Fill each liner about two-thirds full. I learned this the hard way after creating chocolate mushroom clouds in my oven—trust me, two-thirds is the magic number.
- Bake for 18-20 minutes until a toothpick inserted in the center comes out clean. Let them cool in the pan for 5 minutes, then transfer to a wire rack to cool completely. Don’t skip the cooling step or your frosting will slide right off!
- Once cooled, frost each cupcake with a generous dome of chocolate buttercream. While the frosting is still soft, sprinkle one half with red sprinkles to create the “wing,” then add 3-4 mini chocolate chips as spots.
- Use black decorating gel or tiny chocolate chips to create eyes at the top. The kids absolutely love helping with this part—even if the love bugs end up looking a little cross-eyed!
2. Pink Maraschino Cherry Cupcakes
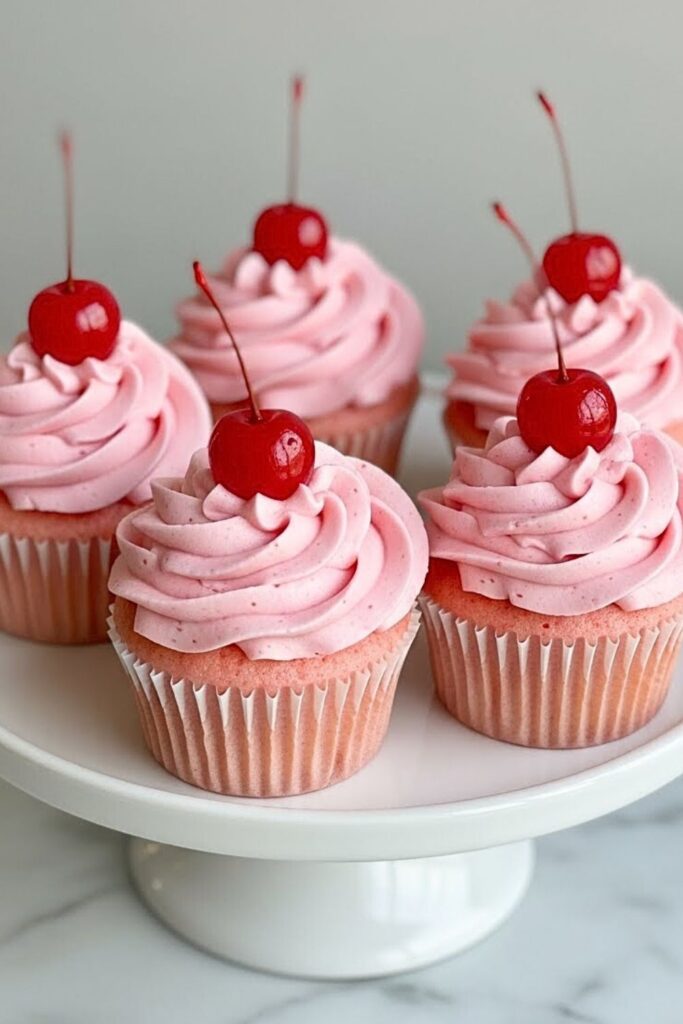
There’s something wonderfully retro about maraschino cherries, and these cupcakes capture that nostalgic flavor perfectly. The batter gets a beautiful blush color from the cherry juice, and each bite delivers that sweet cherry taste we all secretly love.
| Prep Time | 20 minutes |
| Bake Time | 20 minutes |
| Servings | 12 cupcakes |
| Difficulty | Easy |
| Calories | ~295 per cupcake |
Essential Equipment:
- Standard muffin tin – Ensures even baking every time.
- Cupcake liners – Makes cleanup a breeze.
- Stand mixer or hand mixer – For perfectly creamed butter.
Ingredients:
For the Cupcakes:
- 1½ cups all-purpose flour
- 1½ teaspoons baking powder
- ¼ teaspoon salt
- ½ cup unsalted butter, softened
- 1 cup granulated sugar
- 2 large eggs, room temperature
- ½ teaspoon vanilla extract
- ½ teaspoon almond extract
- ½ cup whole milk
- ¼ cup maraschino cherry juice
- 12 maraschino cherries, chopped
For the Frosting:
- 1 cup unsalted butter, softened
- 4 cups powdered sugar
- 3 tablespoons maraschino cherry juice
- Pink food coloring (optional)
- Whole maraschino cherries for topping
Instructions:
- Preheat oven to 350°F and line your muffin tin with paper liners. I like using white liners for these, so the pretty pink color really shows through.
- Whisk the flour, baking powder, and salt together in a medium bowl. Set this aside—we’ll need it in a minute.
- Cream the softened butter and sugar together for about 3 minutes until it’s light and fluffy. You’ll know it’s ready when the mixture looks almost white and has doubled in volume—this is where the magic starts!
- Add eggs one at a time, beating well after each addition. Mix in the vanilla and almond extracts. That almond extract is the secret ingredient that makes these taste like classic cherry almond cookies!
- Combine the milk and cherry juice in a measuring cup. Now here’s the technique: add one-third of your flour mixture to the butter mixture, mix until just combined, then add half the liquid. Repeat, ending with the flour. Don’t overmix—I learned this lesson after making hockey pucks instead of cupcakes!
- Gently fold in the chopped cherries. The batter will be a beautiful pale pink at this point, and your kitchen will smell amazing.
- Fill liners two-thirds full and bake for 18-20 minutes until the tops spring back when lightly touched. Cool completely before frosting.
- For the frosting, beat butter until creamy, then gradually add powdered sugar. Add cherry juice one tablespoon at a time until you reach your desired consistency and flavor. Add a drop or two of pink food coloring if you want a more vibrant shade.
- Frost generously and top each cupcake with a whole maraschino cherry. These look like they came straight from a vintage bakery!
3. Vanilla Cupcakes with LOVE Toppers
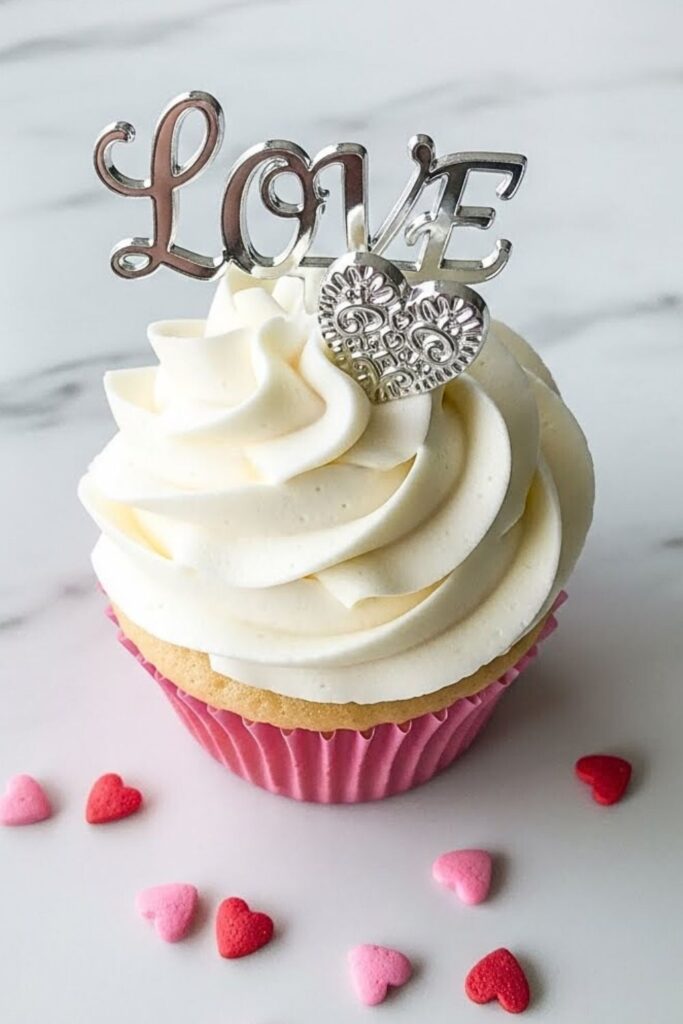
Sometimes the simplest recipes are the most versatile, and these cute Valentine cupcake ideas prove exactly that. Classic vanilla cupcakes become Valentine-ready with pretty toppers—you can use letter picks spelling “LOVE,” heart-shaped sprinkles, or even handwritten tags.
| Prep Time | 15 minutes |
| Bake Time | 18 minutes |
| Servings | 12 cupcakes |
| Difficulty | Easy |
| Calories | ~270 per cupcake |
Essential Equipment:
- Muffin tin – The foundation of great cupcakes.
- Cupcake liners – Choose festive colors for Valentine’s Day.
- Hand or stand mixer – Makes light work of creaming butter.
Ingredients:
For the Cupcakes:
- 1½ cups all-purpose flour
- 1½ teaspoons baking powder
- ½ teaspoon salt
- ½ cup unsalted butter, room temperature
- 1 cup granulated sugar
- 2 large eggs
- 2 teaspoons pure vanilla extract
- ½ cup whole milk
For the Frosting:
- 1 cup unsalted butter, softened
- 3-4 cups powdered sugar
- 2 teaspoons vanilla extract
- 2-3 tablespoons heavy cream
- Red or pink food coloring (optional)
For Decoration:
- Letter toppers spelling “LOVE”
- Heart-shaped sprinkles
- Edible glitter or sanding sugar
Instructions:
- Preheat your oven to 350°F and line the muffin tin with liners. I always make sure my oven is fully preheated before baking—it makes such a difference in how evenly they rise.
- In a medium bowl, whisk together flour, baking powder, and salt. This is your dry mixture, so set it aside for now.
- Beat the butter and sugar together until pale and fluffy, about 3-4 minutes. Don’t rush this step—properly creamed butter creates those perfect little air pockets that make cupcakes light and tender.
- Add eggs one at a time, mixing well after each. Stir in that vanilla extract—use the good stuff here because vanilla is the star of the show!
- With your mixer on low, alternate adding the flour mixture and milk, starting and ending with flour. Mix until just combined. The batter should be smooth but not overmixed—you’ll see just a few small lumps, and that’s perfectly fine.
- Divide batter evenly among liners, filling each about two-thirds full. Bake for 18-20 minutes until a toothpick comes out clean or with just a few moist crumbs.
- Cool in the pan for 5 minutes, then transfer to a wire rack. These need to be completely cool before frosting, so be patient—I like to bake mine in the morning for afternoon decorating.
- For the frosting, beat softened butter until creamy, then gradually add powdered sugar one cup at a time. Add vanilla and cream, beating until light and fluffy. If you want pink or red frosting, add food coloring drop by drop until you achieve your desired shade.
- Frost each cupcake using a spatula, piping bag, or even a ziplock bag with the corner snipped off—whatever works for you! Add your “LOVE” toppers, sprinkles, or other decorations while the frosting is still soft.
4. Red Velvet Cupcakes with Whipped Cream Cheese Frosting
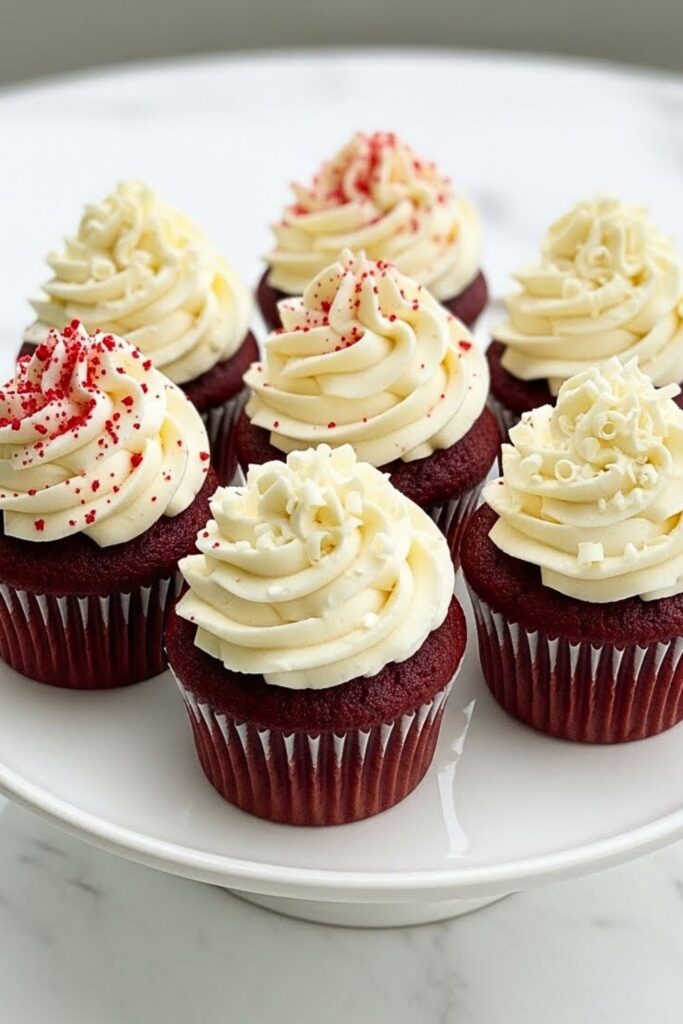
Red velvet is the unofficial official flavor of Valentine’s Day, and these cupcakes deliver that signature tangy-sweet flavor with a cloud-like cream cheese frosting. I’ve been perfecting this recipe for years, and now it’s yours!
| Prep Time | 20 minutes |
| Bake Time | 20 minutes |
| Servings | 12 cupcakes |
| Difficulty | Medium |
| Calories | ~310 per cupcake |
Essential Equipment:
- Muffin tin – Essential for perfectly shaped cupcakes.
- Paper liners – Prevents sticking and looks pretty.
- Electric mixer – Makes the frosting light and whipped.
- Piping bag with star tip – For that bakery-style presentation.
Ingredients:
For the Cupcakes:
- 1¼ cups all-purpose flour
- ¾ cup granulated sugar
- ½ teaspoon baking soda
- ½ teaspoon salt
- 1 tablespoon cocoa powder
- ¾ cup vegetable oil
- ½ cup buttermilk, room temperature
- 1 large egg
- 1 tablespoon red food coloring
- ½ teaspoon vanilla extract
- ½ teaspoon white vinegar
For the Whipped Cream Cheese Frosting:
- 8 oz cream cheese, softened
- ¼ cup unsalted butter, softened
- 2½ cups powdered sugar
- 1 teaspoon vanilla extract
- 2 tablespoons heavy cream
Instructions:
- Preheat the oven to 350°F and line your muffin tin. Red velvet batter can stain, so definitely don’t skip the liners on this one!
- In a large bowl, whisk together flour, sugar, baking soda, salt, and cocoa powder. The cocoa is subtle here—it’s not about making these chocolatey, but rather giving them that distinctive red velvet flavor.
- In another bowl, whisk together the oil, buttermilk, egg, food coloring, vanilla, and vinegar. I know adding vinegar seems weird, but trust me—it reacts with the baking soda to create the most incredible tender crumb.
- Pour the wet ingredients into the dry ingredients and whisk until just combined. The batter will be thin and a gorgeous deep red color. Don’t panic if it seems too liquid—that’s exactly right!
- Fill each liner about two-thirds full and bake for 18-20 minutes. You’ll know they’re done when the tops spring back when gently pressed.
- Let cool in the pan for 10 minutes, then transfer to a wire rack to cool completely. Red velvet cupcakes are particularly sensitive to being frosted warm—the frosting will melt right off, and you’ll be sad.
- For the frosting, beat cream cheese and butter together until smooth and fluffy, about 2 minutes. Gradually add powdered sugar, beating on low at first to avoid a sugar cloud in your kitchen!
- Add vanilla and heavy cream, then beat on high for 2-3 minutes until the frosting is light, whipped, and almost doubled in volume. This whipped texture is what sets this frosting apart from regular cream cheese frosting.
- Pipe or spread generously onto cooled cupcakes. I like to add a light dusting of white chocolate shavings or red sprinkles for that extra Valentine’s touch.
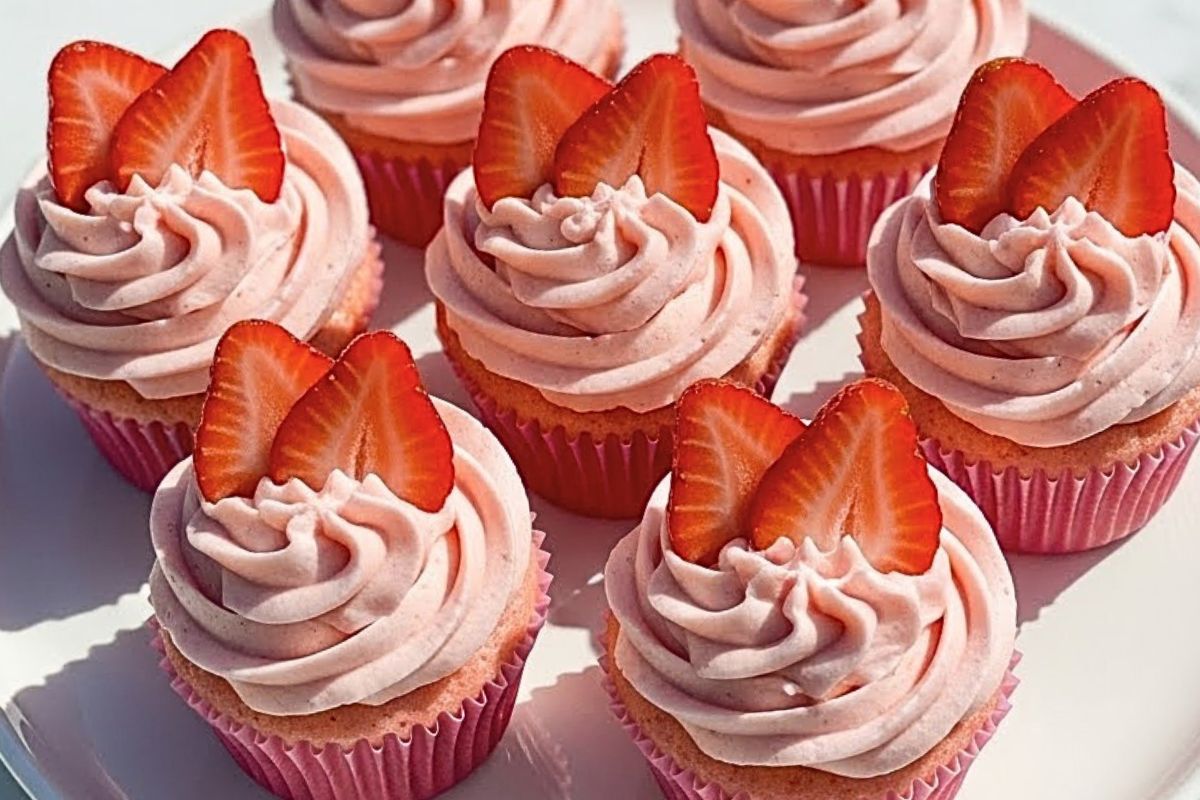
5. Strawberry Milkshake Cupcakes with Fresh Berry Top
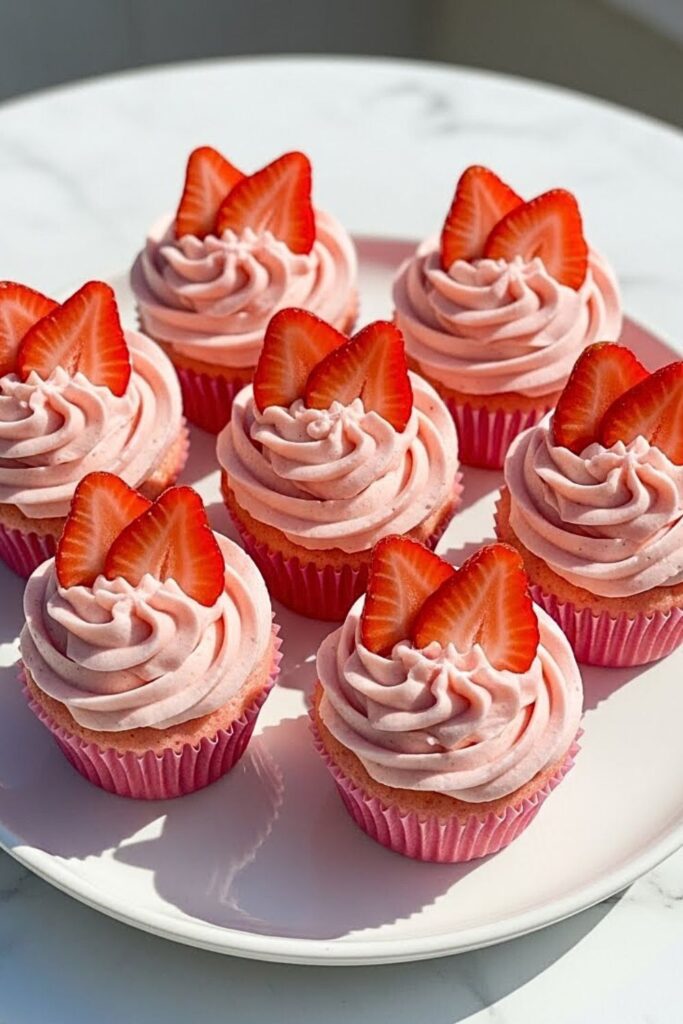
These cupcakes taste exactly like drinking a strawberry milkshake—sweet, creamy, and packed with real strawberry flavor. Topping them with fresh berries makes them look fancy, but I promise they’re beginner-friendly!
| Prep Time | 25 minutes |
| Bake Time | 20 minutes |
| Servings | 12 cupcakes |
| Difficulty | Easy |
| Calories | ~300 per cupcake |
Essential Equipment:
- Standard muffin tin – For even, consistent baking.
- Cupcake liners – Makes serving easy.
- Food processor or blender – To puree fresh strawberries.
Ingredients:
For the Cupcakes:
- 1½ cups all-purpose flour
- 1½ teaspoons baking powder
- ¼ teaspoon salt
- ½ cup unsalted butter, softened
- 1 cup granulated sugar
- 2 large eggs
- 1 teaspoon vanilla extract
- ½ cup strawberry puree (about 1 cup fresh strawberries, blended)
- ¼ cup whole milk
For the Frosting:
- 1 cup unsalted butter, softened
- 4 cups powdered sugar
- ⅓ cup strawberry puree
- Pink food coloring (optional)
For Topping:
- Fresh strawberries, sliced or halved
- Whipped cream (optional)
Instructions:
- Start by making your strawberry puree. Blend fresh strawberries until completely smooth, then strain through a fine-mesh sieve to remove seeds if you prefer—I usually skip this step because I don’t mind the little seeds, but it’s up to you!
- Preheat oven to 350°F and line your muffin tin with liners. I think pink or red liners look especially cute with these.
- Whisk flour, baking powder, and salt in a medium bowl. Set aside while we work on the fun part.
- Cream butter and sugar until light and fluffy—this takes about 3 minutes, and you’ll see the mixture turn almost white. Here’s where most people go wrong: they don’t cream long enough, so be patient!
- Add eggs one at a time, beating well after each addition. Mix in vanilla extract and your strawberry puree. The batter will look a little curdled at this point, but don’t worry—it’ll come together perfectly.
- Alternate adding the flour mixture and milk to the butter mixture, beginning and ending with flour. Mix on low speed until just combined—those little lumps you see are totally fine.
- Divide batter among liners, filling each about two-thirds full. Bake for 18-22 minutes until a toothpick comes out clean. These might take slightly longer than other cupcakes because of the moisture from the strawberry puree.
- Cool completely before frosting. I learned this lesson after watching my beautiful pink frosting slide off like an avalanche—not cute!
- For the frosting, beat butter until creamy, then gradually add powdered sugar. Mix in strawberry puree a tablespoon at a time until you reach the desired flavor and consistency. The frosting should be thick but pipeable—if it’s too thin, add more powdered sugar; too thick, add a tiny splash of milk.
- Frost cupcakes generously and top each with a fresh strawberry slice or half. These look so pretty arranged on a platter, and they taste even better than they look!
6. Dark Chocolate Cupcakes with Pink Marshmallow Frosting
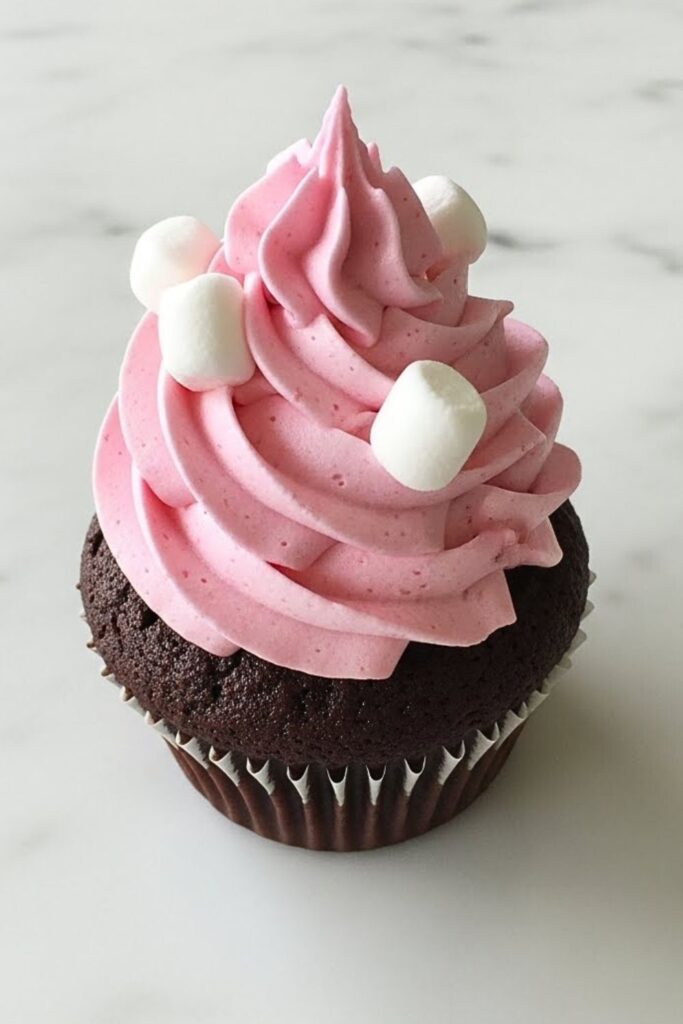
Rich, deeply chocolatey cupcakes topped with fluffy pink marshmallow frosting create the perfect contrast. This is my go-to recipe when I want something that looks impressive but comes together quickly—perfect for Valentine’s Day cupcake ideas that wow.
| Prep Time | 15 minutes |
| Bake Time | 20 minutes |
| Servings | 12 cupcakes |
| Difficulty | Easy |
| Calories | ~320 per cupcake |
Essential Equipment:
- Muffin tin – For perfectly baked cupcakes.
- Paper liners – Essential for easy removal.
- Hand mixer – Makes frosting light and fluffy.
Ingredients:
For the Cupcakes:
- 1 cup all-purpose flour
- ½ cup unsweetened cocoa powder
- 1 cup granulated sugar
- 1 teaspoon baking soda
- ½ teaspoon baking powder
- ½ teaspoon salt
- 1 large egg
- ½ cup hot coffee (or hot water)
- ½ cup buttermilk
- ¼ cup vegetable oil
- 1 teaspoon vanilla extract
For the Pink Marshmallow Frosting:
- 1 cup unsalted butter, softened
- 7 oz marshmallow fluff
- 2-3 cups powdered sugar
- 1 teaspoon vanilla extract
- Pink food coloring
- Mini marshmallows for topping (optional)
Instructions:
- Preheat oven to 350°F and line muffin tin with liners. These cupcakes are intensely chocolate, so I usually use contrasting white or pink liners.
- In a large bowl, whisk together flour, cocoa powder, sugar, baking soda, baking powder, and salt. Make sure there aren’t any lumps in the cocoa powder—I usually sift it first because I’m paranoid about cocoa lumps!
- In another bowl, whisk together egg, hot coffee (this intensifies the chocolate flavor without making it taste like coffee—trust me!), buttermilk, oil, and vanilla.
- Pour wet ingredients into dry ingredients and mix until just combined. The batter will be quite thin—that’s exactly what we want for moist, fudgy cupcakes.
- Fill liners about two-thirds full and bake for 18-20 minutes until a toothpick comes out with just a few moist crumbs. Don’t overbake these or they’ll lose that fudgy texture.
- Cool in pan for 5 minutes, then transfer to a wire rack. These need to cool completely because the marshmallow frosting is sensitive to heat.
- For the frosting, beat butter until light and fluffy, about 2 minutes. Add marshmallow fluff and beat until combined—it’ll look a bit weird at first, but keep mixing!
- Gradually add powdered sugar until you reach your desired consistency. Add vanilla and a few drops of pink food coloring. Beat on high for another minute until the frosting is fluffy and cloud-like.
- Frost cupcakes generously—I like using a piping bag for these because the frosting is so pretty swirled high. Top with mini marshmallows if you’re feeling extra festive. The contrast between the dark chocolate and pink frosting is absolutely stunning!
7. White Chocolate Cupcakes with Raspberry Filling
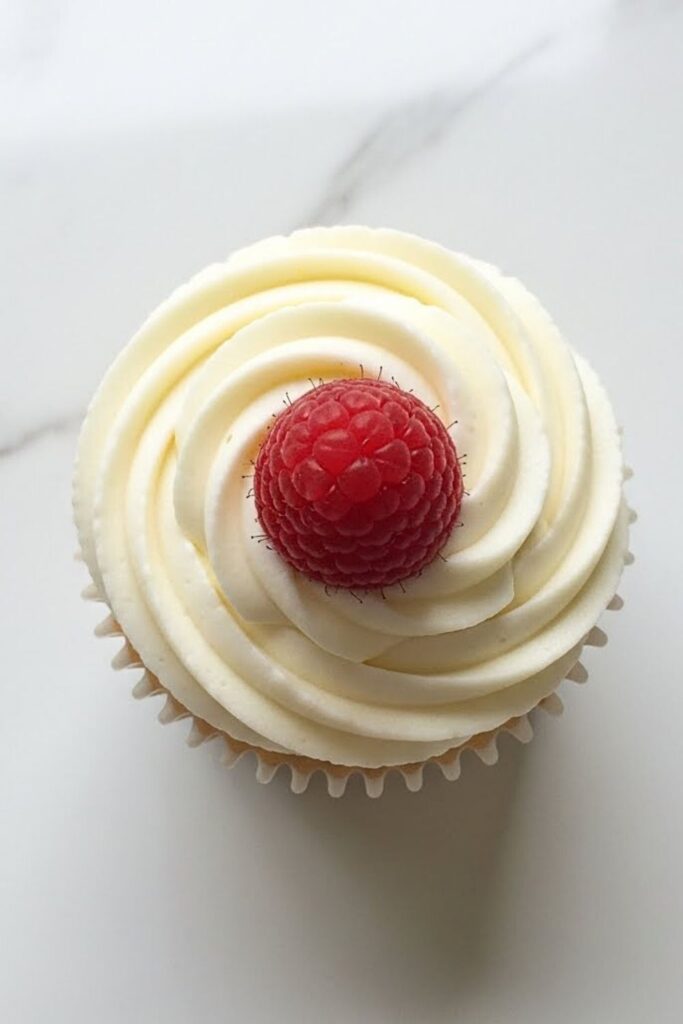
These might be the most elegant cupcakes on this list, but they’re still totally doable for beginners. The surprise raspberry filling in the center makes every bite special, and white chocolate adds a luxurious touch that’s perfect for Valentine’s Day.
| Prep Time | 30 minutes |
| Bake Time | 20 minutes |
| Difficulty | Medium |
| Calories | ~335 per cupcake |
Essential Equipment:
- Standard muffin tin – Foundation for perfect cupcakes.
- Cupcake liners – Makes these easy to serve.
- Electric mixer – Helps incorporate white chocolate smoothly.
- Small cookie scoop or melon baller – For creating the filling cavity.
Ingredients:
For the Cupcakes:
- 1½ cups all-purpose flour
- 1½ teaspoons baking powder
- ¼ teaspoon salt
- ½ cup unsalted butter, softened
- ¾ cup granulated sugar
- 2 large eggs
- 1 teaspoon vanilla extract
- ½ cup whole milk
- 4 oz white chocolate, melted and cooled
For the Raspberry Filling:
- 1 cup fresh or frozen raspberries
- ¼ cup granulated sugar
- 1 teaspoon lemon juice
- 1 teaspoon cornstarch
For the White Chocolate Frosting:
- 1 cup unsalted butter, softened
- 3-4 cups powdered sugar
- 4 oz white chocolate, melted and cooled
- 2 tablespoons heavy cream
- 1 teaspoon vanilla extract
- Fresh raspberries for garnish
Instructions:
- First, make the raspberry filling so it has time to cool. Combine raspberries, sugar, lemon juice, and cornstarch in a small saucepan over medium heat. Stir frequently until the mixture thickens and becomes jam-like, about 8-10 minutes. Let cool completely—I usually make this the night before because patience isn’t my strong suit!
- Preheat oven to 350°F and line muffin tin with liners. The filling process can get a tiny bit messy, so I like using sturdy liners that won’t fall apart.
- Whisk flour, baking powder, and salt in a medium bowl. Set aside.
- Cream butter and sugar until light and fluffy, about 3 minutes. Add eggs one at a time, beating well after each. Mix in vanilla extract.
- Here’s the tricky part: add your cooled, melted white chocolate to the butter mixture. Mix on low speed until just combined—if the white chocolate isn’t cool enough, it can seize up, so make sure it’s just barely warm to the touch.
- Alternate adding flour mixture and milk, beginning and ending with flour. Mix until just combined—overmixing at this stage makes tough cupcakes, and after years of testing, I’ve found that fewer strokes are always better.
- Fill liners two-thirds full and bake for 18-20 minutes until tops are golden and spring back when touched. Cool in pan for 10 minutes, then transfer to a wire rack to cool completely.
- Once cooled, use a small cookie scoop or melon baller to remove a small core from the center of each cupcake—don’t go all the way to the bottom! Fill each cavity with about 1 teaspoon of raspberry filling. You can either eat the removed cake pieces (baker’s privilege!) or crumble them on top for decoration.
- For the frosting, beat butter until creamy. Gradually add powdered sugar, then mix in cooled melted white chocolate, cream, and vanilla. Beat on high for 2-3 minutes until light and fluffy.
- Frost generously and top each cupcake with a fresh raspberry. These look like they came straight from a fancy bakery, but only you need to know how simple they actually were!
General Tips & Notes for Valentine Cupcakes
Baking Tips:
After making hundreds of cupcakes (occupational hazard!), I’ve learned that success really comes down to a few key things. First, room temperature ingredients are non-negotiable—I take my eggs and butter out at least an hour before baking. They blend so much better and create a smoother, more cohesive batter. Second, don’t skip the cooling time. I know it’s tempting to frost warm cupcakes, but warm cake equals melted frosting equals disappointment. Set a timer if you must, but let them cool completely! Third, filling your cupcake liners two-thirds full is the sweet spot—I use an ice cream scoop for perfectly portioned, evenly-sized cupcakes every single time.
Troubleshooting:
If your cupcakes sink in the middle, your oven temperature is probably too high—ovens can be surprisingly inaccurate, so I swear by my oven thermometer. Dense, heavy cupcakes usually mean you’ve overmixed the batter once the flour is added. Mix until you just barely can’t see flour streaks anymore, then stop! If your frosting is too runny, pop it in the fridge for 10-15 minutes and re-whip it—it works like magic. And if your frosting is too stiff, add cream or milk one teaspoon at a time until it reaches that perfect spreadable consistency.
Variations:
All of these recipes are wonderfully flexible! You can easily swap extracts—almond, peppermint, or even coconut extract can completely change the flavor profile. Don’t have buttermilk? Mix regular milk with a tablespoon of lemon juice or white vinegar and let it sit for 5 minutes—instant buttermilk! For gluten-free versions, I’ve had great success using 1:1 gluten-free baking flour in place of regular flour in all of these recipes. And if you’re short on time, store-bought frosting works perfectly fine—I won’t tell if you won’t! Just whip it with a mixer for a minute to make it fluffier and pipe it on for that homemade look.
More Related Recipes
Looking for more Valentine’s Day inspiration? Check out these reader favorites:
- 15 Beginner Valentine’s Day Desserts
- 10 Heart-Shaped Cake Ideas Perfect for Any Celebration
- 12 Beginner-Friendly Valentine’s Cake Ideas
- 10 Beginner-Friendly Valentine’s Cookie Recipes
Conclusion
These seven Valentine cupcakes for beginners prove that you don’t need professional training to create something beautiful and delicious. Whether you’re drawn to the playful Love Bug cupcakes, the nostalgic cherry flavor, or the elegant white chocolate raspberry combo, each recipe is designed to help you succeed on your first try.
I love that Valentine’s Day gives us an excuse to spend time in the kitchen creating something made with love. Emma and Lucas already have their favorites picked out for this year’s Valentine’s party—spoiler alert, anything with marshmallow frosting is an instant winner in our house! Don’t stress about making them perfect. The beauty of these cupcakes is in the joy of making them and sharing them with people you care about. Happy baking, and I hope your kitchen smells like love all month long!