No-Bake Strawberry Icebox Cake
So, I’ll never forget the first summer I discovered icebox cakes. I was visiting my friend Sarah’s beach house, desperately searching for a dessert that wouldn’t heat the kitchen, and she pulled this gorgeous layered creation from the refrigerator. Those tender, cake-like graham crackers soaked in sweet cream, the burst of fresh strawberries – I was completely hooked! The best part? No oven required. After years of making this no-bake strawberry icebox cake for every summer gathering, potluck, and family barbecue, I’ve perfected the technique. Trust me on this one – this is the dessert you’ll want in your rotation all season long. The smell of fresh strawberries mixed with vanilla-scented whipped cream is absolutely heavenly, and watching the layers transform overnight in the fridge never gets old. I promise, if you can whip cream and stack ingredients, you can master this!
Jump to
| Prep Time | Chill Time | Total Time | Servings | Calories (per serving) |
|---|---|---|---|---|
| 15 min | 4 h | 4 h 15 min | 9 | ~321 |
No-Bake Strawberry Icebox Cake Ingredients
The secret to an incredible no-bake strawberry icebox cake starts with quality ingredients – and the good news is, you only need five simple things! I always use the freshest strawberries I can find at the farmers market, and real heavy cream (not the stuff in a tub). Trust me, it makes all the difference in creating those luscious, fluffy layers!
For the Cream:
- 2 cups heavy whipping cream
- ½ cup powdered sugar
- 1 teaspoon vanilla
For the Layers:
- 1 pound strawberries, sliced
- 7.2 ounces graham crackers (1.5 sleeves)
Essential Equipment for No-Bake Strawberry Icebox Cake
You don’t need a fancy kitchen to make this stunning strawberry icebox cake! Here are the tools I reach for every time, plus my honest recommendations from years of testing.
| Equipment | Why You Need It | Check Price |
|---|---|---|
| KitchenAid Classic Stand Mixer | Whips cream to perfect stiff peaks in under 5 minutes every time | ⭐⭐⭐⭐⭐ Check on Amazon |
| Anchor Hocking 9×9 Glass Baking Dish | I love seeing those beautiful layers through the sides – gorgeous! | ⭐⭐⭐⭐⭐ Check on Amazon |
| OXO Good Grips Silicone Spatula | Perfect for spreading cream smoothly without tearing those layers | ⭐⭐⭐⭐⭐ Check on Amazon |
How to Make No-Bake Strawberry Icebox Cake: Step-by-Step
Okay, this is where the magic happens! I’ll walk you through every single step. Take your time – this is easier than it looks, I promise! While your bowl and beaters are chilling in the freezer (yes, we’re doing that!), you can slice up those gorgeous strawberries.
1. Whip the Cream to Stiff Peaks (3-5 minutes)
Here’s my favorite part – watching plain cream transform into fluffy clouds! First, pop your mixing bowl and beaters into the freezer for about 10 minutes while you prep your strawberries. This little trick helps the cream whip faster and hold its shape better.
In a stand mixer or with a hand-held mixer, beat the cream, powdered sugar, and vanilla until stiff peaks form.
You’ll know it’s ready when you lift the beaters and the cream holds its shape in firm peaks that stand straight up – not floppy! This takes less than five minutes with an electric mixer. Don’t overbeat, though, or you’ll end up with butter (ask me how I know). Stop mixing as soon as those peaks hold their shape. The mixture should look light, fluffy, and absolutely dreamy!
2. Create Your First Layer (2-3 minutes)
Now here’s where patience becomes your best friend. I learned this the hard way after watching my graham crackers slide around like ice skaters!
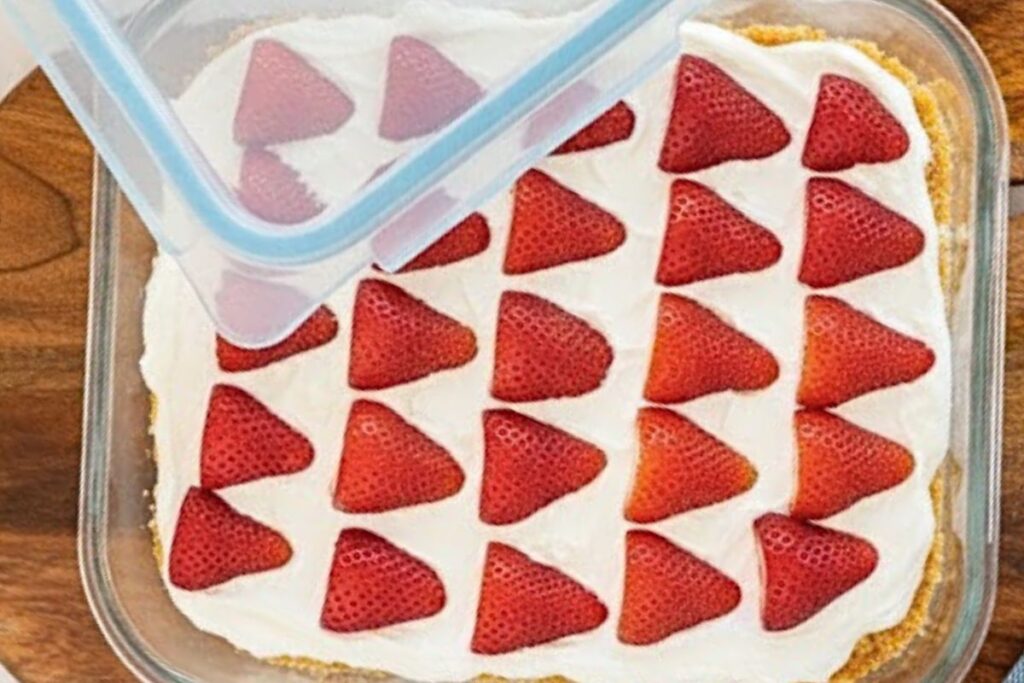
Place a very thin layer of cream on the bottom of a 9×9 square pan. Next, add a single layer of graham crackers. Top with 1/3 of the whipped cream and smooth with a spatula. Add 1/3 of the strawberries in an even layer.
That initial smear of whipped cream is crucial – it acts like glue, keeping everything in place. Break the graham crackers to fit those gaps; it doesn’t need to be perfect. Then spread about one-third of your gorgeous whipped cream over the crackers, making sure to reach all the edges. Layer one-third of your sliced strawberries on top in an even layer. Take your time smoothing each layer with your spatula – this creates those picture-perfect layers you’ll see when you slice into it!
3. Repeat the Layers (5 minutes)
This is where your no-bake strawberry icebox cake really starts to come together, and honestly, it’s so satisfying to watch the layers stack up!
Repeat layers 2 more times, ending with strawberries. Arrange the berries in a pretty pattern, if desired.
So you’ll do: graham crackers, cream, strawberries, then repeat two more times. For that final top layer of strawberries, I like to arrange them in a pretty pattern – maybe in neat rows or a circular design – because this is what everyone sees first! Don’t worry if it’s not Instagram-perfect; mine rarely is, and they disappear so fast that nobody cares. The most important thing is ending with strawberries on top, so you get that gorgeous pop of red.
4. Chill and Let the Magic Happen (4 hours or overnight)
Here’s where the real transformation occurs – and I know waiting is the hardest part!
Cover with plastic wrap and refrigerate for at least 4 hours or overnight before serving.
I always make this the night before I need it because the longer it sits, the better it gets. During those hours in the fridge, the graham crackers absorb the cream and soften into this tender, cake-like texture. The strawberries release their sweet juices into the cream, and everything melds together into something absolutely magical. If you try to cut into it too early, you’ll just have a stack of crackers and cream – trust me, I learned that lesson at my first dinner party! Four hours minimum, but overnight is even better.
Sophie’s Notes
Storage & Freshness This cake keeps beautifully in the refrigerator for up to 3 days, covered with plastic wrap. After that, the crackers can get a bit too soft, and the strawberries start releasing more liquid. Honestly though, in my house, it never lasts more than 24 hours! I don’t recommend freezing this one – the strawberries and cream don’t thaw well, and you’ll lose that perfect texture we’re going for.
Fresh vs. Frozen Strawberries – This Is Important! Fresh strawberries are absolutely the best for this recipe. I personally have not tested this with frozen strawberries, but here’s the thing – if you do decide to try frozen, you’ll need to thaw them completely on paper towels first. Thawed strawberries release a lot of liquid that can make your cake soggy and turn those beautiful layers into a mushy mess. I learned to always keep extra fresh strawberries on hand because I can’t help eating them while I’m slicing!
The Cold Bowl Trick While my bowl and beaters are chilling in the freezer, I slice up the strawberries. This 10-minute chill time is a game-changer for whipping cream – it helps the cream whip faster and hold its shape better. I set a timer so I don’t forget about them! If you’re in a rush, you can skip this step, but it’ll take a bit longer to reach stiff peaks.
Assembly Tips for Perfect Layers Here’s what I’ve learned after making this countless times: place a smear of whipped cream on the bottom of your pan first – this will keep your graham crackers from slip-sliding around when you try to add the next layer. You’ll need to cut some crackers to fit the gaps, and that’s totally normal! I just break them with my hands; no need to get fancy with a knife.
Make-Ahead Magic This is actually the perfect make-ahead dessert, which is why I love it for summer parties. You can assemble the entire thing the night before, cover it with plastic wrap, and refrigerate overnight. The crackers will be perfectly cake-like by the time you’re ready to serve. In fact, I think it tastes even better the next day because the flavors have more time to meld together!
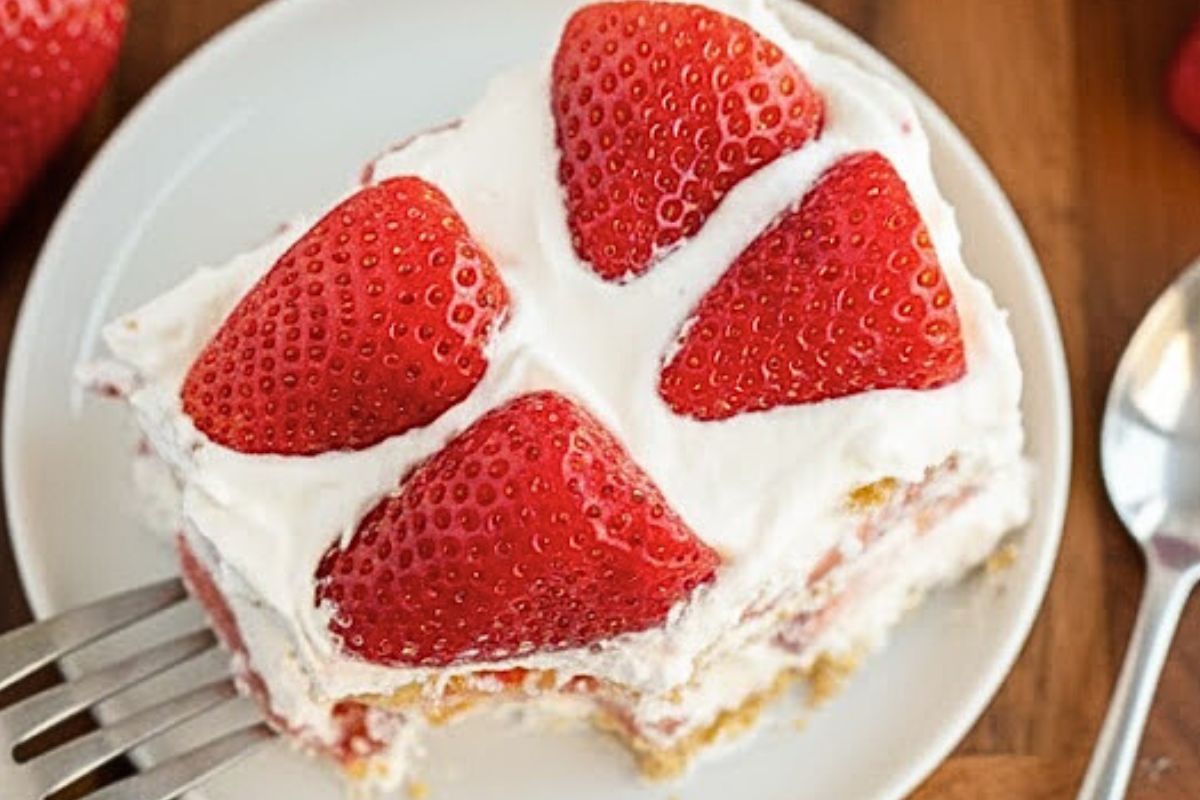
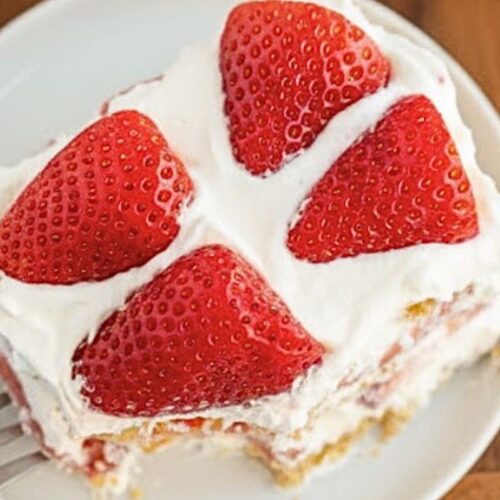
Serving Suggestions I like to cut this into 9 generous squares and serve them on pretty plates. For extra flair, I sometimes add a small dollop of whipped cream and a fresh strawberry on top of each slice right before serving. David likes to drizzle a tiny bit of chocolate sauce over his (don’t tell Nonna Rosa I allowed that!). This is also incredible served alongside vanilla ice cream on really hot days.
The Overnight Transformation The first time I made this, I peeked at it after just 2 hours and panicked – it still looked like stacked crackers! But here’s the magic: during those hours in the fridge, the crackers absorb the cream and strawberry juices, transforming into this tender, cake-like texture. The strawberries lend their fruity sweetness to the cream, and everything comes together into something completely different from what you started with. It’s honestly one of the coolest transformations in baking!
Common Mistake: Not Enough Cream on the Edges This is where most people go wrong – make sure you spread that whipped cream all the way to the edges of your pan. If you leave gaps, the crackers won’t soften evenly, and you’ll end up with crunchy corners. I use my offset spatula and really push the cream to the edges. It doesn’t need to be perfect, but it should reach all the way around.
Extra Strawberries Are Your Friend I always buy about a quarter pound more strawberries than the recipe calls for. First, because I inevitably eat some while I’m slicing (they’re just so good!). Second, because having a few extra means you can make that top layer look absolutely gorgeous without worrying about running out. Plus, you can use any leftovers to garnish the individual slices when serving.
I can’t wait for you to try this no-bake strawberry icebox cake! There’s something so special about pulling this beautiful layered dessert from the refrigerator – watching your friends and family’s faces light up when they see those gorgeous strawberry layers through the glass dish never gets old. This recipe has saved me on countless hot summer days when turning on the oven was absolutely out of the question. The crackers transform into the most tender, cake-like texture, the strawberries lend their fruity sweetness to the cream, and trust me, your friends and family will thank you! Don’t forget to leave a comment below and let me know how yours turned out – I read every single one, and I love hearing about your summer gatherings. Tag me on Instagram @sophiesweetkitchen with a photo of your beautiful creation. I can’t wait to see those gorgeous layers! Happy baking (well, not-baking!), friends!
Recipe Card
No-Bake Strawberry Icebox Cake
Ingredients
For the Cream:
- 2 cups heavy whipping cream
- ½ cup powdered sugar
- 1 teaspoon vanilla
For the Layers:
- 1 pound strawberries sliced
- 7.2 ounces graham crackers 1.5 sleeves
Instructions
- Whip the Cream: In a stand mixer or with a hand-held mixer, beat the cream, powdered sugar, and vanilla until stiff peaks form (3-5 minutes). For best results, chill your mixing bowl and beaters in the freezer for 10 minutes before whipping.
- Create First Layer: Place a very thin layer of cream on the bottom of a 9×9 square pan. Next, add a single layer of graham crackers, breaking them to fit as needed. Top with 1/3 of the whipped cream and smooth with a spatula. Add 1/3 of the strawberries in an even layer.
- Repeat Layers: Repeat layers 2 more times (graham crackers, cream, strawberries), ending with strawberries on top. Arrange the berries in a pretty pattern, if desired.
- Chill: Cover with plastic wrap and refrigerate for at least 4 hours or overnight before serving. The longer it chills, the better the texture!