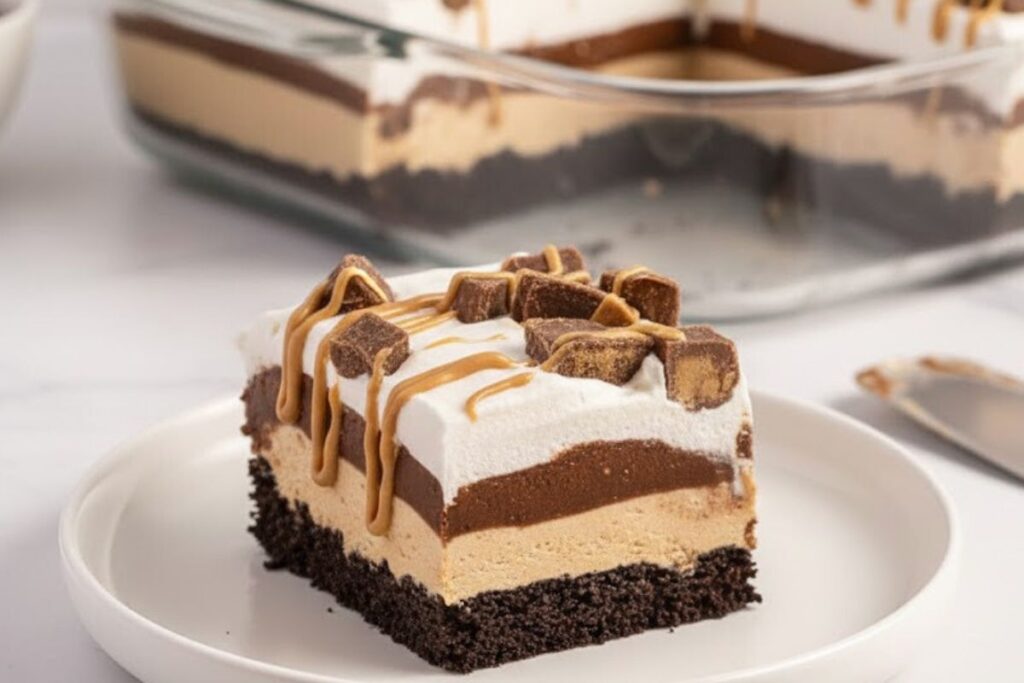
No-Bake Peanut Butter Chocolate Lush (The Ultimate Crowd-Pleaser!)
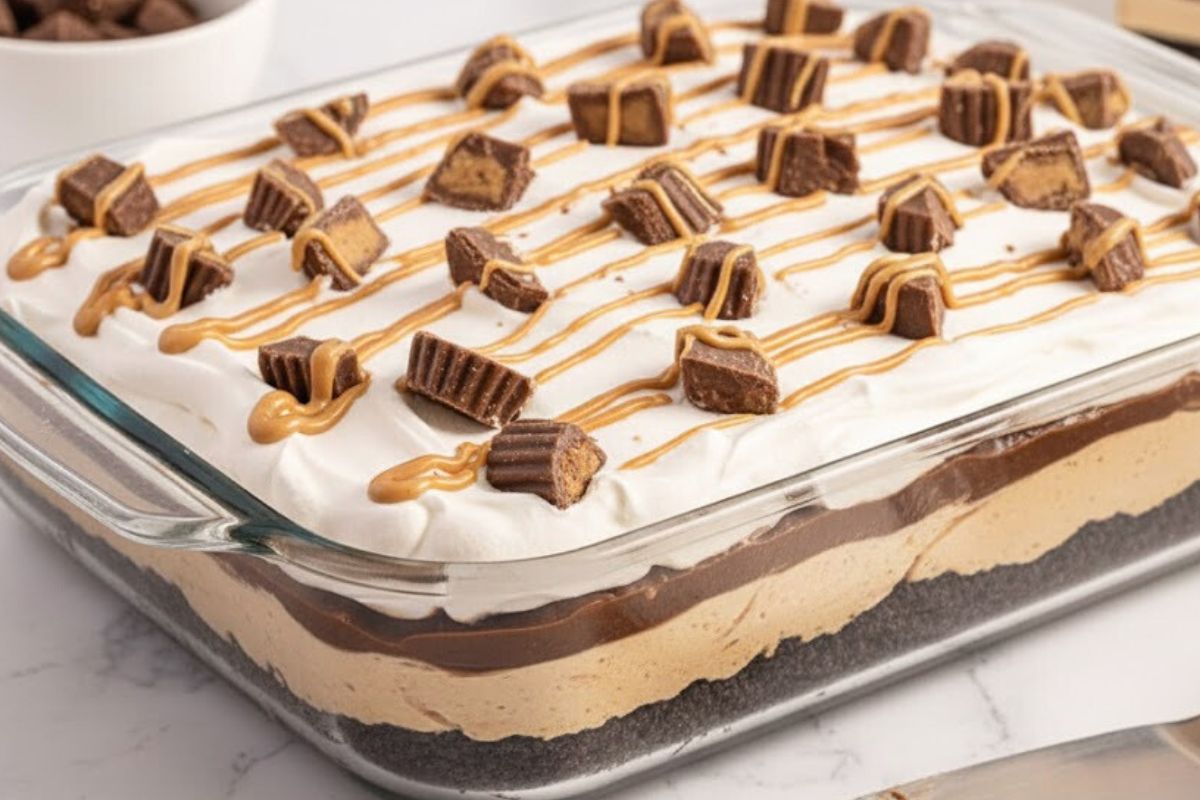
So, I’ll never forget the first time I made this peanut butter chocolate lush for Emma’s birthday party. I was scrambling for a dessert that could feed twenty kids and their parents, something that wouldn’t require me to turn on the oven in the middle of July. David suggested I try this layered dessert his aunt used to make, and honestly? I was skeptical. But after one bite, I was absolutely hooked – and so was everyone else! The combination of that crunchy Oreo crust, silky peanut butter cheesecake layer, rich chocolate pudding, and those little Reese’s cups on top? Pure heaven. The best part is there’s no baking required, which means your kitchen stays cool and you stay stress-free. Trust me on this one – this creamy peanut butter chocolate lush has become my go-to dessert for potlucks, holidays, and honestly, just random Tuesday nights when I need something special. I promise you, if you love the combo of chocolate and peanut butter (and who doesn’t?), you’re going to make this again and again!
Jump to
| Prep Time | Fridge Time | Total Time | Servings | Calories (per serving) |
|---|---|---|---|---|
| 20 minutes | 8 hours | 8 hours 20 minutes | 18 | ~410 |
Peanut Butter Chocolate Lush Ingredients
The secret to an incredible no-bake peanut butter chocolate lush starts with quality ingredients – and here’s the good news: most of these are probably already in your pantry or fridge! I always use full-fat cream cheese and real half and half (never milk!) because the higher fat content gives you those beautifully thick, luxurious layers that hold up perfectly when you’re cutting and serving. Trust me, it makes all the difference!
Oreo Crust:
- 3 cups Oreo cookie crumbs
- 6 tablespoons butter, melted
Peanut Butter Cheesecake Layer:
- 8 ounces cream cheese, softened
- 1¼ cups powdered sugar
- 1 cup creamy peanut butter
- 8 ounces Cool Whip, thawed
Chocolate Pudding Layer:
- 1 box (5.9 oz) chocolate instant pudding mix
- 3 cups half and half
Topping:
- 8 ounces Cool Whip
- Chopped mini Reese’s peanut butter cups
- ½ cup warmed peanut butter (warm in microwave)
Essential Equipment for Peanut Butter Chocolate Lush
You don’t need a fancy kitchen to make this incredible no-bake peanut butter chocolate lush! Here are the tools I reach for every time, plus my honest recommendations from years of testing.
| Equipment | Why You Need It | Check Price |
|---|---|---|
| Pyrex 9×13 Glass Baking Dish | Perfect for layered desserts and chills evenly in the fridge | ⭐⭐⭐⭐⭐ Check on Amazon |
| KitchenAid 5-Speed Hand Mixer | Makes mixing that cream cheese layer silky smooth every time | ⭐⭐⭐⭐⭐ Check on Amazon |
| OXO Good Grips Wire Whisk | Essential for getting that chocolate pudding perfectly smooth and lump-free | ⭐⭐⭐⭐⭐ Check on Amazon |
| Cuisinart Mixing Bowl Set | The various sizes are perfect for each layer – I use all three! | ⭐⭐⭐⭐⭐ Check on Amazon |
| Wilton Angled Spatula | My secret weapon for spreading those layers perfectly smooth and even | ⭐⭐⭐⭐⭐ Check on Amazon |
How to Make Peanut Butter Chocolate Lush: Step-by-Step
Okay, this is where the magic happens! I’m going to walk you through every single step of this no-bake peanut butter chocolate lush. The beauty of this dessert is that it comes together in layers – each one more delicious than the last. Take your time and enjoy the process. I promise, it’s easier than it looks!
1. Make the Oreo Crust (5 minutes)
First, let’s build that foundation. This crust is what dreams are made of!
Mix the Oreo crumbs and melted butter in a small mixing bowl until everything is evenly coated and mixed well.
You’re looking for the texture of wet sand – every crumb should be coated with that buttery goodness. I use salted butter because I love that slight sweet-salty contrast, but unsalted works perfectly too. Here’s a tip I learned the hard way: make sure your butter is fully melted but not hot, or it’ll start to melt any filling remnants in those Oreo crumbs!
2. Press the Crust (2 minutes)
Now here’s where you get to use those muscles!
Press the crumbs firmly into the bottom of a 9×13 cake pan to form an even layer. Place the pan in the freezer for 20 minutes while you prepare the rest.
Really press down firmly – I use the bottom of a measuring cup to get it nice and compact. This ensures your crust won’t fall apart when you’re cutting slices later. The freezer time is crucial here; it firms everything up beautifully. Don’t skip this step – I learned that lesson the hard way when my crust turned into crumbly chaos!
3. Start the Peanut Butter Cheesecake Layer (3 minutes)
This is my favorite layer – so creamy and luscious!
In a large bowl using an electric hand mixer, beat together the cream cheese and powdered sugar until smooth and combined.
Make sure that cream cheese is truly softened – it should be at room temperature and leave a slight indent when you press it. If it’s too cold, you’ll end up with lumps no matter how long you beat it. I usually set mine out about 45 minutes before I start. Beat this for a good 2-3 minutes until it’s completely smooth and fluffy. You’ll know it’s ready when it looks light and airy, almost like frosting!
4. Add the Peanut Butter (1 minute)
Time to bring in that star ingredient!
Mix in the peanut butter.
I use regular creamy peanut butter – the kind you’d use for sandwiches. Natural peanut butter can be a bit too oily and won’t give you the same stable texture. Beat this just until it’s fully incorporated and the mixture looks uniform in color. The kitchen is already starting to smell amazing at this point!
5. Fold in the Cool Whip (2 minutes)
Here’s where patience becomes your best friend.
Mix in the Cool Whip and beat on low speed just until combined.
This is important – you want to keep this light and fluffy, so don’t overmix! I learned this after turning several batches dense and heavy. Use LOW speed and stop as soon as you can’t see any white streaks. It should look like a cloud of peanut butter perfection. If you’re making homemade whipped cream instead (which totally works!), fold it in gently with a spatula rather than the mixer.
6. Spread the Peanut Butter Layer (3 minutes)
Now we’re building our masterpiece!
Spread the peanut butter mixture into an even layer over the Oreo crust.
Take your time here – I use an offset spatula to get it nice and smooth. Make sure you go all the way to the edges so every bite has every layer. It doesn’t need to be perfect (mine never is!), but try to get it relatively even so your final dessert looks gorgeous when you cut into it.
7. Make the Chocolate Pudding Layer (2 minutes)
This layer comes together so fast, you’ll barely believe it!
Pour the chocolate instant pudding mix and the half and half into a mixing bowl. Whisk together for 1-2 minutes until it’s well combined, smooth, and thickened.
Use a wire whisk for this, not the electric mixer – you don’t want to beat too much air into it. The pudding will start to thicken almost immediately, which is exactly what we want. After about a minute of whisking, it should look glossy and thick, kind of like a chocolate milkshake. Don’t use regular milk here – the half and half gives you that luxurious, thick texture that makes this dessert so special!
8. Spread the Chocolate Pudding (3 minutes)
Layer number three going down!
Spread the chocolate pudding over the peanut butter layer.
Work gently here because you don’t want to disturb that peanut butter layer underneath. I start in the center and gently spread outward, using long, smooth strokes. The pudding is thick enough that it won’t seep down into the peanut butter layer, but just be gentle. This is when the dessert starts to look really impressive!
9. Add the Final Cool Whip Layer (2 minutes)
The crowning glory!
Spread the Cool Whip over top for the final layer. Cover the cake pan with plastic wrap or a lid, and refrigerate for at least 8 hours or overnight is even better.
This final fluffy layer is like a cloud on top of all that richness. Again, spread it gently and evenly, all the way to the edges. Now comes the hardest part – waiting! I know the temptation to dig in right away is real, but trust me on this one: that fridge time is essential. The layers need time to set up and firm, and the flavors need time to meld together. I always make this the night before I need it.
10. Add the Final Touches (2 minutes, right before serving)
This is where you make it Instagram-worthy!
When ready to serve, sprinkle the mini Reese’s over top and drizzle the warmed peanut butter. Warm up the peanut butter in the microwave for about 45-60 seconds or until it’s a pourable consistency for drizzling.
Wait until just before serving for this step – you want that peanut butter drizzle to look fresh and gorgeous! I warm my peanut butter for about 45 seconds, stir it, and if it’s not quite pourable enough, zap it for another 15 seconds. Then I drizzle it over the top in a zigzag pattern – it doesn’t need to be perfect, just pretty! Scatter those chopped Reese’s cups all over, and watch everyone’s eyes light up.
Sophie’s Notes
The Overnight Magic (And Why You Can’t Skip It)
Here’s the thing about this no-bake peanut butter chocolate lush – you absolutely need that minimum 8 hours of fridge time. I know, I know, waiting is the hardest part! But this allows all the layers to thicken and firm up properly, which makes the dessert so much easier to cut into clean, beautiful slices. I actually prefer making it the night before and letting it refrigerate for 12-18 hours. The flavors meld together beautifully, and the texture is just perfection. It’s honestly the ultimate make-ahead dessert for this reason!
The Full-Fat Dairy Secret
I learned this lesson after making a “lighter” version that just didn’t hold up – always use full-fat cream cheese and real half and half for this recipe. I can’t stress this enough! The higher fat content allows the layers to thicken really nicely, which helps the dessert hold its shape when you’re cutting and serving it. Low-fat versions will be runny and disappointing. Trust me, I’ve tried it both ways, and the full-fat version is absolutely worth it. This is a special occasion dessert, so let’s make it right!
Butter Choice (Yes, It Matters)
For the crust, both unsalted and salted butter work just fine, but I prefer salted butter. That subtle salty-sweet contrast with the Oreo crumbs is a chef’s kiss. If you only have unsalted, don’t worry – your crust will still be delicious! Just make sure your butter is fully melted and slightly cooled before mixing with the crumbs.
Serving and Storage Made Easy
I cut this dessert into 18 generous pieces – 3 rows by 6 columns. Here’s my trick: run your knife under hot water, wipe it dry, then make your cut. Clean the knife between each cut for the prettiest slices. As for storage, this keeps beautifully covered in the fridge for up to 5 days. I use the lid from my cake pan or plastic wrap pressed directly on the Cool Whip layer to prevent it from drying out.
Wait Before Adding the Toppings
This is important – wait until just before serving to drizzle on that warmed peanut butter and sprinkle the chopped Reese’s cups. If you add them too early, the peanut butter drizzle will firm back up in the fridge and the Reese’s cups will get soft. I learned this at Emma’s party when I topped it two hours early! For the best presentation and texture, add your toppings right before you bring it to the table.
Creative Crust Options
While I adore the classic Oreo crust, you can switch it up! I’ve had great success with chocolate Teddy Grahams, peanut butter Oreos (talk about peanut butter overload – in the best way!), chocolate graham crackers, Nutter Butter cookies, or even Nilla Wafers for a completely different vibe. Just pulse them in a food processor until you have 3 cups of crumbs, mix with the melted butter, and you’re good to go!
Homemade Whipped Cream Alternative
If you want to skip the Cool Whip, you can absolutely make your own whipped cream! For each 8-ounce container, beat 1.5 cups of heavy whipping cream with ¼ cup powdered sugar until stiff peaks form. Start on low speed and gradually increase as it thickens. You’ll need to do this twice since the recipe calls for two containers of Cool Whip. It’s a bit more work, but the flavor is incredible!
Topping Variations to Try
After making this dozens of times, I’ve experimented with all sorts of toppings! Try chopped peanut butter Oreos instead of Reese’s, or Reese’s Pieces for a colorful crunch. My nephew loves it when I use the peanut butter lovers Reese’s cups. Sometimes I’ll add a chocolate drizzle instead of (or in addition to!) the peanut butter drizzle. Chopped peanuts add a nice salty crunch too. Get creative – this dessert is your canvas!
The Room Temperature Cream Cheese Rule
I can’t tell you how many times I’ve been too impatient and tried to use cold cream cheese. Don’t be like early-Sophie! Cold cream cheese will leave you with lumps no matter how long you beat it. The cream cheese should be soft enough to leave an indent when you press it with your finger, but not greasy or shiny. Set it out about 45 minutes before you start, or if you forget (like I do at least once a week), cut it into small cubes and let it sit for 15-20 minutes.
Perfect Pudding Consistency
When you’re whisking that chocolate pudding layer, you want it to thicken to about the consistency of a thick milkshake – it should coat the whisk and hold its shape when you dollop it. If it seems too thin, give it another 30 seconds of whisking. The half and half is key here; regular milk won’t give you that thick, luxurious texture. This isn’t the place to cut corners!
The Perfect Dessert Is Waiting for You!
I can’t wait for you to make this no-bake peanut butter chocolate lush! There’s something so satisfying about layering all these delicious components and then pulling that perfect slice out of the pan – watching everyone’s faces light up when they see all those gorgeous layers. This recipe has brought so much joy to my kitchen over the years, from Emma’s birthday parties to summer potlucks to random weeknight celebrations when we just need something special. The combination of that crunchy Oreo crust, dreamy peanut butter layer, rich chocolate pudding, and fluffy topping – it’s pure magic, and now it’s yours to make your own!
Your kitchen is about to become the most popular spot in the neighborhood with this creamy peanut butter chocolate lush! Don’t forget to leave a comment below and let me know how it turned out. I read every single one, and I absolutely love hearing about your family’s reactions. Did your kids fight over the last piece? Did you try any fun topping variations? Tag me on Instagram @sophiesweetkitchen – I’d love to celebrate your baking success with you!
Happy baking, friends! 🥄
Recipe Card
No-Bake Peanut Butter Chocolate Lush
Ingredients
Oreo Crust:
- 3 cups Oreo cookie crumbs
- 6 tablespoons butter melted
Peanut Butter Cheesecake Layer:
- 8 ounces cream cheese softened
- 1¼ cups powdered sugar
- 1 cup creamy peanut butter
- 8 ounces Cool Whip thawed
Chocolate Pudding Layer:
- 1 box 5.9 oz chocolate instant pudding mix
- 3 cups half and half
Topping:
- 8 ounces Cool Whip
- Chopped mini Reese’s peanut butter cups
- ½ cup warmed peanut butter warm in microwave
Instructions
- Crust: Mix the Oreo crumbs and melted butter in a small mixing bowl until everything is evenly coated and mixed well.
- Press the crumbs firmly into the bottom of a 9×13 cake pan to form an even layer. Place the pan in the freezer for 20 minutes while you prepare the rest.
- Peanut Butter Cheesecake Layer: In a large bowl using an electric hand mixer, beat together the cream cheese and powdered sugar until smooth and combined.
- Mix in the peanut butter.
- Mix in the Cool Whip and beat on low speed just until combined.
- Spread the peanut butter mixture into an even layer over the Oreo crust.
- Chocolate Pudding Layer: Pour the chocolate instant pudding mix and the half and half into a mixing bowl. Whisk together for 1-2 minutes until it’s well combined, smooth, and thickened.
- Spread the chocolate pudding over the peanut butter layer.
- Topping: Spread the Cool Whip over top for the final layer. Cover the cake pan with plastic wrap or a lid, and refrigerate for at least 8 hours or overnight is even better.
- When ready to serve, sprinkle the mini Reese’s over top and drizzle the warmed peanut butter. Warm up the peanut butter in the microwave for about 45-60 seconds or until it’s a pourable consistency for drizzling.