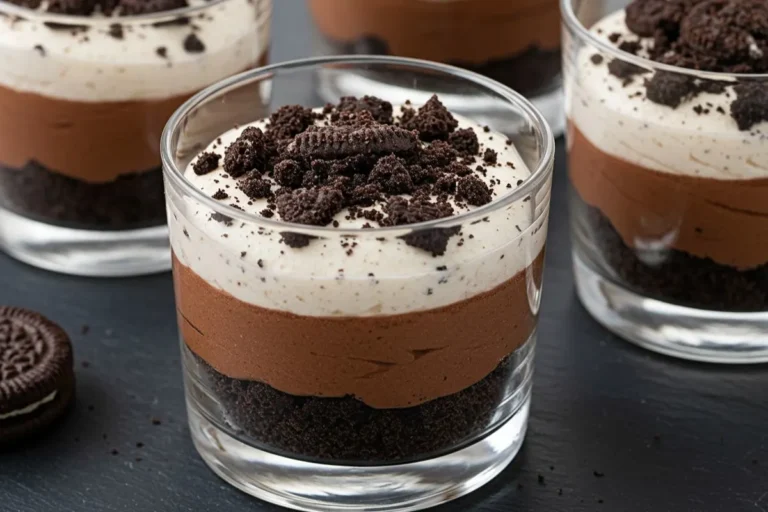
Cookies and Cream Mousse Cups
There’s something undeniably nostalgic about the combination of chocolate sandwich cookies and creamy goodness. The first time I made Cookies and Cream Mousse Cups, I was trying to impress my then-boyfriend (now husband), David, with a dessert that felt fancy but didn’t require me to spend hours in the kitchen. Let’s just say my first attempt was more “cookie crumble chaos” than an elegant dessert! But after years of tweaking – and a few tips from Nonna Rosa about mastering creamy textures – I’ve landed on a recipe that’s become a staple in my Portland bakery, Sophie’s Sweet Haven.
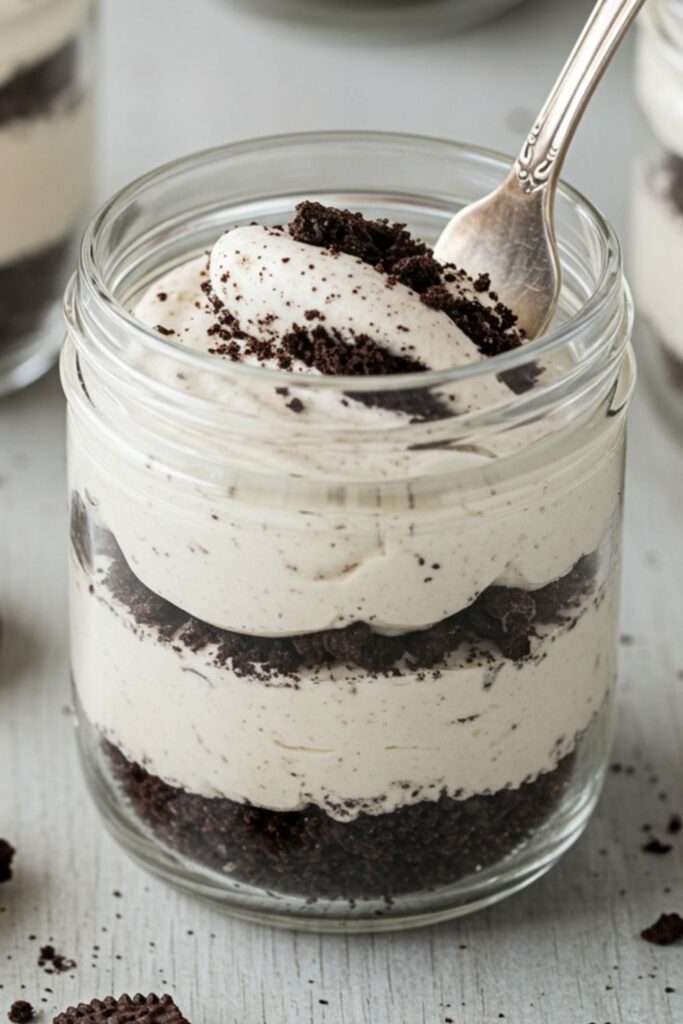
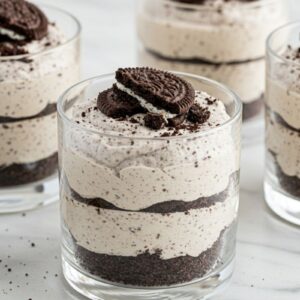
These mousse cups are the perfect blend of childhood comfort and grown-up sophistication, with layers of airy vanilla mousse speckled with chocolate cookie crumbs, served in pretty glasses that make everyone feel like they’re dining at a five-star restaurant. Whether you’re hosting a dinner party or just treating your family to something special, these Cookies and Cream Mousse Cups are guaranteed to steal the show. Trust me on this one – I’ve seen even the pickiest eaters ask for seconds!
Jump to
Why Cookies and Cream Mousse Cups Are Special
Cookies and Cream Mousse Cups are the dessert equivalent of a warm hug from your childhood, dressed up for a fancy night out. The magic lies in their simplicity: that iconic duo of chocolate sandwich cookies and creamy vanilla takes center stage, but the presentation elevates it to something extraordinary. I love how the crushed cookies add just the right amount of crunch to the silky-smooth mousse, creating a texture that’s light yet satisfying. After years of testing, I’ve found that the key is balancing the sweetness – the cookies bring their sugary punch, so the mousse needs to be rich but not cloying.
What makes these cups truly special is their versatility. You can whip them up in advance (a lifesaver for busy hosts!), and they look stunning in clear glassware, showing off those gorgeous layers. I once made a batch for a friend’s wedding dessert table, and the guests couldn’t stop raving about how professional they looked – little did they know how easy they were to make! Whether it’s a summer barbecue or a cozy winter dinner, Cookies and Cream Mousse Cups fit any occasion, bringing nostalgic comfort with a touch of elegance. Plus, they’re a hit with kids and adults alike – my daughter Emma, who’s six, calls them “cookie clouds” because of their fluffy texture.
Essential Ingredients for Perfect Cookies and Cream Mousse Cups
Let’s talk ingredients, because quality makes all the difference here. I’ve experimented with everything from budget-friendly staples to high-end options, and while you don’t need to break the bank, choosing the right ingredients will take your Cookies and Cream Mousse Cups from good to unforgettable.
- Heavy Whipping Cream: This is the backbone of the mousse’s airy texture. Look for cream with at least 36% fat content for the best whip. I’ve found that organic cream often has a richer flavor, but any good-quality heavy cream works. If you’re dairy-free, coconut cream can be a great substitute – just chill it overnight first.
- Cream Cheese or Mascarpone: I prefer mascarpone for its luxurious, slightly sweet flavor, but cream cheese works just as well and is easier on the wallet. Make sure it’s at room temperature to avoid lumps. I learned this the hard way after a batch turned out grainy because I rushed this step!
- Chocolate Sandwich Cookies: You know the ones – those classic cookies with creamy filling. I use the most popular brand (you can probably guess it!), but any similar cookie will do. You’ll need about 15-20 cookies for crushing, plus a few extra for garnish. If you’re feeling adventurous, try homemade cookies for an extra-special touch.
- Powdered Sugar: This sweetens the mousse and dissolves smoothly for a silky texture. Don’t swap it for granulated sugar – it’ll make the mousse gritty. I usually use about ¾ cup, but adjust to your taste.
- Vanilla Extract: A good-quality pure vanilla extract is non-negotiable. It enhances the cookies’ flavor and adds warmth to the mousse. I’ve been using the same brand from a local Portland market for years – it’s like a secret weapon.
- Cocoa Powder (Optional): For a chocolate mousse layer, a tablespoon or two of unsweetened cocoa powder adds depth. I like Dutch-processed for a smoother flavor, but regular works fine too.
- Salt: Just a pinch. Nonna Rosa always said, “A little salt makes the sweet sing.” It balances the flavors without being noticeable.
Step-by-Step Cookies and Cream Mousse Cups Recipe
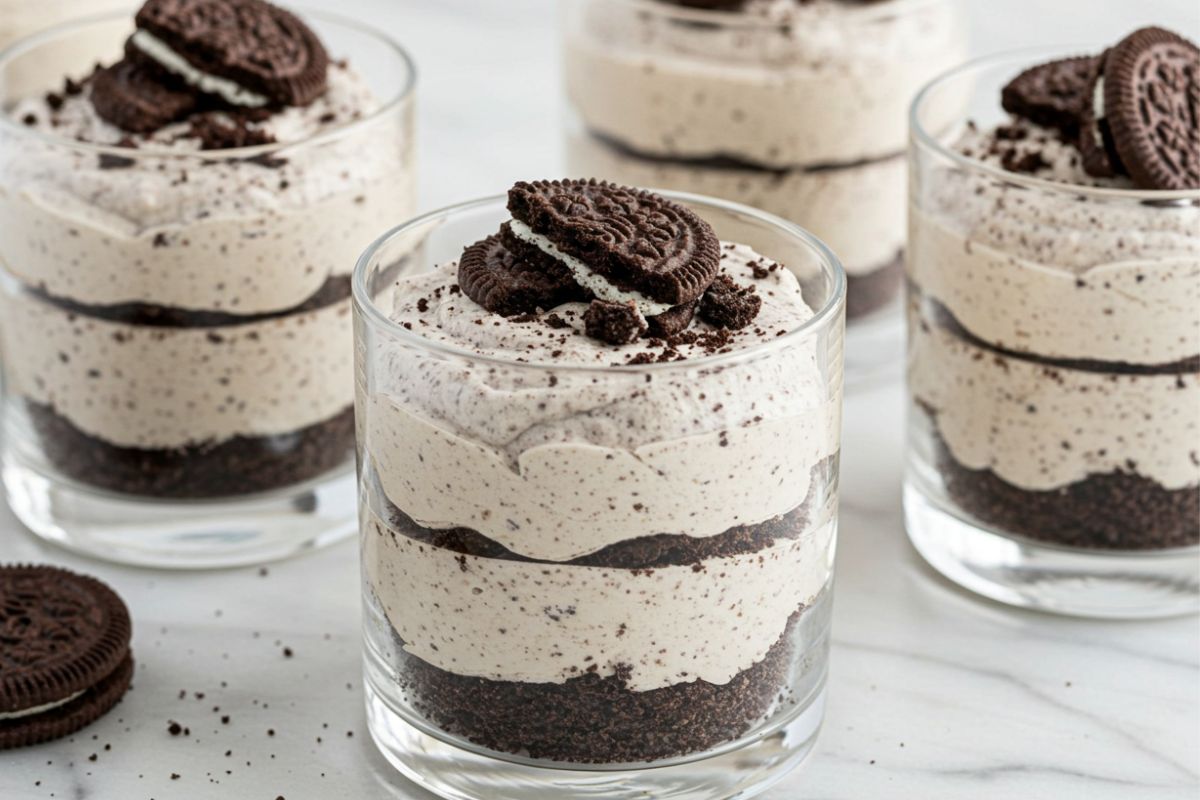
This recipe makes about 6-8 individual Cookies and Cream Mousse Cups, depending on the size of your serving glasses. I like using 8-ounce clear glasses or mason jars for that layered effect, but you can use ramekins or even wine glasses for a fancy touch. Here’s how to make them – I’ll be right beside you in spirit, cheering you on!
- Crush the Cookies: Place 15-20 cookies in a food processor and pulse until you get fine crumbs with some slightly larger pieces for texture. No food processor? Pop them in a zip-top bag and crush with a rolling pin. I did this once at a friend’s house when her processor broke – it’s a great arm workout! Set aside about ¼ cup of crumbs for garnish.
- Whip the Cream: In a chilled mixing bowl, whip the cold heavy cream on medium-high speed until soft peaks form – this usually takes me about 3-4 minutes with a stand mixer. Be careful not to overwhip; you want it fluffy, not buttery. Set aside half the whipped cream if you’re making a chocolate layer.
- Make the Vanilla Mousse Base: In another bowl, beat the softened mascarpone or cream cheese with the powdered sugar, vanilla extract, and a pinch of salt until smooth and creamy, about 2 minutes. Here’s where most people go wrong – if your mascarpone is cold, you’ll end up with lumps. Trust me, I’ve tossed out a batch or two because I skipped this step! Gently fold in half the whipped cream (or all if you’re skipping the chocolate layer) until fully combined. The mixture should be light and silky.
- Add Cookies to Vanilla Mousse: Fold in about ¾ of the crushed cookies into the vanilla mousse mixture. Don’t overmix – you want those cookie bits to stay distinct for that perfect cookies-and-cream texture. The smell alone will have your neighbors knocking!
- Optional Chocolate Mousse Layer: If you want a two-tone effect, mix the cocoa powder into the reserved whipped cream with a tablespoon of powdered sugar. Fold this into the remaining mascarpone mixture to create a chocolate mousse. I like to tell my customers this step is optional but adds such a pretty contrast.
- Assemble the Cups: Spoon or pipe a layer of vanilla cookies-and-cream mousse into the bottom of each glass, about 1-2 inches thick. If using chocolate mousse, add a thinner layer on top. Repeat the layers until the glasses are filled, ending with vanilla mousse. I use a piping bag for neatness, but a spoon works just fine – don’t worry if it looks messy at first, mine did too!
- Chill and Set: Cover the cups with plastic wrap and refrigerate for at least 2 hours, or overnight for the best texture. This step is crucial for the mousse to set properly and for the flavors to meld. I know it’s tempting to dig in right away – I’ve been there! – but patience is the secret ingredient here.
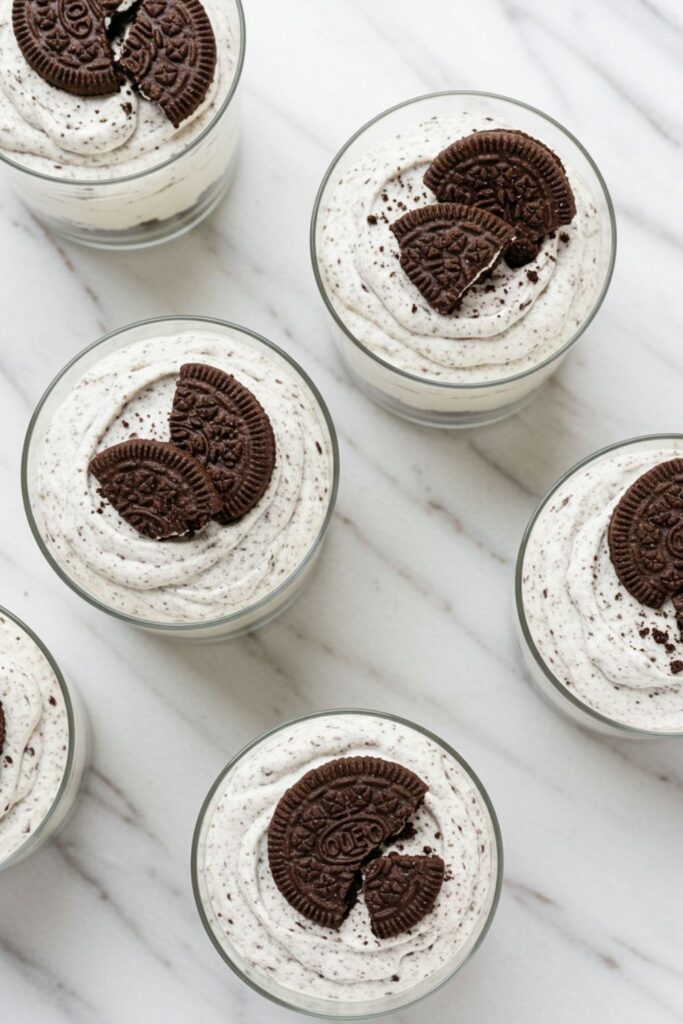
- Garnish and Serve: Before serving, sprinkle the reserved cookie crumbs over the top of each cup. For extra flair, add a dollop of whipped cream or a mini cookie. I like to place a single cookie standing upright for that picture-perfect finish.
Pro Tips for Cookies and Cream Mousse Cups Success
After years of making these Cookies and Cream Mousse Cups, I’ve picked up a few tricks that make all the difference:
- Chill Everything: Cold cream whips better, and chilled glasses keep the mousse firm. I pop my serving glasses in the fridge for 10 minutes before assembling.
- Don’t Overmix the Mousse: Folding is your friend here. Overmixing deflates the whipped cream, leaving you with a denser texture. I learned this after my first batch turned out more like pudding than mousse!
- Test Your Cookie Crumbs: Too fine, and they’ll disappear into the mousse; too chunky, and they’ll overpower it. Aim for a mix of fine crumbs and pea-sized pieces.
- Make Ahead: These cups can sit in the fridge for up to 2 days, making them perfect for entertaining. I once prepped 30 for a baby shower, and they held up beautifully.
- Room Temperature Mascarpone: I can’t stress this enough – cold mascarpone leads to lumps. Let it sit out for 30 minutes before starting.
Variations and Customizations for Cookies and Cream Mousse Cups
One of the joys of Cookies and Cream Mousse Cups is how easy they are to tweak. Here are a few variations I’ve tried over the years:
- Mocha Mousse Cups: Add a teaspoon of instant espresso powder to the chocolate mousse layer for a coffee kick. I made these for David, my coffee-roaster husband, and he was obsessed.
- Peanut Butter Twist: Swap half the mascarpone for smooth peanut butter and use peanut butter sandwich cookies. It’s like a grown-up version of a childhood favorite.
- Berry and Cream: Layer in fresh raspberries or strawberries between the mousse layers for a summery twist. I love this for the spring farmers’ market season.
- Gluten-Free Option: Use gluten-free chocolate sandwich cookies. I tested this for a customer with celiac disease, and it was a hit.
- Mini Mousse Cups: Use shot glasses for bite-sized portions – perfect for parties. My daughter Emma loves helping me assemble these tiny treats.
Storing and Serving Your Cookies and Cream Mousse Cups
These Cookies and Cream Mousse Cups are best stored in the fridge, tightly covered with plastic wrap to prevent them from absorbing other flavors. They’ll stay fresh for up to 2 days, though I’ve never seen them last that long in my house – Butter, our golden retriever, is always hopeful for a stray crumb! If you need to stack the cups, place a piece of parchment between layers to avoid sticking.
Serve them chilled straight from the fridge for the best texture. I like to pair them with a hot cup of coffee or tea to balance the creamy richness – David’s latest roast is always my go-to. For a fun presentation, try serving them on a tray with scattered cookie crumbs or edible flowers for a touch of elegance. If you’re feeling extra indulgent, a scoop of vanilla ice cream on the side takes it to another level.
Full Recipe Summary
Cookies and Cream Mousse Cups
Ingredients
- 2 cups heavy whipping cream cold
- 8 oz mascarpone or cream cheese softened
- ¾ cup powdered sugar sifted
- 1 tbsp pure vanilla extract
- Pinch of salt
- 15-20 chocolate sandwich cookies crushed (plus 4-6 extra for garnish)
- 2 tbsp unsweetened cocoa powder optional, for chocolate mousse layer
- Optional: Whipped cream or mini cookies for topping
Instructions
- Crush cookies into crumbs.
- Whip cream to soft peaks; reserve half if making chocolate layer.
- Beat cream cheese, sugar, vanilla, salt; fold in half the whipped cream and most cookie crumbs for vanilla mousse.
- (Optional) Mix cocoa powder with reserved whipped cream for chocolate mousse.
- Layer vanilla and chocolate mousse with cookie crumbs in glasses.
- Chill for 2+ hours.
- Garnish with crumbs, whipped cream, or mini cookies before serving.
Equipment
For detailed step-by-step instructions, check out the full recipe above.
Equipment
- Stand mixer or hand mixer
- Food processor or zip-top bag and rolling pin (for crushing cookies)
- Piping bags (optional, for neat layers)
- 6-8 serving glasses or cups
⚠ Note: Some of the links above are affiliate links. If you click and purchase, I may earn a small commission—at no extra cost to you. Thank you for your support!
Conclusion
Cookies and Cream Mousse Cups are the dessert I turn to when I want to impress without stress. They’re a reminder that baking doesn’t have to be complicated to feel special – sometimes, it’s about taking familiar flavors and giving them a little love. I hope this recipe brings a bit of Sophie’s Sweet Haven into your kitchen, whether you’re sharing these with friends at a dinner party or sneaking a spoonful after the kids are in bed (I won’t tell!). Don’t be afraid to make them your own – add a favorite cookie, play with flavors, or let your kids help with the crushing (Emma’s favorite part). Baking is about creating memories, and I can’t wait for you to make some with these delicious Cookies and Cream Mousse Cups. Happy baking!