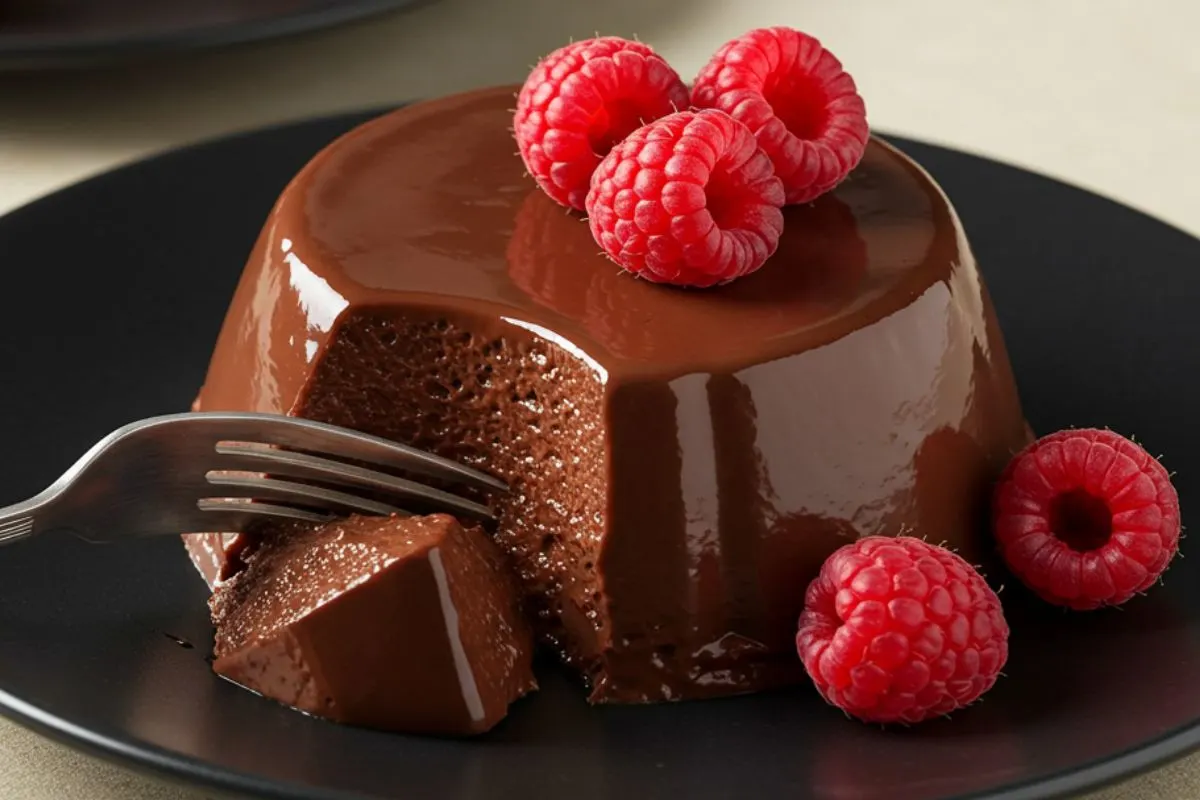
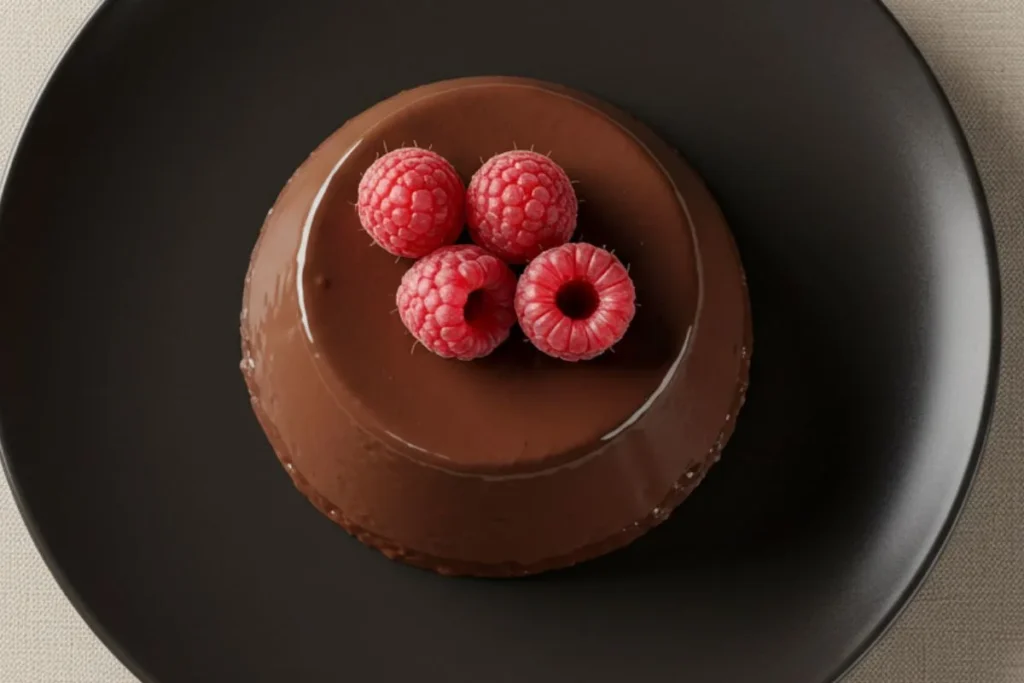
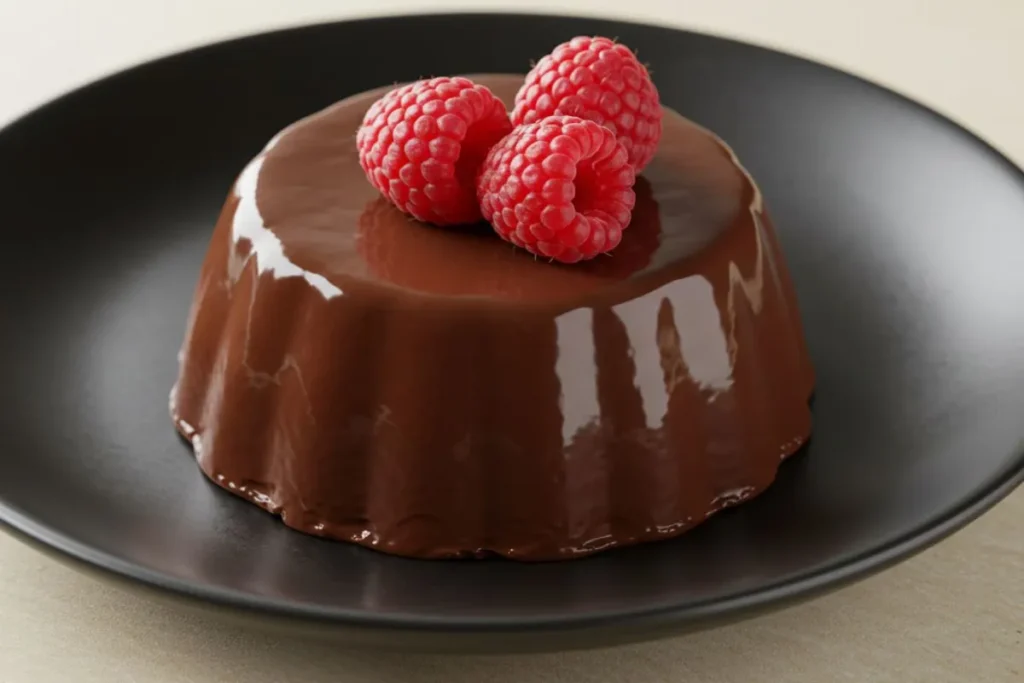
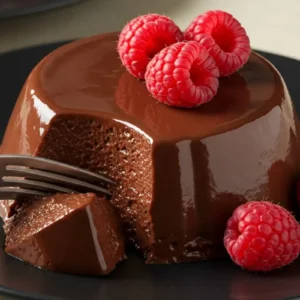
Chocolate Panna Cotta with Raspberry
There’s something undeniably magical about a perfectly set Chocolate Panna Cotta, its glossy surface trembling just slightly as you set it on the table. I still remember the first time I tasted this dessert at a tiny trattoria during a trip to Italy with my husband, David. I was skeptical—custard didn’t sound like it could steal the show. But one spoonful of that velvety, chocolatey goodness, paired with a tart raspberry, and I was hooked.
Back home in Portland, I spent months tweaking my version, burning through more gelatin packets than I care to admit. My kids, Emma and Lucas, were thrilled to be my taste-testers, even if they mostly fought over the raspberries! After years of testing, I’ve landed on a Chocolate Panna Cotta recipe that’s luxurious yet simple enough for any home baker. Trust me on this one—it’s a dessert that feels like a hug from Nonna Rosa herself.
Jump to
Why Chocolate Panna Cotta is Special
Chocolate Panna Cotta is the kind of dessert that makes you look like a pro without needing a culinary degree. What makes it so special? It’s all about balance. The creamy, melt-in-your-mouth texture comes from a careful dance between cream, gelatin, and just the right amount of chocolate. Unlike a heavy mousse or a dense cake, Chocolate Panna Cotta feels light yet indulgent, with a silkiness that coats your spoon like a dream.
The raspberries add a burst of brightness that cuts through the richness, making each bite feel fresh and exciting. I love how versatile this dessert is—perfect for a cozy winter night or a summer dinner party when you want something chilled and effortless. Plus, it’s make-ahead, which is a lifesaver when you’re juggling kids, a dog named Butter sniffing for crumbs, and a million other things. After twelve years as a professional baker, I can tell you this is one dessert that never fails to impress.
Essential Ingredients for Perfect Chocolate Panna Cotta
Let’s talk ingredients, because quality is everything when it comes to Chocolate Panna Cotta. I’ve made this recipe enough times to know that cutting corners just won’t do. Here’s what you’ll need and why each component matters:
- Heavy Cream (2 cups): This is the backbone of your panna cotta, giving it that luscious, creamy texture. I’ve tried using half-and-half to lighten it up, but trust me, the full richness of heavy cream is worth it.
- Whole Milk (1 cup): Milk balances the cream so it’s not overwhelmingly heavy. I use whole milk for the best mouthfeel—skim just doesn’t cut it here.
- Granulated Sugar (½ cup): Just enough to sweeten without overpowering the chocolate. I’ve found that too much sugar can mask the cocoa’s depth, so don’t go overboard.
- Unsweetened Cocoa Powder (¼ cup, high-quality): A good cocoa powder, like Dutch-processed, gives a deep, rich flavor. I learned the hard way that cheap cocoa makes a grainy panna cotta—invest in the good stuff.
- Dark Chocolate (4 oz, 60-70% cacao): Chopped finely, this melts into the cream for an extra layer of decadence. I like to tell my customers to pick a chocolate they’d eat on its own.
- Gelatin (2½ tsp, unflavored): The key to that perfect wobble. I’ve had disasters with too much gelatin (think rubbery pudding), so measure carefully.
- Cold Water (¼ cup): For blooming the gelatin. Don’t skip this step—it ensures the gelatin dissolves evenly.
- Vanilla Extract (1 tsp): A touch of vanilla rounds out the chocolate flavor. I use pure extract, not imitation, for that warm, authentic note.
- Fresh Raspberries (for serving): Their tartness is non-negotiable for balancing the richness. Frozen can work in a pinch, but fresh berries shine.
- Optional: Raspberry Coulis or Mint Leaves: For that restaurant-style flourish. I’ll share a quick coulis recipe below.
Substitutions? You can swap in coconut milk for a dairy-free version, but it’ll change the flavor profile slightly. Gluten-free folks, you’re in luck—this dessert is naturally gluten-free. Just double-check your chocolate’s label.
Step-by-Step Chocolate Panna Cotta Recipe
Now, let’s get to the fun part—making your Chocolate Panna Cotta! This recipe serves 6 and takes about 20 minutes of active time, plus chilling. Here’s how I do it, step by step, as if I’m right there in your kitchen with you.
- Bloom the Gelatin: Sprinkle the gelatin over the cold water in a small bowl. Stir gently and let it sit for 5-7 minutes until it looks spongy. I can’t tell you how many times I’ve rushed this step and ended up with clumps—patience is the secret ingredient here.
- Heat the Cream Mixture: In a medium saucepan, whisk together the heavy cream, milk, sugar, and cocoa powder over medium heat. Stir constantly to prevent the cocoa from clumping. Heat until it’s steaming and the sugar is dissolved (about 5-7 minutes), but don’t let it boil. I learned this the hard way when a batch scorched and tasted like burnt toast.
- Add the Chocolate: Remove the pan from heat and stir in the chopped dark chocolate until it’s completely melted and smooth. The mixture should look glossy and smell like heaven. If it’s lumpy, don’t panic—just whisk a bit more. Mine looked off the first time I made this, but it came together!
- Incorporate the Gelatin: Add the bloomed gelatin to the warm chocolate mixture and stir until fully dissolved, about 1 minute. Then stir in the vanilla extract. This is where the magic happens—the gelatin gives that signature wobble.
- Strain and Pour: For the smoothest texture, strain the mixture through a fine-mesh sieve into a large measuring cup or bowl with a spout. This catches any stray cocoa bits or undissolved gelatin. Pour the mixture evenly into 6 ramekins, small glasses, or molds (about 4-6 oz each). I like using clear glasses to show off the layers when I add raspberries later.
- Chill: Cover the ramekins with plastic wrap and refrigerate for at least 4 hours, or overnight for the best set. I’ve found 6 hours is my sweet spot for that perfect jiggle. Nonna Rosa always said, “A good panna cotta needs time to rest, just like you.”
- Serve: When ready to serve, top each Chocolate Panna Cotta with a handful of fresh raspberries. For extra flair, drizzle with raspberry coulis (blend 1 cup raspberries with 2 tbsp sugar and 1 tsp lemon juice, then strain) or add a mint sprig. A light dusting of cocoa powder never hurts either. The smell alone will have your neighbors knocking!
Pro Tips for Chocolate Panna Cotta Success
Here’s where most people go wrong with Chocolate Panna Cotta, and how you can avoid those pitfalls. I’ve had my share of flops, so trust me on these:
- Measure Gelatin Precisely: Too much gelatin, and your panna cotta will be bouncy like Jell-O; too little, and it won’t set. I use a digital scale for accuracy (2½ tsp is about 7 grams).
- Don’t Boil the Cream: High heat can curdle the cream or dull the chocolate’s flavor. Keep it at a gentle simmer and stir constantly.
- Chill Thoroughly: If you try to unmold or serve too early, you’ll end up with a puddle. I learned this during my Great Soufflé Disaster of 2019—same principle applies!
- Use Quality Chocolate: Cheap chocolate can make the texture grainy. I like to tell my customers to treat themselves to a bar they’d savor on its own.
- Unmolding Trick: If you want to unmold the panna cotta, dip the ramekins in warm water for 5-10 seconds to loosen, then invert onto a plate. Don’t overdo the warm water, or you’ll melt your masterpiece.
Variations and Customizations for Chocolate Panna Cotta
One of the joys of Chocolate Panna Cotta is how easy it is to make it your own. Here are a few variations I’ve tested over the years:
- Mocha Panna Cotta: Add 1 tsp instant espresso powder to the cream mixture for a coffee-chocolate twist. David, my coffee-roasting husband, goes wild for this one.
- White Chocolate Panna Cotta: Swap the dark chocolate for 4 oz white chocolate and skip the cocoa powder. It’s sweeter, so reduce the sugar to ⅓ cup.
- Spiced Chocolate Panna Cotta: Add a pinch of cinnamon or cayenne for a warm, spicy kick—perfect for fall baking.
- Berry Swap: Try blueberries or blackberries instead of raspberries for a different tart-sweet balance. I love blueberries in summer when I hit the farmers’ market.
- Boozy Twist: Stir in 1 tbsp of Grand Marnier or Baileys after adding the vanilla for an adult version. Just don’t tell Emma and Lucas!
Feel free to play with garnishes too—chopped hazelnuts, shaved chocolate, or even a dollop of whipped cream can take it to the next level.
Storing and Serving Your Chocolate Panna Cotta
Chocolate Panna Cotta is a dream for make-ahead entertaining. Store the ramekins, covered tightly with plastic wrap, in the fridge for up to 3 days. Don’t add the raspberries or coulis until just before serving to keep them fresh. I’ve found that the flavors deepen after a day, so making these the night before is ideal.
If you want to freeze them, you can, but only without the toppings. Wrap each ramekin tightly in plastic wrap and freeze for up to 1 month. Thaw in the fridge overnight before serving. I’ve done this for big parties, and it’s a lifesaver.
Serve chilled, straight from the fridge, for that cool, creamy texture. Pair with a strong espresso (David’s influence!) or a glass of red wine for a sophisticated touch. For a casual vibe, I love setting these out on my rustic wooden table with a few extra raspberries scattered around—it looks effortlessly elegant.
Recipe Summary
Chocolate Panna Cotta with Raspberry
Ingredients
- 2½ tsp unflavored gelatin
- ¼ cup cold water
- 2 cups heavy cream
- 1 cup whole milk
- ½ cup granulated sugar
- ¼ cup high-quality unsweetened cocoa powder
- 4 oz dark chocolate 60-70% cacao, finely chopped
- 1 tsp pure vanilla extract
- Fresh raspberries for serving
- Optional: raspberry coulis see below, mint leaves, or cocoa powder for garnish
Instructions
- Bloom gelatin in cold water for 5-7 minutes.
- Heat cream, milk, sugar, and cocoa powder until steaming; don’t boil.
- Stir in chocolate until melted.
- Add gelatin and vanilla; stir until dissolved.
- Strain mixture and pour into 6 ramekins.
- Chill for 4-6 hours.
- Serve with raspberries and optional garnishes.
Equipment
For detailed step-by-step instructions, check out the full recipe above.
Equipment Needed
- Small bowl
- Medium saucepan
- Whisk
- Fine-mesh sieve
- Large measuring cup or bowl with spout
- 6 ramekins, small glasses, or molds (4-6 oz each)
- Plastic wrap
- Blender (optional, for coulis)
⚠ Note: Some of the links above are affiliate links. If you click and purchase, I may earn a small commission—at no extra cost to you. Thank you for your support!
Conclusion
Chocolate Panna Cotta with raspberries is one of those desserts that feels like a special occasion but is simple enough for a weeknight treat. After years of tweaking this recipe in my Portland kitchen, I’ve learned that it’s all about quality ingredients, a little patience, and trusting the process. Whether you’re serving it to impress guests or just treating yourself after a long day, this dessert delivers every time. So grab your whisk, channel your inner Nonna Rosa, and give this Chocolate Panna Cotta a try. I’d love to hear how it turns out—especially if your kitchen smells as heavenly as mine does when these are chilling in the fridge!