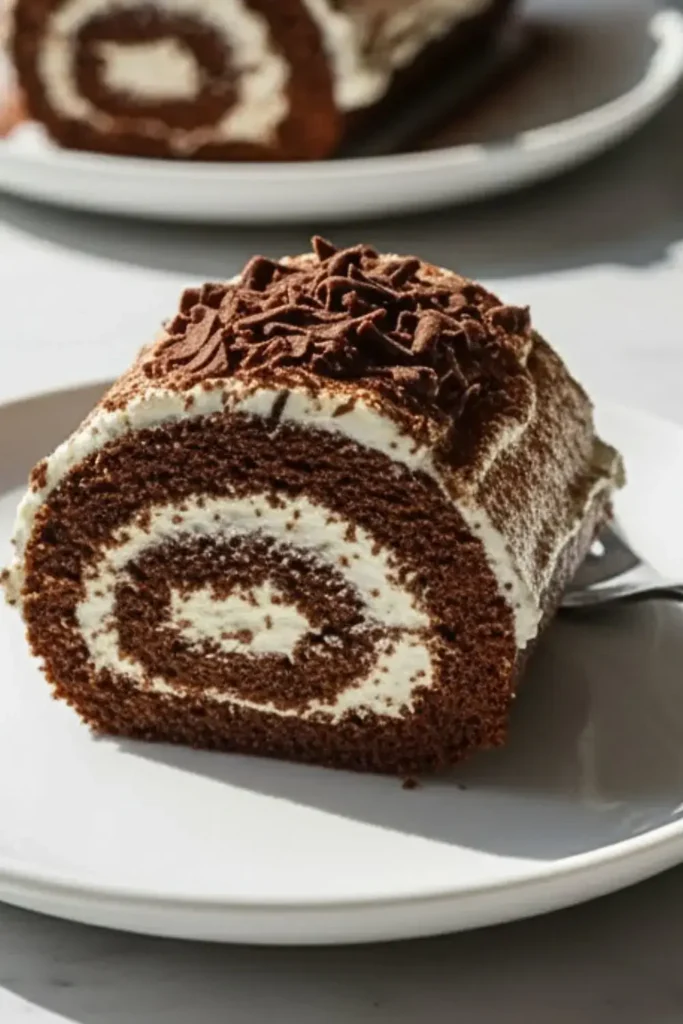
Chocolate Cake Roll (Classic Swiss Roll)
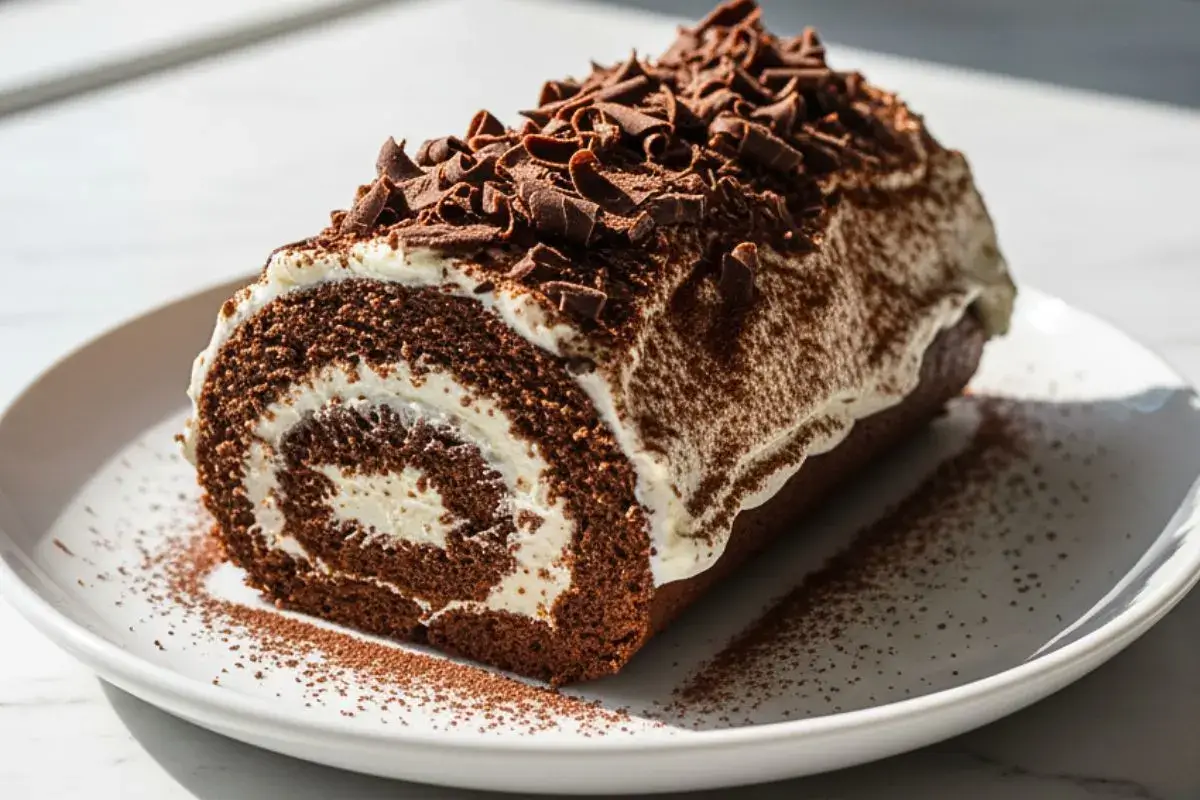
There’s something absolutely magical about slicing into a chocolate Swiss roll and seeing that perfect spiral! I’ve been making this chocolate cake roll for years, and it never fails to impress—whether it’s a casual Sunday dessert or a fancy dinner party. The secret? A tender chocolate sponge that’s flexible enough to roll without cracking, paired with a stabilized whipped cream filling that won’t weep or get watery. Trust me, once you nail this technique, you’ll be making it on repeat!
| Prep Time | 20 minutes |
| Cook Time | 12 minutes |
| Total Time | 40 minutes (includes cooling) |
| Servings | 10-12 slices |
| Difficulty | Medium |
| Calories | ~220 per slice (est.) |
Jump to
How To Make Chocolate Swiss Roll Recipe
A. Essential Equipment
You don’t need fancy gadgets for this one—just a few basics:
- 10×15 inch jelly roll pan (critical for the right thickness!)
- Parchment paper (your best friend for easy rolling)
- Electric mixer (stand or hand mixer works great)
- Clean kitchen towel (for the rolling technique)
- Offset spatula (makes spreading the filling so much easier)
B. Ingredients (with Substitution Table)
For the Chocolate Sponge:
- 4 large eggs (room temperature)
- ¾ cup granulated sugar
- ⅓ cup Dutch-processed cocoa powder
- ¾ cup all-purpose flour
- 1 teaspoon baking powder
- ¼ teaspoon salt
- 1 teaspoon vanilla extract
- Powdered sugar (for dusting)
For the Stabilized Whipped Cream Filling:
- 1½ cups heavy whipping cream (cold)
- 4 oz cream cheese (softened)
- ⅓ cup powdered sugar
- 1 teaspoon vanilla extract
| Ingredient | Substitution | Note |
|---|---|---|
| Dutch-processed cocoa | Natural cocoa powder | Less deep color, slightly different flavor |
| All-purpose flour | Cake flour | Makes it even more tender |
| Heavy cream | Coconut cream | Dairy-free option, chills well |
| Cream cheese | Mascarpone | Richer, sweeter filling |
| Granulated sugar | Coconut sugar | Adds caramel notes to cake |

C. Instructions
Making the Chocolate Sponge:
- Preheat your oven to 350°F and line your 10×15 inch jelly roll pan with parchment paper. I like to let the paper hang over the edges—makes lifting so much easier later!
- In a large bowl, beat the eggs and granulated sugar with an electric mixer on high speed for about 5 minutes. You’ll know it’s ready when it’s thick, pale, and falls in ribbons from the beaters. This step is crucial—don’t rush it!
- Sift together the cocoa powder, flour, baking powder, and salt. Here’s where most people go wrong: add the dry ingredients in three additions, folding gently with a spatula after each addition. You want to see some streaks of flour still visible when you add the next batch. Add vanilla with the last addition.
- Pour the batter into your prepared pan and spread it evenly to all corners using an offset spatula. The batter should be about ¼ inch thick.
- Bake for 10-12 minutes until the cake springs back when lightly touched. Mine usually takes exactly 11 minutes, but ovens vary! Don’t overbake or it’ll crack when you roll it.
The Rolling Technique (This Changed Everything for Me!):
- While the cake bakes, lay a clean kitchen towel on your counter and dust it generously with powdered sugar. Trust me on this one—don’t skip the sugar!
- As soon as the cake comes out of the oven, run a knife around the edges and immediately flip it onto the prepared towel. Carefully peel off the parchment paper.
- Starting from the short end, roll the cake up with the towel inside. I learned this the hard way after having three cakes crack on me—rolling it while warm with the towel trains it to hold that shape! Let it cool completely in this rolled position, about 30 minutes.
Making the Stabilized Whipped Cream:
- Beat the softened cream cheese and powdered sugar until smooth and fluffy, about 2 minutes. This is what keeps your filling from getting watery!
- In a separate cold bowl, whip the heavy cream and vanilla to stiff peaks. Gently fold the whipped cream into the cream cheese mixture until no streaks remain. Your kitchen will smell like heaven!
Assembly:
- Carefully unroll the cooled cake—it’s okay if it cracks slightly at the edges, that’s normal! Spread the stabilized whipped cream filling evenly over the cake, leaving about ½ inch at the edges.
- Roll the cake back up (without the towel this time!) starting from the same short end. Take your time with this—there’s no rush. Wrap it in plastic wrap and refrigerate for at least 1 hour before slicing. This helps everything set perfectly.
- Before serving, dust with more powdered sugar and slice with a sharp, serrated knife. Clean the knife between cuts for those Instagram-worthy swirls!
Tips & Notes for Success
Baking Tips
- Room temperature eggs are essential—they whip up to much greater volume than cold eggs. I set mine out 30 minutes before baking.
- Don’t overmix once you add the flour—this is a sponge cake, not a dense cake! Fold gently and stop when you still see a few streaks.
- Use Dutch-processed cocoa for the deepest chocolate flavor—it’s worth seeking out at the store. I swear by this ingredient!
- The towel-rolling trick is non-negotiable—I’ve tested skipping this step, and the cake cracked every single time. Rolling while warm is what makes it flexible!
- Chill before slicing—I know the temptation to cut into it immediately, but trust me, an hour in the fridge makes all the difference for clean slices.
Troubleshooting
- Cake cracked when rolling? You likely overbaked it by a minute or two, or didn’t roll it while still warm. The cake should feel slightly tacky to the touch when you flip it out.
- Filling is runny? Make sure you beat the cream to stiff peaks and that your cream cheese was fully softened. Cold cream cheese won’t incorporate smoothly!
- Cake is too dense? You didn’t beat the eggs and sugar long enough in step 2. That 5-minute beating time creates all the air that makes the cake light.
- Edges are dry or crispy? Your oven might run hot—try reducing temperature to 325°F next time and bake a minute longer.
Variations
- Chocolate ganache filling—melt 8 oz chocolate with ½ cup heavy cream for a richer option. Let it cool to spreadable consistency before using.
- Coffee-chocolate version—add 1 tablespoon instant espresso powder to the dry ingredients. The coffee intensifies the chocolate flavor!
- Raspberry cream filling—fold ½ cup seedless raspberry jam into the whipped cream for a fruity twist. My family goes crazy for this one!
- Peppermint bark roll—add ½ teaspoon peppermint extract to the filling and sprinkle crushed candy canes on top. Perfect for holidays!
- Make it boozy—brush the unrolled cake with 2 tablespoons coffee liqueur or rum before spreading the filling.
Storage & Make-Ahead
- Refrigerator: Store wrapped tightly in plastic wrap for 3-4 days. The stabilized cream holds up beautifully!
- Freezer: Wrap the whole roll (unfrosted on top) in plastic wrap, then foil. Freeze for up to 2 months. Thaw overnight in the fridge before dusting with powdered sugar and serving.
- Make-ahead tip: You can bake the cake and roll it with the towel up to 1 day ahead. Just wrap the rolled towel-cake in plastic wrap and store at room temperature. Fill the next day!
More Related Recipes
If you loved this chocolate roll cake recipe, here are some other favorites from my kitchen:
- Gingerbread Swiss Roll with Cream Cheese Frosting
- Pumpkin Cream Cheese Roll
- Oreo Cake Roll Recipe
- Refreshing Lemon Tiramisu
Conclusion
After years of testing, I’ve found that this homemade swiss roll is foolproof—and trust me, I’ve tested that theory! The combination of tender chocolate sponge and stabilized whipped cream creates the perfect balance. Don’t be intimidated by the rolling technique—once you try it, you’ll see it’s easier than it looks. Now go make this and watch everyone’s faces light up when you slice into it!
Recipe Card

Chocolate Cake Roll (Classic Swiss Roll)
Ingredients
For the Chocolate Sponge:
- 4 large eggs room temperature
- ¾ cup granulated sugar
- ⅓ cup Dutch-processed cocoa powder
- ¾ cup all-purpose flour
- 1 teaspoon baking powder
- ¼ teaspoon salt
- 1 teaspoon vanilla extract
- Powdered sugar for dusting
For the Stabilized Whipped Cream Filling:
- 1½ cups heavy whipping cream cold
- 4 oz cream cheese softened
- ⅓ cup powdered sugar
- 1 teaspoon vanilla extract
Instructions
- Preheat oven to 350°F and line jelly roll pan with parchment paper.
- Beat eggs and sugar on high for 5 minutes until thick and ribbony.
- Sift dry ingredients and fold into egg mixture in three additions with vanilla.
- Pour into pan, spread evenly, and bake 10-12 minutes.
- Dust towel with powdered sugar, flip hot cake onto towel, peel parchment, and roll with towel. Cool 30 minutes.
- Beat cream cheese and powdered sugar until fluffy.
- Whip cream to stiff peaks and fold into cream cheese mixture.
- Unroll cake, spread filling, and re-roll without towel.
- Wrap in plastic and refrigerate 1 hour before slicing.
- Dust with powdered sugar and serve chilled.
Equipment
- 10×15 inch jelly roll pan (critical for the right thickness!)
- Parchment paper (your best friend for easy rolling)
- Electric mixer (stand or hand mixer works great)
- Clean kitchen towel (for the rolling technique)
- Offset spatula (makes spreading the filling so much easier)