10 Beginner-Friendly Valentine’s Cookie Recipes

I’ll never forget my first attempt at Valentine’s cookies—I was so determined to impress David on our second Valentine’s Day together that I tried making elaborate decorated sugar cookies without any real plan. Let’s just say they looked more like abstract art than hearts! Since then, I’ve learned that the best Valentine’s Day cookies don’t have to be complicated to be absolutely delicious and impressive.
This collection of easy Valentine cookie ideas is perfect for anyone who wants to celebrate with homemade treats but doesn’t want to spend hours in the kitchen. Whether you’re baking with kids, making treats for a classroom party, or surprising your sweetheart, these Valentine cookies for beginners come together quickly and taste amazing. I’ve included everything from no-bake options to simple cake mix shortcuts, plus a few classics that never go out of style. Trust me on this one—even Emma and Lucas can help with most of these, and they turn out beautiful every single time!
Jump to
1. Classic Vanilla Shortbread Hearts

These buttery, melt-in-your-mouth cookies are my go-to when I want something elegant but easy. The dough is forgiving, rolls out beautifully, and you only need five ingredients!
| Prep Time | 15 minutes |
| Bake Time | 12 minutes |
| Servings | 24 cookies |
| Difficulty | Easy |
| Calories | ~110 per cookie |
Essential Equipment:
- Heart-shaped cookie cutters (2-3 inch) – Creates perfect Valentine shapes every time. See my favorite cookie cutter set
- Rolling pin – For even dough thickness. Grab my go-to rolling pin
- Parchment paper – Prevents sticking and makes cleanup easy. Check out my trusted parchment
Ingredients:
- 2 cups all-purpose flour
- ½ cup powdered sugar
- 1 cup unsalted butter, softened
- 2 teaspoons vanilla extract
- ¼ teaspoon salt
- Pink or red sanding sugar for decoration (optional)
Instructions:
- Beat the softened butter and powdered sugar together for about 2 minutes until light and fluffy. You’ll know it’s ready when it looks almost whipped—this is where the melt-in-your-mouth texture comes from!
- Mix in vanilla extract and salt, then gradually add the flour. The dough will look crumbly at first, but keep mixing until it comes together. Don’t worry if it takes a minute—mine always does!
- Form the dough into a disk, wrap it in plastic wrap, and chill for 30 minutes. I learned this the hard way: skipping this step makes the dough too soft to cut clean shapes.
- Roll out the dough on a lightly floured surface to about ¼ inch thick. Cut out heart shapes and place them on parchment-lined baking sheets about 1 inch apart.
- Sprinkle with sanding sugar if using, then bake at 325°F for 10-12 minutes. The edges should just barely start to turn golden—don’t overbake these! They’ll firm up as they cool.
2. Soft Glazed Strawberry Sour Cream Cookies
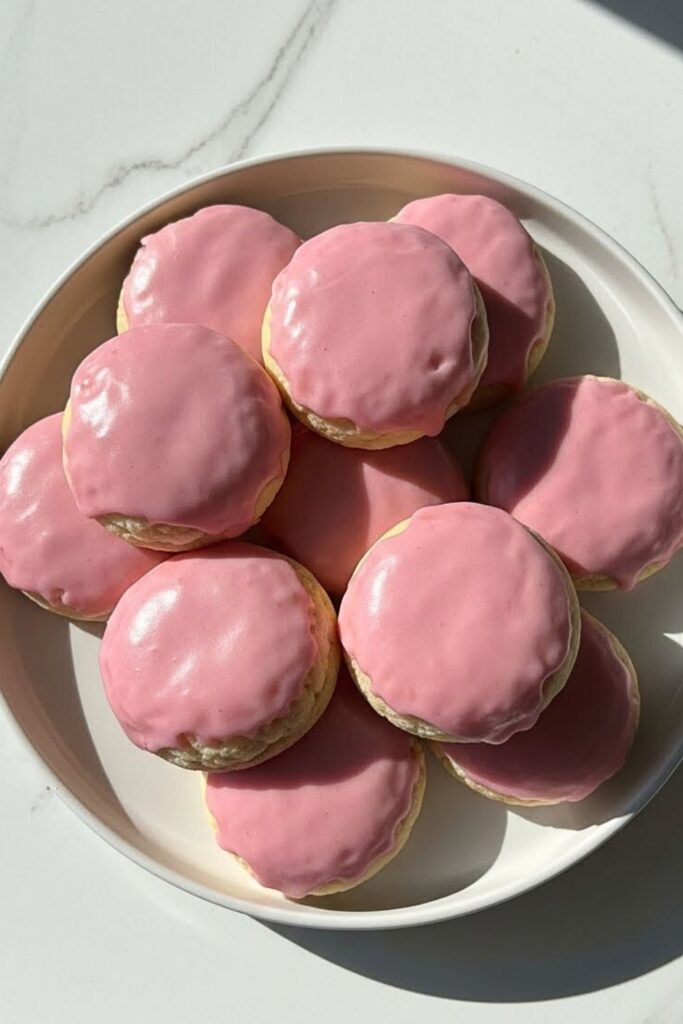
These pillowy-soft cookies taste like strawberries and cream in cookie form. The sour cream keeps them incredibly tender, and that pink glaze? Absolutely gorgeous for Valentine’s Day!
| Prep Time | 20 minutes |
| Bake Time | 10 minutes |
| Servings | 20 cookies |
| Difficulty | Easy |
| Calories | ~140 per cookie |
Essential Equipment:
- Stand mixer or hand mixer – Makes mixing quick and easy. Here’s the one I use
- Cookie scoop (2 tablespoon size) – For uniform cookies that bake evenly. Get my recommended scoop
Ingredients:
For the Cookies:
- 2½ cups all-purpose flour
- 1 teaspoon baking powder
- ½ teaspoon baking soda
- ½ teaspoon salt
- ½ cup unsalted butter, softened
- 1 cup granulated sugar
- 1 large egg
- ½ cup sour cream
- 1 teaspoon vanilla extract
- 3 tablespoons strawberry jam
For the Glaze:
- 1½ cups powdered sugar
- 2-3 tablespoons milk
- 2 tablespoons strawberry jam
- Pink food coloring (optional)
Instructions:
- Cream butter and sugar for 2-3 minutes until fluffy. Beat in the egg, sour cream, vanilla, and strawberry jam until smooth. The jam adds both flavor and a subtle pink color!
- In a separate bowl, whisk together flour, baking powder, baking soda, and salt. Gradually mix the dry ingredients into the wet ingredients until just combined. Don’t overmix—these cookies should be tender, not tough.
- Use a cookie scoop to drop rounded tablespoons of dough onto parchment-lined baking sheets, spacing them about 2 inches apart. These spread just a bit, so give them room!
- Bake at 350°F for 9-11 minutes. They should look set but still pale—they won’t brown much. Let them cool completely on the baking sheet before glazing.
- For the glaze, whisk together powdered sugar, milk, and strawberry jam until smooth. Dip the top of each cooled cookie into the glaze and let it set for about 20 minutes. The smell alone will have your neighbors knocking!
3. Red Velvet Cake Mix Cookies
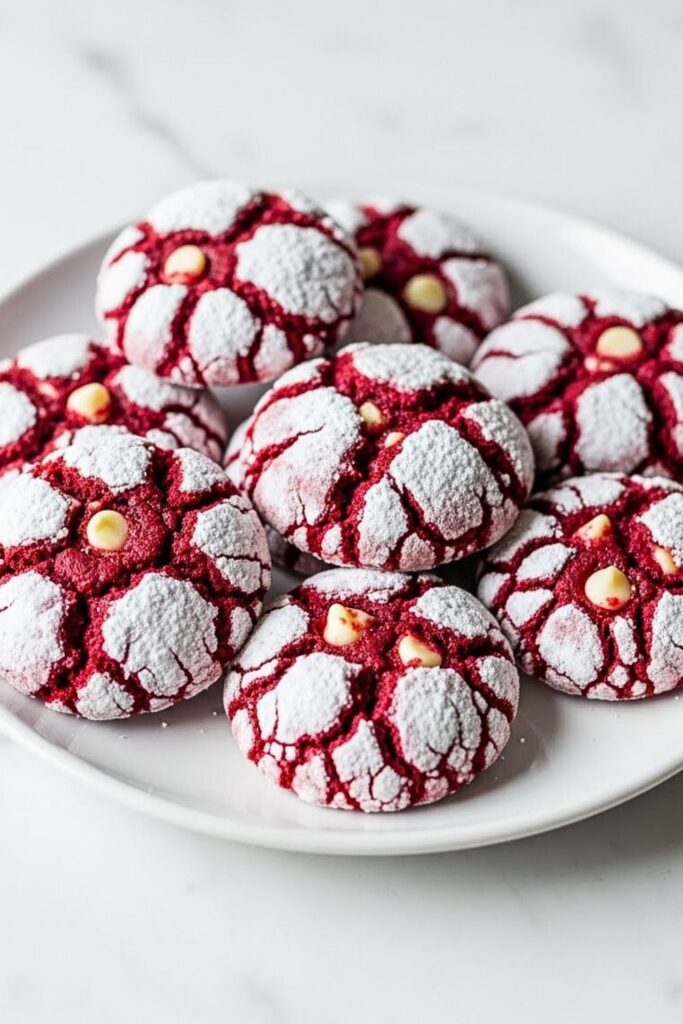
After years of testing, I’ve found that cake mix cookies are absolutely foolproof—and trust me, I’ve tested that theory! These come together in minutes and have that classic red velvet flavor everyone loves.
| Prep Time | 10 minutes |
| Bake Time | 10 minutes |
| Servings | 24 cookies |
| Difficulty | Easy |
| Calories | ~120 per cookie |
Essential Equipment:
- Silicone baking mat – Prevents spreading and sticking. Grab my favorite baking mat
Ingredients:
- 1 box red velvet cake mix (15.25 oz)
- 2 large eggs
- ⅓ cup vegetable oil
- 1 teaspoon vanilla extract
- ½ cup white chocolate chips
- Powdered sugar for rolling (optional)
Instructions:
- Mix together the cake mix, eggs, oil, and vanilla until a soft dough forms. It’ll look thick and almost brownie-like—that’s exactly what we want! Fold in the white chocolate chips.
- If you want that beautiful crackled look, roll balls of dough in powdered sugar before baking. I like to use about 1½ tablespoons of dough per cookie.
- Place dough balls on lined baking sheets about 2 inches apart. They’ll spread as they bake, creating those gorgeous cracks.
- Bake at 350°F for 9-11 minutes. The centers will look slightly underdone—that’s perfect! They’ll firm up as they cool, giving you soft, chewy cookies.
- Let them cool on the baking sheet for 5 minutes before transferring to a wire rack. Trust me on this one—moving them too soon makes them fall apart!
4. Pink Lemonade Crinkle Cookies
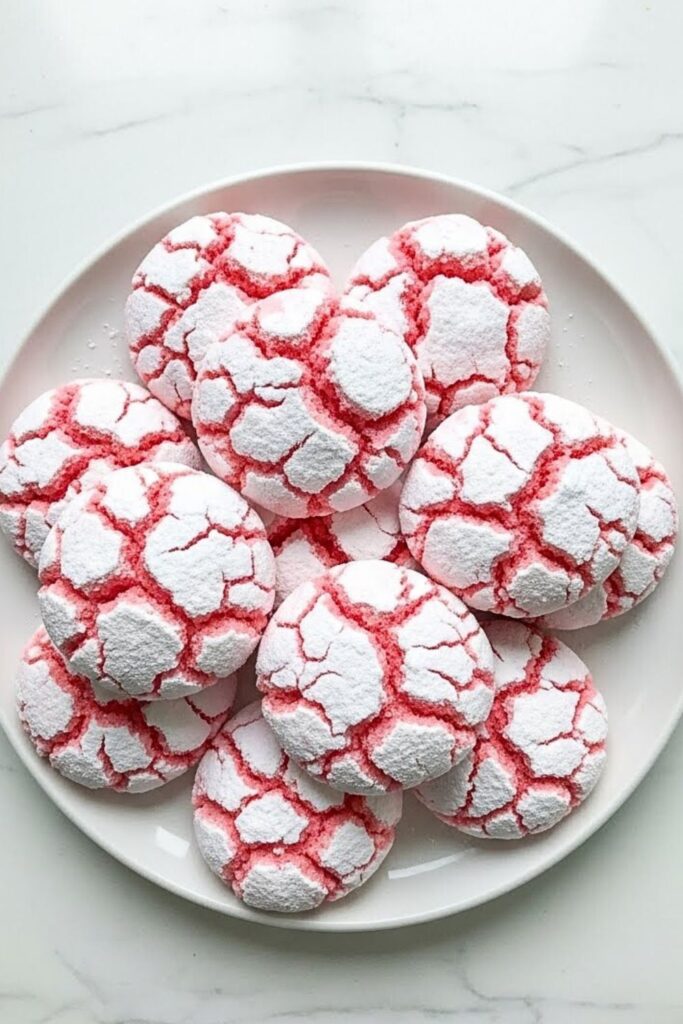
These bright, tangy cookies are like sunshine in cookie form. The pink color makes them perfect for Valentine’s Day, and that crispy-chewy texture? I swear by this technique!
| Prep Time | 15 minutes (plus 2 hours chilling) |
| Bake Time | 11 minutes |
| Servings | 30 cookies |
| Difficulty | Easy |
| Calories | ~95 per cookie |
Essential Equipment:
- Zester or microplane – For fresh lemon zest. Check out my trusted zester
Ingredients:
- 2 cups all-purpose flour
- 1 teaspoon baking powder
- ½ teaspoon salt
- ½ cup unsalted butter, softened
- 1 cup granulated sugar
- 1 large egg
- ¼ cup frozen pink lemonade concentrate, thawed
- 1 tablespoon lemon zest
- Pink food coloring (optional, for deeper color)
- ½ cup powdered sugar (for rolling)
Instructions:
- Cream butter and granulated sugar until light and fluffy, about 2-3 minutes. Beat in the egg, lemonade concentrate, lemon zest, and a few drops of food coloring if you want a brighter pink.
- In a separate bowl, whisk together flour, baking powder, and salt. Gradually mix into the wet ingredients until just combined. The dough will be soft and sticky—that’s normal!
- Cover the dough and refrigerate for at least 2 hours or overnight. I usually make mine the night before—it’s easier than waiting!
- Roll chilled dough into 1-inch balls, then roll generously in powdered sugar. The more sugar, the better the crinkle effect. Place on lined baking sheets 2 inches apart.
- Bake at 350°F for 10-12 minutes. They’ll puff up and crack beautifully. Let them cool completely on the baking sheet—they’re delicate when warm but firm up perfectly as they cool.
5. Chocolate Dipped Peanut Butter Hearts

The combination of peanut butter and chocolate never gets old! These cookies are rich, tender, and that chocolate dip makes them look bakery-perfect.
| Prep Time | 20 minutes |
| Bake Time | 12 minutes |
| Servings | 28 cookies |
| Difficulty | Easy |
| Calories | ~130 per cookie |
Essential Equipment:
- Heart-shaped cookie cutters – For perfect Valentine shapes. See my favorite cookie cutters
Ingredients:
For the Cookies:
- 1½ cups all-purpose flour
- ½ teaspoon baking soda
- ¼ teaspoon salt
- ½ cup unsalted butter, softened
- ¾ cup creamy peanut butter
- ½ cup granulated sugar
- ½ cup brown sugar
- 1 large egg
- 1 teaspoon vanilla extract
For the Chocolate Dip:
- 1½ cups semi-sweet chocolate chips
- 1 tablespoon coconut oil
- Valentine’s sprinkles (optional)
Instructions:
- Beat butter, peanut butter, and both sugars together until creamy, about 2 minutes. Add the egg and vanilla, mixing until smooth. Here’s where most people go wrong—make sure everything is well combined before adding the flour!
- Whisk together flour, baking soda, and salt, then gradually mix into the peanut butter mixture. The dough should be soft but not sticky.
- Roll dough to ¼ inch thick on a floured surface. Cut out heart shapes and place on parchment-lined baking sheets. I like to use a fork to make those classic crisscross marks on top!
- Bake at 350°F for 10-12 minutes until the edges are set. Let them cool completely before dipping—warm cookies and melted chocolate don’t mix well!
- Melt chocolate chips with coconut oil in 30-second bursts in the microwave, stirring between each burst. Dip half of each cooled cookie in chocolate and place on parchment paper. Add sprinkles immediately if using, then let the chocolate set for about 30 minutes.
6. Easy M&M Valentine’s Day Blondie Bars
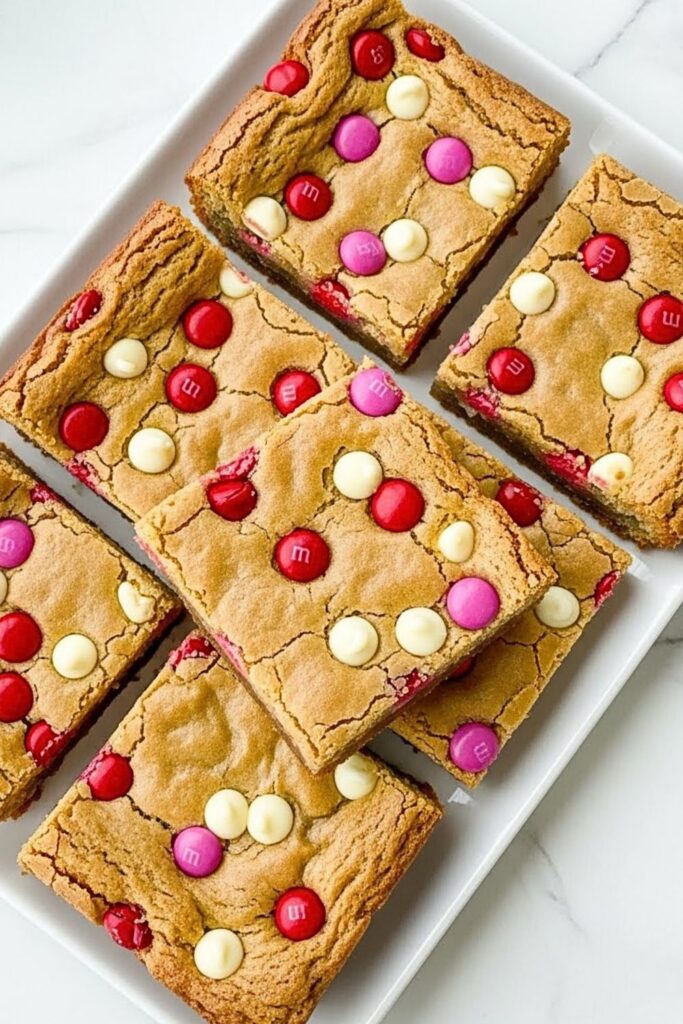
These aren’t technically cookies, but they’re one of my most requested Valentine’s treats! They’re chewy, buttery, and those colorful M&Ms make them so festive. Plus, bars are way easier than rolling out dozens of individual cookies!
| Prep Time | 10 minutes |
| Bake Time | 25 minutes |
| Servings | 16 bars |
| Difficulty | Easy |
| Calories | ~210 per bar |
Essential Equipment:
- 9×13 inch baking pan – For perfectly even bars. Grab my go-to baking pan
Ingredients:
- 2 cups all-purpose flour
- 1 teaspoon baking powder
- ½ teaspoon salt
- ¾ cup unsalted butter, melted
- 1½ cups brown sugar
- 2 large eggs
- 2 teaspoons vanilla extract
- 1 cup Valentine’s M&Ms (plus extra for topping)
- ½ cup white chocolate chips
Instructions:
- Line your 9×13 pan with parchment paper, leaving overhang on the sides—this makes removing the bars so much easier! Preheat your oven to 350°F.
- In a large bowl, whisk together melted butter and brown sugar until smooth. Beat in eggs and vanilla. The mixture should look glossy and slightly thick.
- Stir in flour, baking powder, and salt until just combined. Don’t overmix! Fold in M&Ms and white chocolate chips, saving a handful of M&Ms for topping.
- Spread the batter evenly in the prepared pan—it’ll be thick, so use a spatula to smooth it out. Press extra M&Ms on top for that pretty look!
- Bake for 23-27 minutes. Here’s the trick: they should look slightly underdone in the center when you take them out. They’ll firm up as they cool, giving you that perfect chewy texture. Let them cool completely before cutting into bars.
7. Dipped Strawberry Wafer Cookies (No-Bake Option)
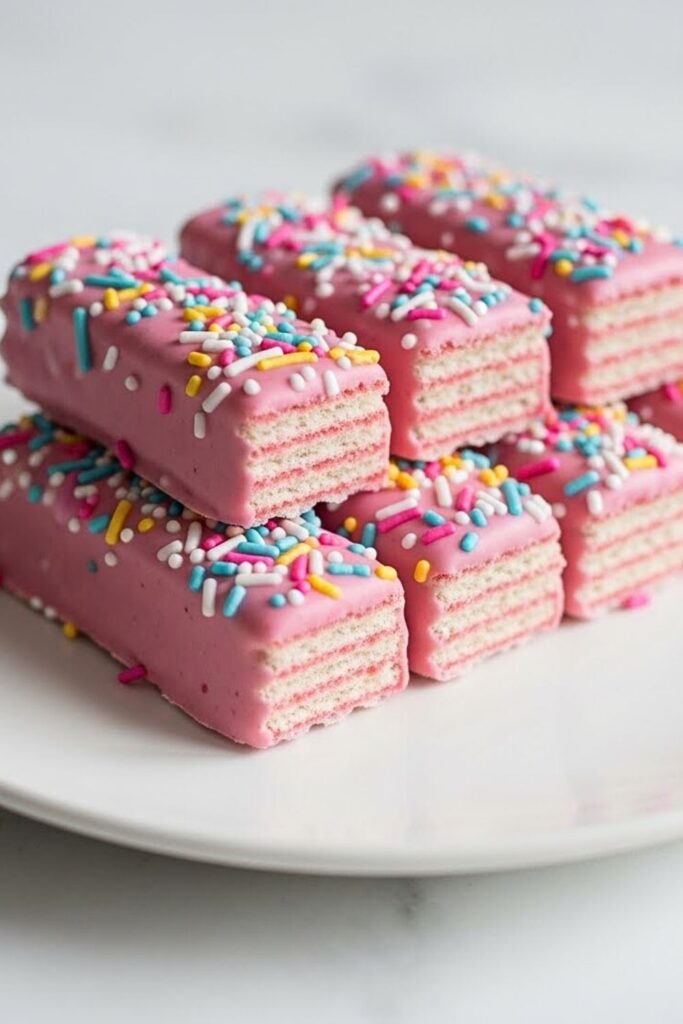
I discovered this trick when I needed a last-minute Valentine’s treat and didn’t have time for actual baking. These look absolutely stunning and taste amazing—no one will guess how easy they were!
| Prep Time | 15 minutes |
| Bake Time | 0 minutes (no-bake!) |
| Servings | 24 cookies |
| Difficulty | Easy |
| Calories | ~80 per cookie |
Essential Equipment:
- Microwave-safe bowl – For melting chocolate smoothly. See my recommended melting bowl
Ingredients:
- 24 strawberry wafer cookies (or vanilla wafers)
- 1 cup white chocolate chips
- 1 cup milk chocolate chips
- Pink food coloring
- Valentine’s sprinkles
- Freeze-dried strawberries, crushed (optional)
Instructions:
- Line a baking sheet with parchment paper and set your wafer cookies out in a single layer. Make sure they’re at room temperature—cold cookies can cause the chocolate to seize!
- Melt white chocolate chips in the microwave in 30-second intervals, stirring between each one. Add a tiny drop of pink food coloring and stir until you get your desired shade.
- Melt milk chocolate the same way in a separate bowl. Now here’s the fun part—you can dip cookies fully in one chocolate, or do half and half!
- Dip each cookie about halfway into your chosen chocolate, letting the excess drip off. Place on the parchment paper and immediately add sprinkles or crushed freeze-dried strawberries before the chocolate sets.
- Let them sit at room temperature for about 30 minutes until the chocolate is completely set. If you’re in a hurry, pop them in the fridge for 15 minutes. Store these in an airtight container—they’ll keep for up to a week!
8. White Chocolate Dipped Red Velvet Oreos

Another no-bake wonder! I make these every Valentine’s Day because they’re ridiculously easy but look like they came from a fancy bakery. My family goes crazy for these!
| Prep Time | 20 minutes |
| Bake Time | 0 minutes (no-bake!) |
| Servings | 30 cookies |
| Difficulty | Easy |
| Calories | ~120 per cookie |
Ingredients:
- 1 package Red Velvet Oreos (about 30 cookies)
- 2 cups white chocolate chips or melting wafers
- 1 tablespoon coconut oil
- Red and pink Valentine’s sprinkles
- Red sanding sugar (optional)
Instructions:
- Set up your workspace with parchment paper laid out on a baking sheet. Trust me, doing this first makes the whole process so much smoother!
- Melt white chocolate with coconut oil in the microwave, stirring every 30 seconds. The coconut oil helps thin the chocolate for easier dipping—this little trick will change everything for you!
- Using a fork, dip each Oreo into the white chocolate, making sure to coat it completely. Tap the fork gently on the edge of the bowl to let excess chocolate drip off.
- Place dipped Oreos on parchment paper and immediately sprinkle with your decorations. Work quickly—the chocolate sets fast! I like to do a mix of sprinkles and sanding sugar for different textures.
- Let them set at room temperature for 30 minutes, or speed things up with 15 minutes in the fridge. These are perfect for packaging in clear bags with ribbons for Valentine’s gifts!
9. Heart-Shaped Jam Thumbprints

These remind me of Nonna Rosa’s kitchen—she used to make thumbprints with whatever jam she had canned. The heart-shaped indent makes them extra special for Valentine’s Day!
| Prep Time | 20 minutes |
| Bake Time | 12 minutes |
| Servings | 30 cookies |
| Difficulty | Easy |
| Calories | ~85 per cookie |
Ingredients:
- 1 cup unsalted butter, softened
- ⅔ cup granulated sugar
- 2 large egg yolks
- 1 teaspoon vanilla extract
- ¼ teaspoon almond extract
- 2 cups all-purpose flour
- ½ teaspoon salt
- Strawberry or raspberry jam (about ½ cup)
- Powdered sugar for dusting (optional)
Instructions:
- Cream butter and sugar together until light and fluffy, about 3 minutes. Beat in egg yolks, vanilla, and almond extract. That almond extract is subtle but makes such a difference—don’t skip it!
- Mix in flour and salt until just combined. The dough should be soft but not sticky. If it feels too soft, chill it for 15 minutes before shaping.
- Roll dough into 1-inch balls and place on parchment-lined baking sheets about 2 inches apart. Now for the heart shape: use your thumb or the back of a small heart-shaped measuring spoon to make an indent in each cookie. I gently press down and twist slightly to create a deeper well.
- Fill each indent with about ½ teaspoon of jam. Don’t overfill—I learned this the hard way when jam bubbled over and burned on my baking sheet!
- Bake at 350°F for 11-13 minutes until the edges are just starting to turn golden. The centers will still look pale—that’s perfect! Let them cool completely before dusting with powdered sugar if desired. The jam will be molten hot right out of the oven, so resist the urge to taste-test immediately!
10. Soft Sugar Cookies with Easy Royal Icing

I saved the classic for last! These are the soft, pillowy sugar cookies that everyone dreams about—none of that hard, crunchy stuff. The royal icing might sound intimidating, but this recipe is foolproof.
| Prep Time | 30 minutes (plus 1 hour chilling) |
| Bake Time | 10 minutes |
| Servings | 36 cookies |
| Difficulty | Medium |
| Calories | ~140 per cookie |
Ingredients:
For the Cookies:
- 3 cups all-purpose flour
- 1½ teaspoons baking powder
- ½ teaspoon salt
- 1 cup unsalted butter, softened
- 1½ cups granulated sugar
- 2 large eggs
- 1 tablespoon vanilla extract
- ½ cup sour cream
For the Royal Icing:
- 4 cups powdered sugar
- 3 tablespoons meringue powder
- 5-6 tablespoons warm water
- Red and pink gel food coloring
Instructions:
- Beat butter and sugar together for 3-4 minutes until super light and fluffy—this is what makes the cookies soft! Add eggs one at a time, then mix in vanilla and sour cream.
- Whisk together flour, baking powder, and salt. Gradually add to the butter mixture, mixing on low speed until just combined. The dough will be soft and slightly sticky.
- Divide dough in half, flatten each half into a disk, wrap in plastic, and refrigerate for at least 1 hour. I usually do this step the night before Valentine’s Day—it saves so much time!
- Roll dough to ¼ inch thick on a well-floured surface. Cut out heart shapes and place on parchment-lined baking sheets about 1 inch apart. These don’t spread much!
- Bake at 350°F for 8-10 minutes. They should look set but still very pale—don’t let them brown! Let cool completely before icing.
- For the royal icing, beat together powdered sugar, meringue powder, and water for 7-8 minutes until stiff peaks form. Divide into bowls and tint with food coloring. For flooding consistency (smooth icing), add water a teaspoon at a time until it’s the texture of honey. For outlining, use it thick.
- Outline each cookie with thick icing, then flood the center with thinner icing. Use a toothpick to spread it evenly and pop any air bubbles. Let the icing set completely, about 2-4 hours, before stacking or packaging.
More Related Recipes
Looking for more holiday inspiration? Check out these favorites:
- 13 No-Bake Thanksgiving Desserts
- 12 Best Swiss Roll Recipes Perfect for Fall & Holiday Season
- 15 Cozy Apple Cinnamon Desserts
Conclusion
These Valentine’s cookies prove that homemade doesn’t have to mean complicated! Whether you’re drawn to the no-bake simplicity of the chocolate-dipped treats, the classic elegance of shortbread hearts, or the fun of decorated sugar cookies, there’s something here for every skill level and time constraint.
I’ve been making these recipes for years—some for customers at the bakery, others for school parties with Emma and Lucas, and all of them for family celebrations. Every single one has earned its place on this list because it delivers big on flavor while keeping the stress low. That’s what Valentine’s Day baking should be about—creating something sweet (literally!) without the pressure.
Pick your favorite, grab your apron, and let’s make this Valentine’s Day delicious. Your kitchen will smell like heaven, and whoever you’re baking for will feel so loved. Happy baking!